


How to cook
How to cook. Cooking, cookbooks, and food blogging can all be extremely lucrative in today’s society. In fact, many famous chefs didn’t begin their careers in culinary schools; instead, they did so in their own kitchens, proving that you don’t necessarily need an expensive culinary degree to do it. Ree Drummond from The Pioneer Woman or Rachael Ray are two examples. The most effective way to start your culinary empire is to figure out how to develop a recipe that is exclusively your own.
How to cook French toast
On the inside, they are fluffy and soft, and the outside is gorgeously toasted. Discover the best bread to use, the ideal batter to utilize, and the proper cooking methods for cooking scrumptious French toast.
:max_bytes(150000):strip_icc():format(webp)/Simply-Recipes-French-Toast-Lead-Shot-3b-c3a68a576a9548f5bd43cce3d2d7f4b7.jpg)
Is there any Sunday breakfast food better than French toast?
Thick slices of bread toasted in a frying pan with cinnamon, milk, and beaten eggs. Served with butter and maple syrup. We have to say that this is one of our favorite and most decadent breakfast options.
Best Bread for French Toast
French toast works best when you use thick, several days old slices of French or Italian loaf bread. The slices will hold up better when dipped in the egg milk mixture and fried as a result of having had time to firm up.
When you do this, thin fresh bread slices frequently fall apart or become mushy, which results in poor recipe.
Ingredients
- Four big eggs
- 3/4 cup of milk
- Cinnamon, 2 teaspoons
- 8 slices, thick bread from a day ago (better if slightly stale)
- Butter (can swap vegetable oil) (can sub vegetable oil)
- maple sugar
Optional
- Freshly grated orange zest, 2 tablespoons, and 1/4 cup triple sec
- vibrant berries
Instructions
1. To prepare the egg mixture, whisk the eggs, milk, and cinnamon in a medium basin. Add the triple sec and/or orange zest, if using. In a shallow basin big enough to fit a slice of the bread you’ll be using, whisk the mixture until it is thoroughly combined.
:max_bytes(150000):strip_icc():format(webp)/Simply-Recipes-French-Toast-Method-Shot-1-15d1929a7418444da983f44ab4b72025.jpg)
2. Place each piece of bread into the milk-egg mixture and let it soak in part of it for the bread to absorb.
:max_bytes(150000):strip_icc():format(webp)/Simply-Recipes-French-Toast-Method-Shot-2a-80f40e2c94584ce39bfd54a3ae394660.jpg)
:max_bytes(150000):strip_icc():format(webp)/Simply-Recipes-French-Toast-Method-Shot-2b-ff5edd7c004246b69b752b6e4ca6c765.jpg)
3. Melt some butter in a big skillet over medium-high heat before frying the French toast. Slices of bread should be shaken clean of any extra egg mixture before being placed on a hot skillet. Flip the French toast over after the first side has finished browning.
:max_bytes(150000):strip_icc():format(webp)/Simply-Recipes-French-Toast-Method-Shot-3-94d5ef75bf2f414d90a8b4f3ba9a0eed.jpg)
:max_bytes(150000):strip_icc():format(webp)/Simply-Recipes-French-Toast-Method-Shot-4b-bcaca55fa7674e0689023e5f09b47150.jpg)
4. French toast should be served hot, accompanied by butter, maple syrup, and/or fresh fruit.
:max_bytes(150000):strip_icc():format(webp)/Simply-Recipes-French-Toast-Lead-Shot-2b-122aad46f39841e3bcb8830acc872993.jpg)
Additions
- Sugar Powder: Many people enjoy sprinkling sugar powder on their French toast! Personally, I don’t think adding more sugar is necessary when there is already sufficient in the maple syrup.
- Orange zest and Triple Sec: One of my favorite modifications is to add some orange zest and a little Triple Sec orange liqueur to the batter for added zing. This concept came from The Silver Palate Cookbook 20 or so years ago.
How to cook banana bread
The best banana bread recipe to use with those delicious bananas. It is delicious and moist, and it can be quickly prepared in one bowl without a mixer.
:max_bytes(150000):strip_icc():format(webp)/Simply-Recipes-Easy-Banana-Bread-LEAD-2-66837beab63c495292d89743c6767171.jpg)
This banana bread has been Simply Recipes’ most well-liked recipe for more than ten years. Numerous people achieve success every day. Why?
Since this recipe yields the best banana bread ever. Everything can be combined in a single bowl, and the amount of sugar or bananas can be changed as desired. And what’s the secret to its mouthwatering flavor?
The best part of this banana bread recipe is that you don’t even need a fancy mixer; all you need is a bowl, a fork for whisking the eggs, and a sturdy spoon for stirring the batter. Sugar content can be altered. The original recipe called for one cup of white sugar, but many people—including myself—do just fine with 3/4 cup, and many are happy with 1/2 cup.
You can use the dough to make banana-nut muffins in muffin tins, or you can add a cup of chopped nuts, raisins, or chocolate chips if you prefer. Make chocolate banana bread if you want to go even further.
This recipe yields a tall loaf and needs an 8 x 4-inch loaf pan. Although the bread will be a little bit shorter, the recipe also works in a loaf pan that measures 8 1/2 by 4 1/2 inches. Due to the larger pan, baking takes place for 47 to 57 minutes. In a 9 5 inch pan, baking for 45 to 55 minutes will yield a very quick but still tasty bread.
Banana bread Ingredients
- Peeled, very ripe bananas, 2 to 3 medium-sized (length: 7′′ to 7-7/8′′) bananas (1 1/4 to 1 1/2 cups mashed).
- 76g of salted or unsalted butter, melted into a third cup.
- An equal-sized spoonful of baking soda, not baking powder.
- one pinch of salt.
- 150g or 3/4 cup (or 1/2 or 1 cup) of sugar, depending on how sweet you like it.
- 1 large, well-beaten egg.
- a teaspoon of vanilla extract.
- universal flour, 1 1/2 cups (205g).
Instructions
1. Both the pan and the oven should be ready.
In the meantime, preheat the oven to 350°F (175°C) and butter an 8 x 4-inch loaf pan.
2. Before adding the butter, mash the bananas with a fork in a mixing bowl. The butter is melted and then mixed with the mashed bananas.
:max_bytes(150000):strip_icc():format(webp)/Simply-Recipes-Easy-Banana-Bread-METHOD-1-8c3b632837ae49cfa57f1d49912d1271.jpg)
:max_bytes(150000):strip_icc():format(webp)/Simply-Recipes-Easy-Banana-Bread-METHOD-2-19c62e4a7aa2447eb05e25703c80dbe7.jpg)
3. After combining the remaining ingredients, salt and baking soda are added. Add sugar, vanilla bean paste, and one beaten egg. Blend in the flour.
:max_bytes(150000):strip_icc():format(webp)/Simply-Recipes-Easy-Banana-Bread-METHOD-3-32fe590df70d4e1bb7a77aea94bd30e9.jpg)
:max_bytes(150000):strip_icc():format(webp)/Simply-Recipes-Easy-Banana-Bread-METHOD-4-b68e8b86aea34c7db3e4550aca4ab6f9.jpg)
:max_bytes(150000):strip_icc():format(webp)/Simply-Recipes-Easy-Banana-Bread-METHOD-5-a9a9c4e47f7a46e2adbf3b423606604a.jpg)
5. Take out of the oven, allow to cool in the pan for a while, and then serve. Remove the banana bread from the pan when it’s time to serve and allow it to completely cool. Cut, then serve. (Cutting slices that won’t fall apart is simpler when using a bread knife. If properly wrapped, the banana bread will remain at room temperature for four days. For extended storage of up to 5 days, the bread can be frozen or chilled.
:max_bytes(150000):strip_icc():format(webp)/Simply-Recipes-Easy-Banana-Bread-METHOD-6-2e03de4b1a32468c84e8ecc491c267ef.jpg)
How to cook rice
You can make delicious rice every time by following these instructions for the conventional method, the pasta method, the pilaf method, and more.
How to Cook Perfect Rice
Use our straightforward techniques to consistently produce delicious, fluffy rice.
Rice is a simple and inexpensive food item, which may account for the abundance of information on how to prepare it. In contrast to what is recommended on the back of the rice bag, your favorite website suggests a different way to cook rice. It’s good news that you’ve discovered our tried-and-true manual. You’ll learn how to cook different kinds of rice using every conceivable technique, ensuring that it never comes out mushy, sticky, or burned.
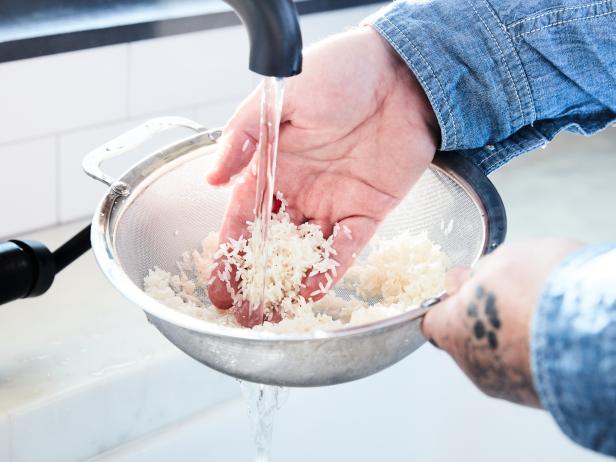
Prior to cooking rice, make sure to rinse it.
No matter what kind of rice you’re making or how you cook it, always rinse the grains first. Extra starch is removed in this way. The results are unappealing and gummy if the starch is left on the rice. Instead of following some recipes’ instructions to put the rice in a bowl and repeatedly change the water, we believe that rinsing the rice in a fine mesh strainer is the simplest method. Agitate the grains with your hands while applying water to them so that the showering is even. When the water flows crystal clear, the rinse is complete. If you’re having trouble determining whether the liquid is clear, take any bubbles out of the rice-draining water, put a clear dish underneath it, and then check to see if it’s still clear.
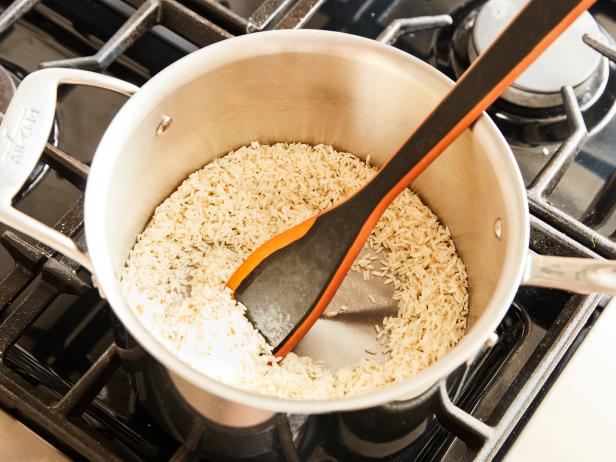
Take into account toasting the rice.
This step is not necessary, to be honest. But if you have the time, it brings out the rice’s natural flavor. The rice will be cooked in a saucepan that has been heated over medium heat with a teaspoon of butter or olive oil. Add the rice and keep stirring until it starts to smell nutty and a little like popcorn. White rice can be toast by keeping an eye out for a light tan color change.
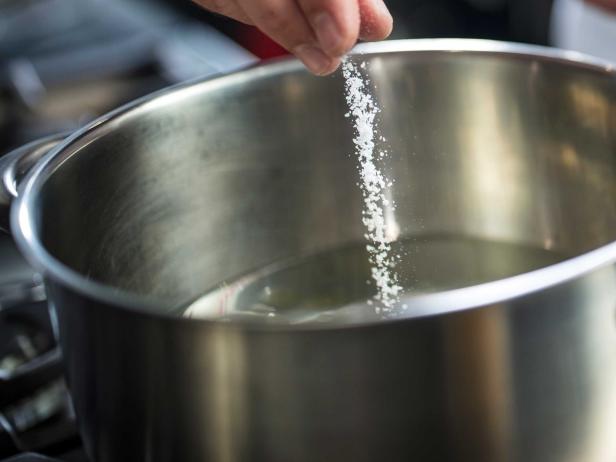
Remember to season the water.
The flavor of your cooked rice can be significantly balanced by adding a generous amount of salt to the cooking water. You will taste salt in every bite of rice if you forget to season it before it is finished cooking.
What Does It Mean to “Fluff Rice?”, in the real world.
Numerous rice recipes conclude with the simple instruction to “fluff rice. Simply put, this tells you to use a fork to separate any grains of rice that are clumped together. Your dish is finished with a lot more fluff thanks to the process.
How to Cook Rice on the Stove
If you read the back of each packet of rice you have in your pantry, you’ll find there are many ways to cook rice on the stove. You should adjust your method based on the type of rice you’re cooking. But do not worry; we have outlined everything below.
The Traditional Approach.
Due to its long history, this method is probably the one that comes to mind when you think of making rice. This works amazingly well with white rice made of the typical long grains. You can always refer to the directions on the package to modify this method for a particular type, like short-grain rice.
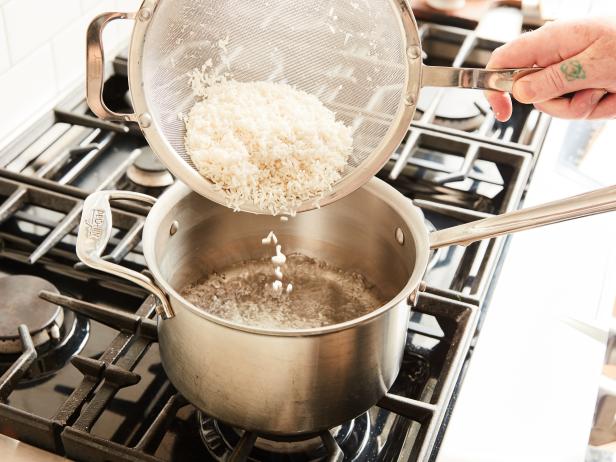
- Clean the rice.
- Water should be used in the proper quantity. 1 part of rice and 2 parts of water should be combined in a large pot.
- For slightly firmer rice, mix 1/3 rice with 1 part liquid.
- It boils when water is added. Add a lot of salt once it begins to boil.
- Stirring continues. Reduce the heat to low, tightly fasten the lid, and keep the pot simmering.
- As you’re cooking, don’t peek or stir. Cook for 18 minutes, or until all of the water is absorbed. Try to wait until the cooking process is complete before peeking to avoid steam leaks. In any case, don’t mix the rice while it’s cooking because that will make the rice gummy.
- Place a cover over the rice and set it aside. Rice should be covered for ten minutes after the heat is turned off. In order to produce extra fluffy rice, the rice will steam during this time.
- Rice can be fluffed with a fork.
The Pasta Method
As with pasta, it comes as a surprise that you can cook rice in any amount of water. This is an excellent way to prepare long-cooking and occasionally unpredictable rice varieties like brown rice and wild rice. It’s a smart strategy to make a lot of any kind of rice without using a rice cooker. Large amounts of rice cooked the traditional way can be tricky to get right because there is so much more water that needs to be kept at a constant simmer. Instead, follow these instructions.
- Launder the rice.
- Once the water has reached a boil, add the rice. Add water to the pan without weighing it, just like you would with pasta water, and then salt it.
- Carefully add the desired amount of rice after it begins to boil.
- Boiling should go on. For a few minutes, rice should be cooked in an uncovered pot without stirring until it is thoroughly softened but not mushy.
- Rince the rice. Drain the rice using a strainer with fine mesh.
The Pilaf Method
You can enhance the naturally nutty flavor of aromatic rice varieties like Basmati and Jasmine by using a few cunning techniques during this process.
- Launder the rice.
- The nuttiness will be improved by toasting the rice. Rice of all varieties can be toasted, but fragrant rice produces the best results. For 2 to 3 minutes, or until the rice looks toasted and smells nutty, cook 1 part rice in a pot with a small amount of oil or butter over medium heat.
- Bring the water to a boil prior to adding it to the rice. While you wait, bring two parts of water to a boil. Pouring already boiling water on top of the rice helps you control the precise amount of water you’re adding to basmati and jasmine rice, which are on the starchy side and can become sticky. The grains should stand out clearly.
- Make the rice. Simmer on low heat with the lid on for about 18 minutes, or until the liquid is completely absorbed.
- Place a cover over the rice and set it aside. The rice should be covered for ten minutes after the heat is turned off to allow the rice to steam.
- To fluff, use a fork.
How to Cook Rice in a Rice Cooker
Rice cookers promote faster boiling by reducing the air pressure above the liquid. Brilliant.
- Rice should be cleaned.
- Use a 1:1 ratio of water and rice. This ratio has an impact on larger batches as well. When used in smaller amounts, water doesn’t absorb at the same rate, which could affect the final product. You’ll need to experiment with the cooker a little while adhering to the manual’s instructions in order to determine what works best with various recipes and for your specific needs.
- Entrust the entire process to the rice cooker. In order for the cooker to start cooking, the “on” button must be depressed.
- Rice should be covered and left to rest. Let it sit covered for about 10 minutes for fluffy results.
How to Cook Rice In the Microwave
This approach works well with long, medium, and short grain rice. Quick and fluffy results are produced by it.
- Clean the rice.
- Use a sizable heat-safe container. It works well to use a square baking dish with a big bowl. Do not forget that rice will expand as it cooks.
- Rice and water should be combined in a ratio of 3 1/2 to 2.
microwave on high before covering. microwave once there are obvious steam holes and most of the water has evaporated. - If you use 2 cups of rice, the cooking time will be around 10 minutes.
- In a microwave with a cover, medium-low. Cook the rice in the heat-safe plastic wrap for about 15 minutes, or until the liquid has completely been absorbed.
- Season and fluff the food before serving. While fluffing the grain with a fork, season it.
How to make Buttermilk
How to Make Buttermilk. Let’s spend a moment discussing the recipe. Baking with buttermilk produces deliciously fluffy, light, and tangy results. You’ve seen me use buttermilk in recipes for muffins and pancakes, and I’m very eager to share a straightforward cake recipe with you later this week.
And what exactly is buttermilk? Buttermilk was once the fermenting liquid left over after making butter from cream. Modern buttermilk is usually prepared from milk that has had lactic bacteria added, which produces lactic acid.
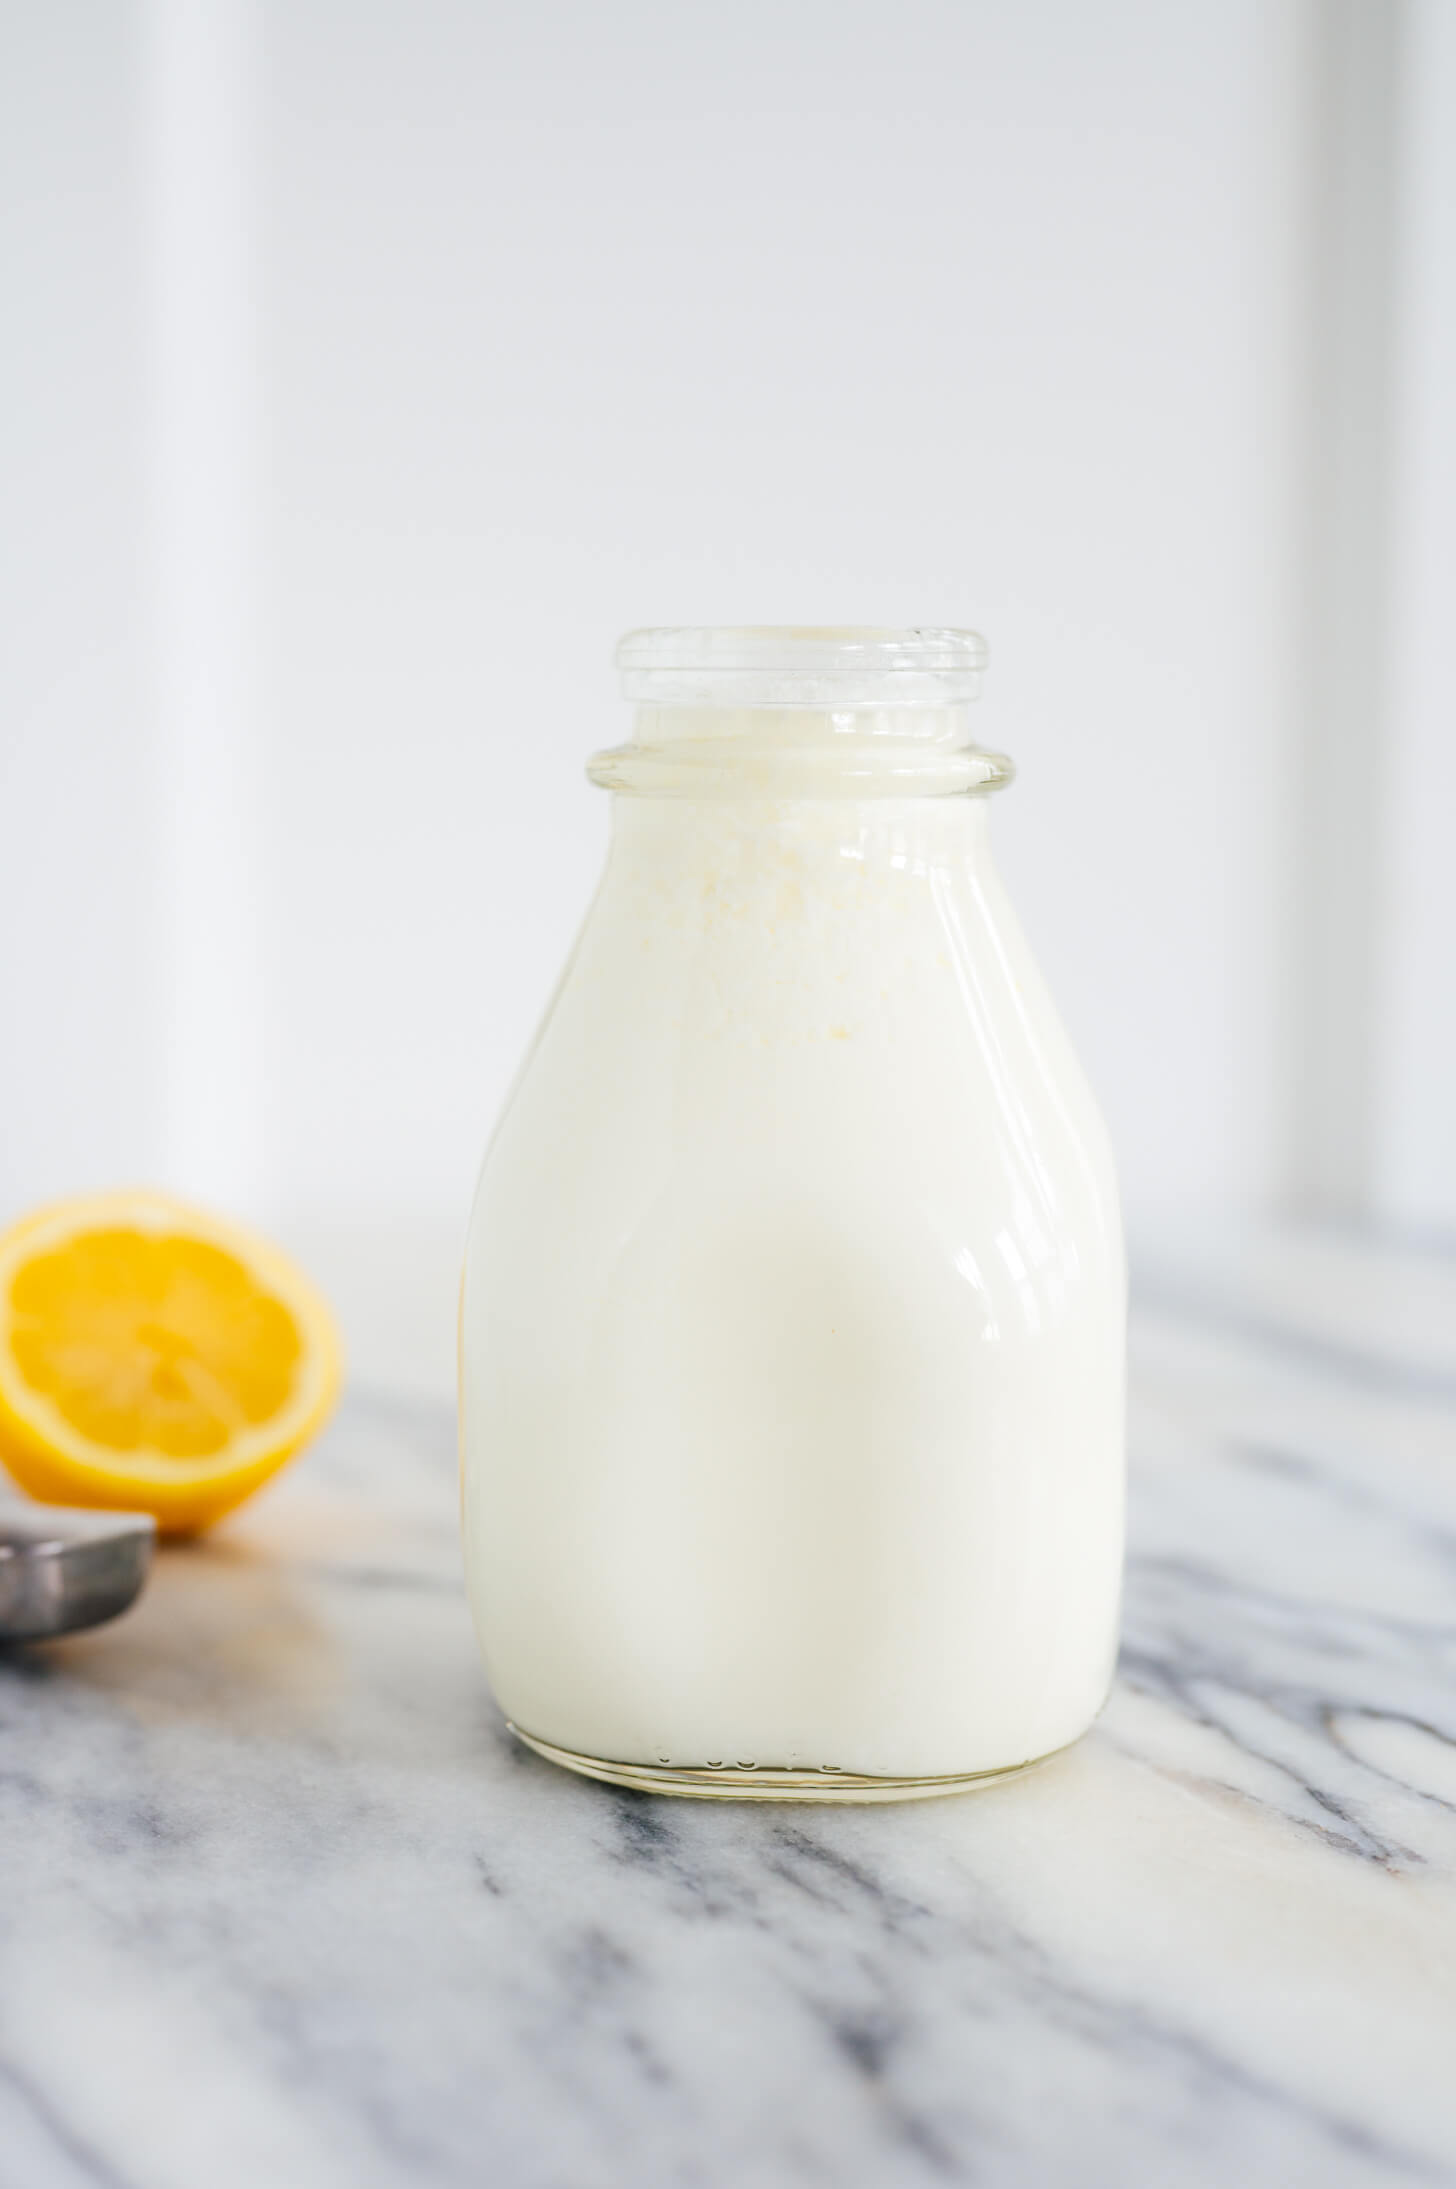
Buttermilk is not buttery and has a low fat content, despite what its name and thicker texture imply. Even while there are reduced-fat options, store-bought alternatives typically compare favorably to whole milk.
Why do we use buttermilk instead of plain milk?
Aside from its tangy flavor, buttermilk’s acid content helps balance baking soda’s basic nature. Baking soda is rather bitter on its own; in order for it to taste good and work effectively, it needs both acidity and moisture.
When compared to thicker cultured dairy products like sour cream or yogurt, functions similarly. I usually substitute about two-thirds of a cup of buttermilk for one cup of sour cream or yogurt because it is thinner.
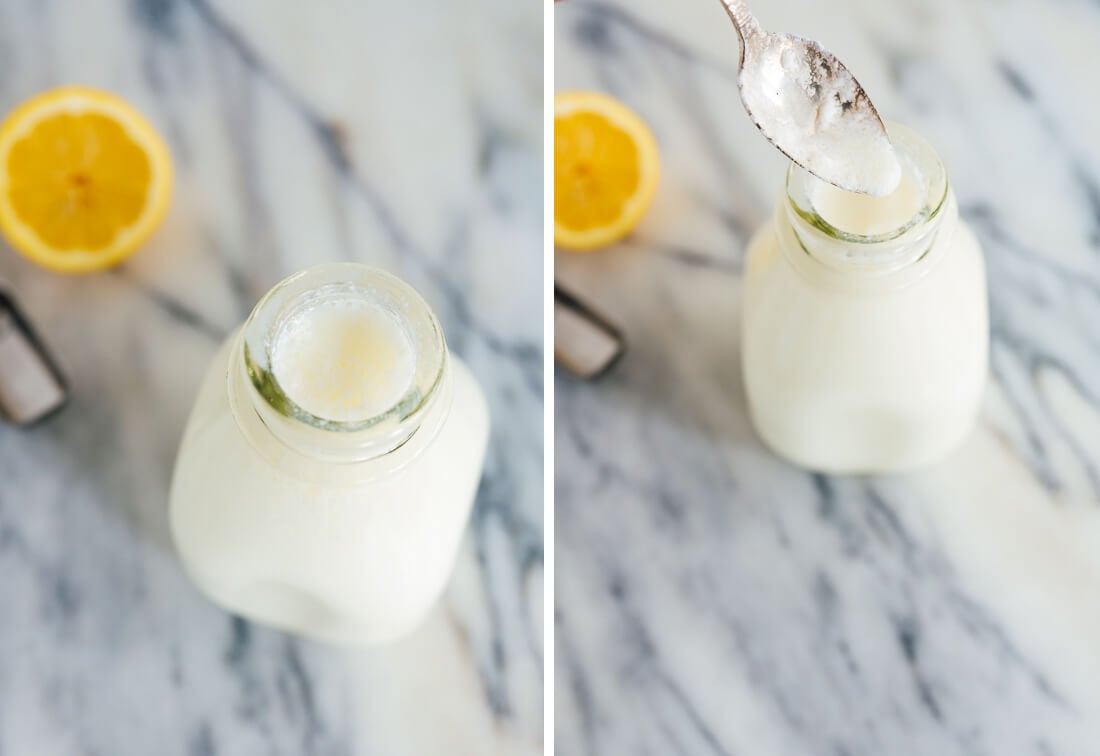
Today, we’re going to speak about acidified buttermilk, which is milk that has had acid (like vinegar or lemon juice) added to it so that it behaves. When you don’t have any buttermilk on hand, this is the ideal replacement for your baking endeavors.
Since I never seem to finish a complete a bottle in a timely manner, I appreciate using this trick because it prevents me from buying it. Because you can manufacture buttermilk from any sort of milk, this approach is particularly practical if you follow a vegan or dairy-free diet.
How to Make Buttermilk
Ingredients
- 1 tablespoon of lemon or vinegar juice.
- 1 cup of milk of any kind.
Instructions
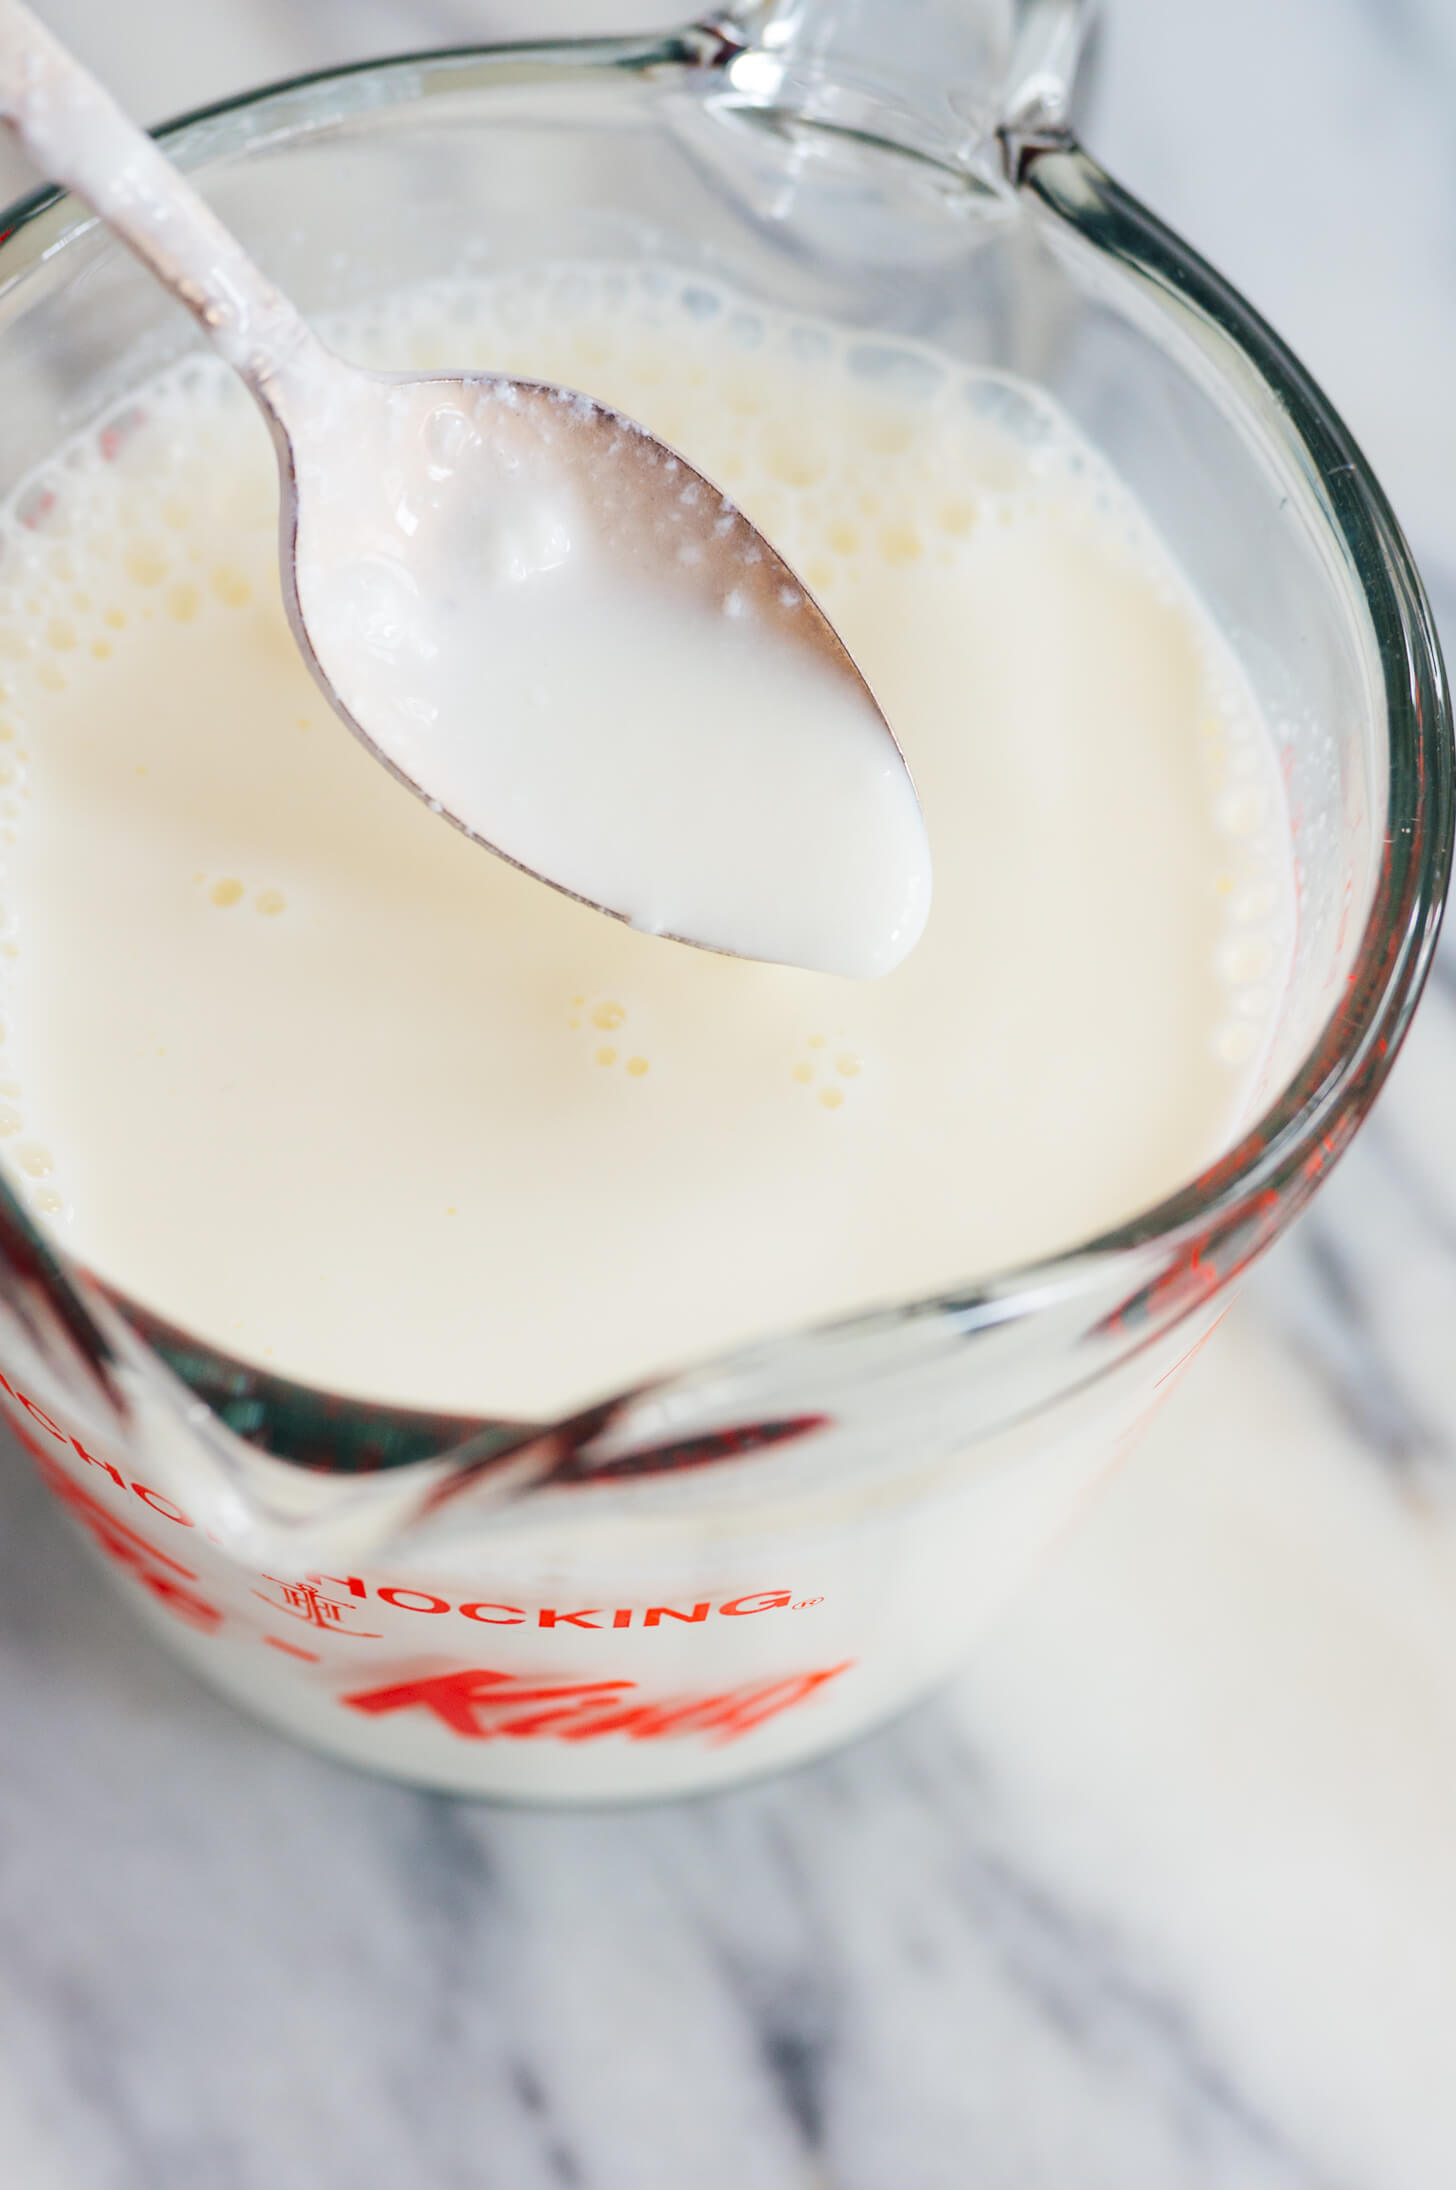
- Into a liquid measuring cup, add vinegar or lemon juice as needed.
- Pour milk into the measuring cup until it reaches the 1-cup mark. At least five to ten minutes should pass after stirring the ingredients. The milk will appear to be slightly curdling (separating). Just use it as instructed.
Notes.
- Pick a vinegar that is clear or nearly transparent, like Champagne vinegar, rice vinegar, apple cider vinegar, or plain distilled vinegar. Whichever is used has no impact on the final flavor of the baked good because all of them have an acidity level that is similar enough to function.
- There are many different types of milk available, including cow’s milk, almond milk, coconut milk, soy milk, and oat milk.
- By using your favorite milk, you can make it vegan or dairy-free.
- NUT FREE IT: Use milk devoid of nuts.
- REMOVE SOY: Be sure to use milk devoid of soy.
How to cook bacon in the oven
Excellent oven-cooked bacon is bacon that is perfectly crispy. Additionally, cooking on a stove is less simple and messy in the kitchen, and you can multitask there. Bake some bacon if you haven’t already!
Okay, you can have my fried, soft, and hard boiled eggs as well as my poached eggs with bacon. Not to mention the tasty maple syrup-dipped bacon and my paleo pancakes.

Cooking bacon in the oven
Bacon can only really be baked if you want the crispiest, most evenly cooked bacon. But it’s incredible how many people have never given it a shot. The cooktop dominates the kitchen, it seems.
I’ll explain why you ought to start using bacon that has been baked instead. I promise that once you’ve cooked bacon in the oven, you’ll never cook it on the stove again!
Cooking bacon on a stovetop produces hot spots and surface splatter all over the pan. As a result, it might be possible that some bacon cooks more quickly than others. It also explains why some of your bacon might inadvertently burn a little bit while some of it might still be raw.
Each slice of bacon will cook evenly due to the oven’s heat. They cook evenly because they gently sizzle and don’t spatter. The object is lovely.
Benefits of oven-roasted bacon.
- First off, you can cook enough food for a large crowd—sometimes that group consists only of your immediate family. This is essential for special occasions or whenever many guests visit your home. Additionally, it is crucial for helping you stay sane while preparing food for a large group of people.
- The bacon is more hygienic to bake than to fry, which is the second reason. The cooktop is notorious for being covered in splatters because I probably cook my bacon a little too hot. There are no splatters (or as many as you like) when bacon is baked, instead it simply sizzles until it is perfectly crispy.
- And finally, baking bacon in the kitchen allows you to multitask. Since after you’ve baked that wonderful sheet pan of bacon, you have about 15 minutes to make some eggs, a batch of pancakes, or waffles.
Tips
- Either line a sizable sheet pan with parchment paper, or leave it unlined (although that’s messy). Simply take out a piece of parchment paper, place the bacon on top, and fry.
- In my opinion, the bacon shouldn’t be cooked on a cooling rack. I tested it, and there is hardly any difference. But after that, I needed to clean a cooling rack, and those things are difficult to clean.
- A temperature of 400 degrees Fahrenheit yields excellent results from both thin and thick cut bacon. Depending on how crisp you like your bacon, cook the bacon in the oven for 18 to 20 minutes once it is hot. I only rotate the pan halfway through to ensure even cooking. Do not forget that your bacon will continue to crisp up after drying.
How to cook bacon in the oven
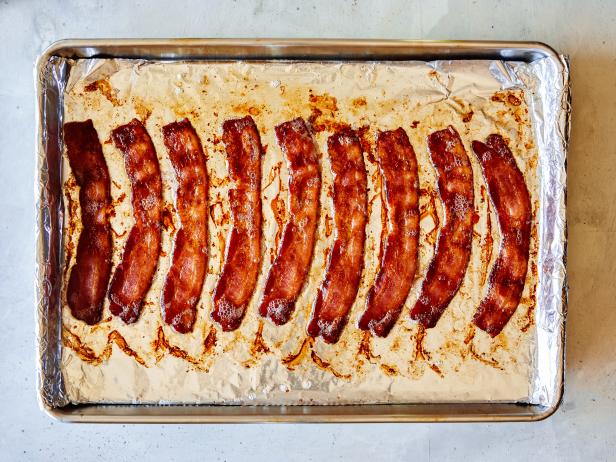
1. Place the bacon on a baking sheet lined with foil.
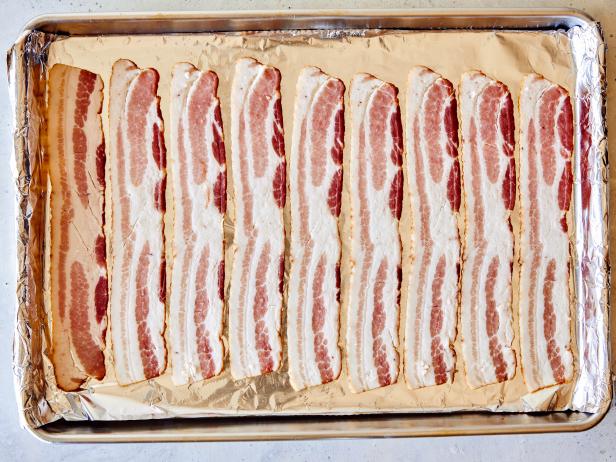
On top of the foil, you can place the bacon in a single layer; the pieces should contact but not overlap. To allow extra fat to drain away as the bacon cooks, you may also equip the baking sheet with an oven-safe cooling rack and place the bacon on top of that. Either way, it won’t be a big concern. You are welcome to omit the rack so there will be fewer dishes to wash.
Take your bacon to the next level right now to wow your family or brunch visitors. Think about adding a seasoning, such as chipotle chile powder, brown sugar, or cracked black pepper.
2. Use a cold oven to place the bacon.
This action is really crucial. Put the bacon in a chilly, not-yet-preheated oven. Start preheating the oven after the bacon is in there. Why? Bacon that is heated slowly renders out its fat and becomes extremely crispy; it is much crispier than bacon that is heated quickly in an oven.
Once the bacon is inside, preheat the oven to 400 degrees F and bake it until it reaches the desired level of crispy. It should take around 20 minutes to complete; but, because the bacon will need to cook while the oven is preheating, this process will take a little longer than usual. You must shorten the cooking time if you prefer to cook the bacon in an oven that is already hot; otherwise, it will burn.
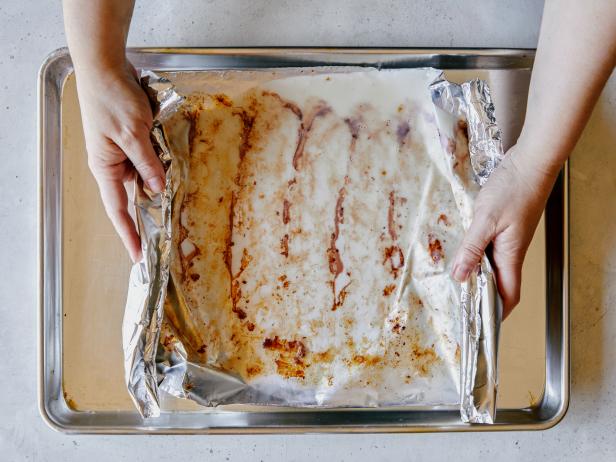
With the aid of tongs, carefully transfer the bacon to paper towels after removing the baking sheet from the oven.
3. Eat and clean up (easy)!
Pour the bacon grease carefully into a heat-safe container if you wish to store it; consider using an old metal coffee can. The hot, grease-filled baking sheet can be set aside and left to cool if you don’t feel like conserving the fat. For relatively simple cleanup, the grease will solidify onto the foil, which you can pull up and throw away.
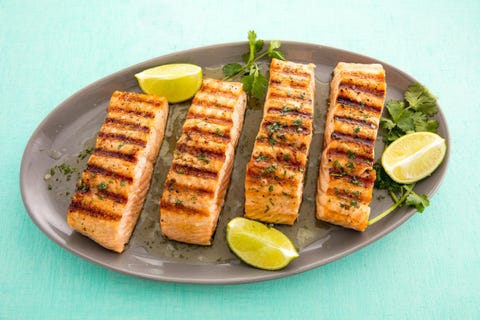
How to cook salmon recipes
How to cook salmon. Salmon might be a little frightening if you’ve never cooked before or aren’t quite sure in your abilities. Which side should be roasted first? What shade of pink is appropriate? How can you tell when it’s finished? Please calm down and prepare more salmon.
It’s not only that you require the fish oil, although you do. You just need to choose the cooking method that works best for you. Salmon might be among the simplest foods in the world to prepare. You won’t believe how simple it is, despite the fact that it looks fantastic and sophisticated as hell. Anyone can complete this.
What type of salmon should I purchase first?
If you want to make the most ethical choice possible, keep the Seafood Watch app from the Monterey Bay Aquarium handy. You can use it to research the specific salmon variety that is available in your area. Otherwise, pick the most premium, fresh fish you can find. Always keep in mind that the helpful staff at the counter has a wealth of knowledge to impart; all you have to do is ask them what’s the freshest and tastiest!
A word about how long salmon should be cooked:.
The FDA advises cooking salmon to an internal temperature of 145°. We usually check the doneness of high-quality salmon with a fork rather than a thermometer. When the salmon easily flakes with a fork, it is cooked. Simply make sure to look at the thickest part of the fillet.
Broil

Broiling salmon is among the easiest and least labor-intensive cooking techniques. Set your oven’s broiler to high and place an oven rack in the top third of the oven, where the salmon will be about 5 inches from the coils.
Place your filets on a baking sheet lined with parchment paper or aluminum foil that has been lightly greased (to prevent sticking!) and generously season with salt, pepper, and any additional ingredients of your choice. Here, we used garlic, grainy mustard, and herbs, all of which are delectable. Broil the fish for 5 to 8 minutes, depending on how you like it.
Apply pressure with a fork to the corner of the filet to quickly determine when the salmon is ready. If the fish flakes, you’re good to go!
How to cook salmon by bake
Baking is incredibly easy to learn and is perfect for a quick but special Tuesday dinner. It is comparable to broiling. When roasting, a single large filet is preferred over several small ones because doing so makes the presentation game impossible.
Cover a sizable baking sheet with foil and preheat your oven to 350 degrees Fahrenheit. With the skin side down, bake your filet for 12 to 15 minutes, or until pink and opaque. Using our traditional method, the salmon is cooked directly over a bed of thinly sliced lemons while being seasoned with garlic, honey, and thyme. With the way it tastes, you can really go anywhere. Any citrus will do. Remember that if you serve your salmon over a bed of lemon (or pineapple), the skin won’t get crispy.
How to cook salmon by pan-fry
Any fish you’ve ever had at a restaurant is likely to have been seared, giving it a delicious golden crust and skin so crispy you want to eat it. It is good news that you can do it at home.
Before heating a cast-iron or nonstick skillet to medium-high heat, it is advisable to coat the bottom of the pan with butter, vegetable, or olive oil. After being placed skin side up in the pan, cook your filets until they release naturally from the pan with a spatula (you should hear a sizzle). Once the crust has fully formed, which should take about 6 minutes, turning will be easy (don’t press it to release if it won’t!).
After turning, cook for a further 4 minutes to let the skin become nicely crispy. (Bake the entire skillet for 5 minutes at 350 degrees if the skin is getting too crispy but the fish’s center is still pink and firm. The result is fish that would pass muster in a restaurant, but without the restaurant price.
Poach

Poaching salmon is a simple way to get consistently delicious, moist fish. First, season both sides of the salmon fillets with the seasoning. In a large skillet, bring 1 cup of water and 1 cup of dry white wine to a boil. Add the salmon after lowering the heat to a simmer. With the lid on, cook for approximately 10 minutes. Carefully remove the salmon using a fish spatula or a sizable slotted spoon.
To enhance the flavor, add some fresh herbs and garlic cloves to the skillet. Fresh dill is delicious.
Grill
While the weather is nice, you must grill outside. There is smokey flavor in that charring. When grilling fish, we really like to use two different techniques.
First, learn how to quickly grill salmon on a grill (or grill pan). When cooking fish, always season it first. Grates on the grill should be greased, and the temperature should be set to medium-high (to facilitate flipping). When adding salmon, make sure to add it skin-side down and cook it for 6 to 8 minutes, or until the bottom half of the fish appears opaque and the skin easily peels off. After 4 to 6 minutes of flipping and cooking on the second side, the fish ought to be fully cooked.
The foil packs of grilled salmon are up next, and we adore them because you can essentially make your entire meal from one packet. Serving meals to guests in this manner is also incredibly entertaining.
Pick out your vegetables and flavoring components first. You should choose foods that cook quickly or slice your food very thinly. The healthiest foods are thinly sliced potatoes, zucchini, bell peppers, onions, and asparagus. When making the flavor bombs, we almost always add some type of citrus, a potent herb (like thyme or rosemary), and garlic. Including a tab of butter in each packet is always a good idea.
After liberally seasoning with salt and pepper, place everything on top of a long piece of foil. After folding the foil in half, the edges should be folded up to seal the packet. When the salmon is cooked through and the vegetables are tender, place the packets on a warm grill and cook for 10 to 12 minutes.
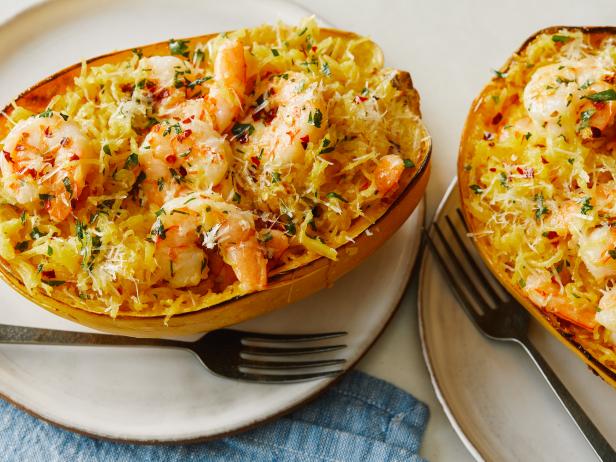
How to make spaghetti squash
Spaghetti squash preparation methods. Spaghetti squash appears to have originated in China because it was first eaten there in the 1850s, despite the fact that there are other squash species native to the Americas. It wasn’t made readily available on the market in the United States until 1936, when Chinese seed dealers brought a well-liked Japanese strain to the country’s markets. Spaghetti squash is now a well-liked low-carb alternative to pasta because its flesh can be shredded into spaghetti-like strands that take on the flavor of conventional pasta sauces. The vegetable’s popularity as a healthy food is not surprising given that beta carotene, which gives it its vibrant natural colors, is also high in antioxidants, low in calories, and a great source of fiber. It can be prepared in a variety of ways; here, we’ll show you the simplest.
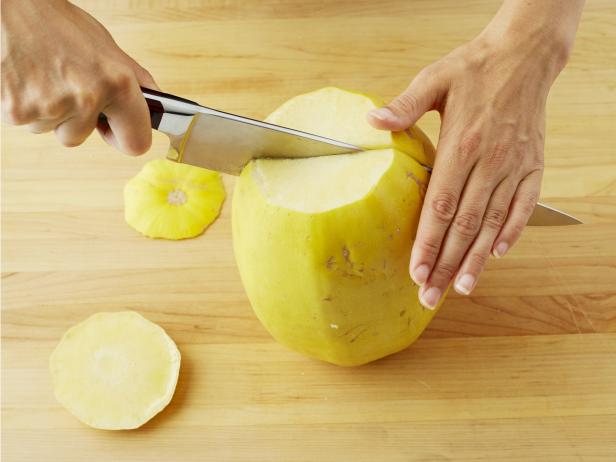
Cutting a spaghetti squash.
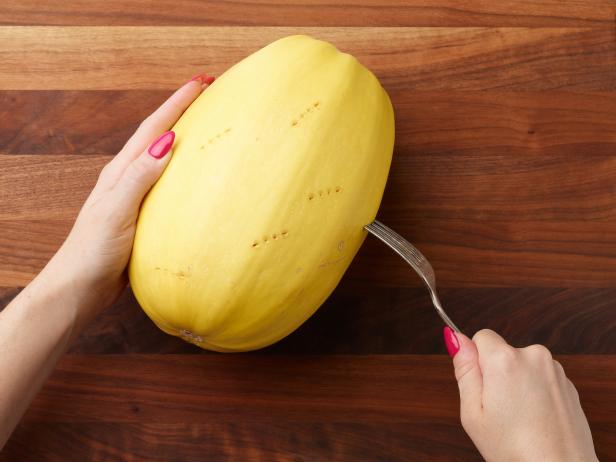
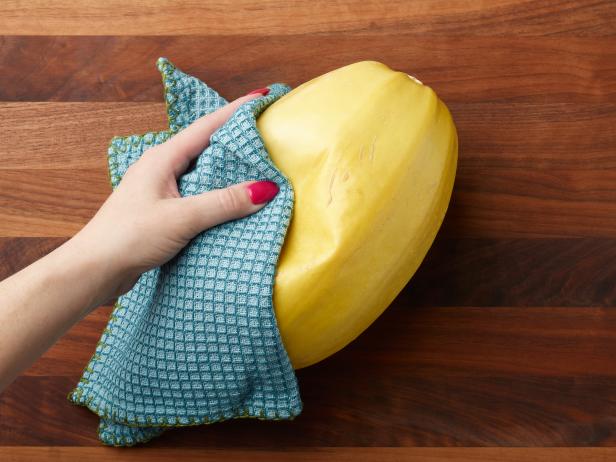
Similar to its related butternut squash, spaghetti squash has a very hard skin. You’re not alone; a lot of people struggle with cutting the squash. Try microwaving the entire thing for about 2 minutes to make the skin easier to cut.
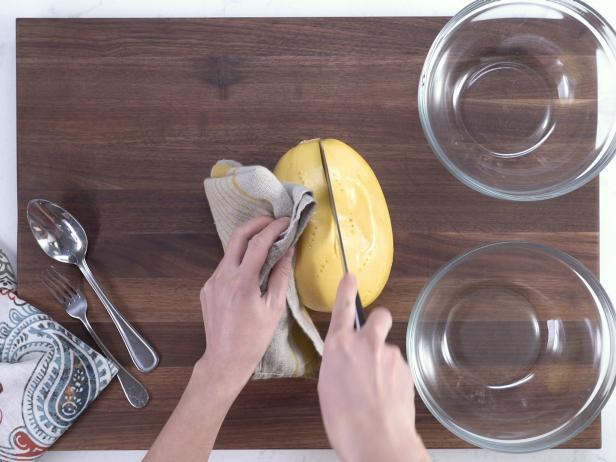
1. By cutting off both ends, you can create a stable surface.
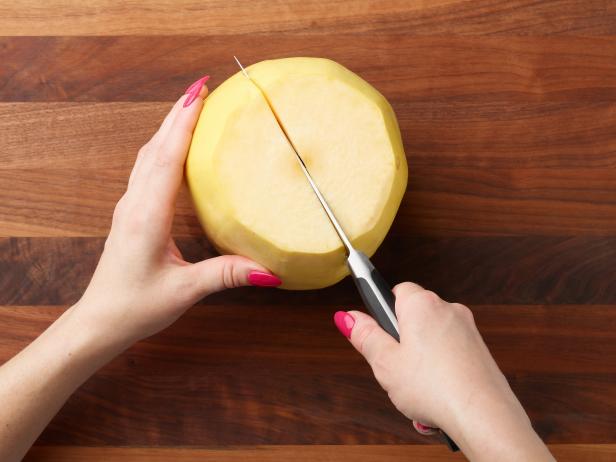
2. Slice the squash in half lengthwise, top to bottom. With this method, a lot of surface area is exposed, enabling even cooking and uniform browning across the cut surfaces. A different camp exists, though. The fibrous strands of flesh that give spaghetti squash its noodle-like texture surround the squash’s center in a horizontal pattern rather than a vertical one. This means that cutting the squash in half lengthwise preserves the circular threads in both parts, producing noticeably longer cooked “noodles.”. ”.
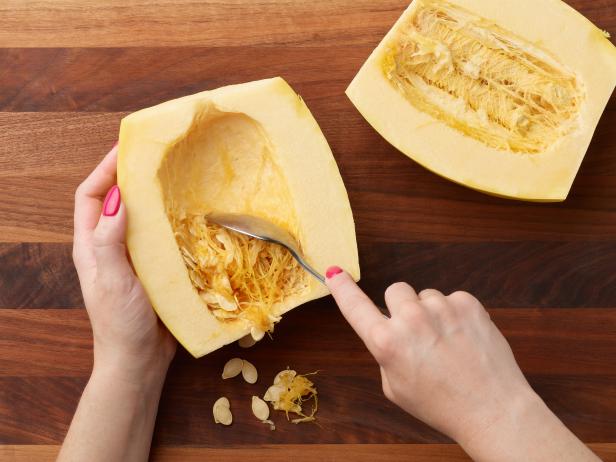
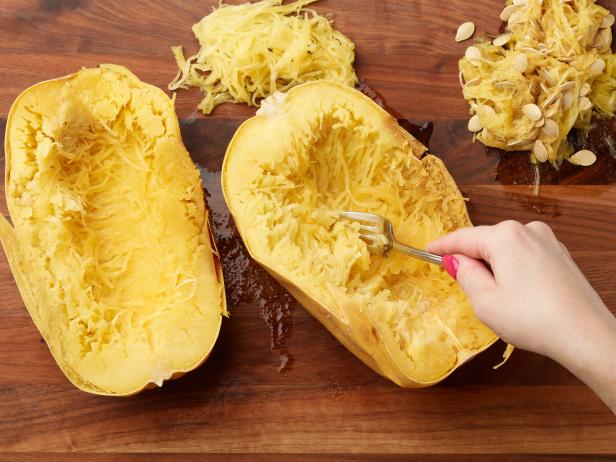
3. Take out the seeds and pulp with a spoon.
How to Bake
How to Roast a Halved Spaghetti Squash
Although it takes a little bit of preparation beforehand, this is the quickest way to roast a spaghetti squash.
1. Arrange the squash halves on a baking sheet with the cut side up.

2. Raise and chop. For about 25 minutes, bake at 400 degrees F until fork-tender. Use a fork’s tines to loosen and separate the strands of squash from the skin after the squash is cold enough to handle. Throw away the skin.
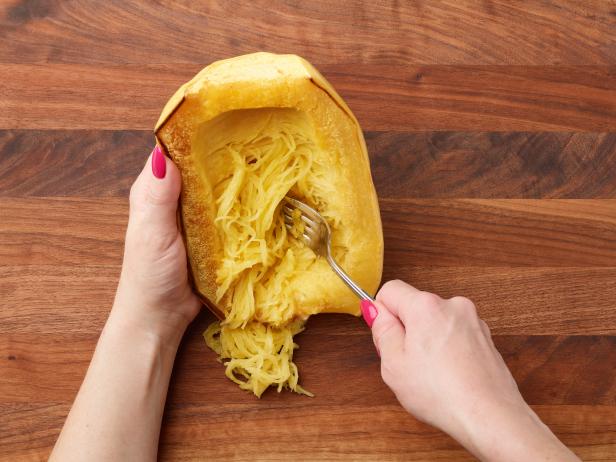
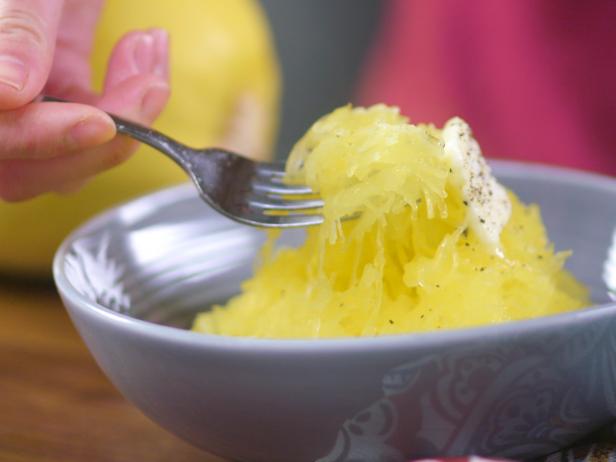
3. Put spaghetti squash “noodles” on the table. Try the straightforward and delicious combination of butter, salt, and pepper; grated Parmesan is also great.
How to Roast a Whole Spaghetti Squash
This method does not require any prior preparation time, but it does take longer than cooking spaghetti
squash halves.
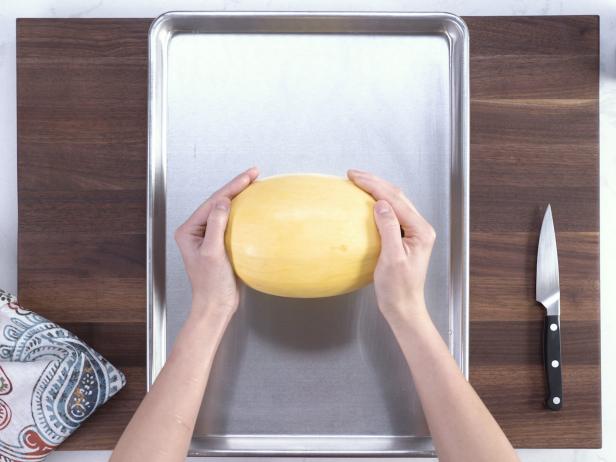
1. Place the spaghetti squash whole on a sheet pan. 400 degrees Fahrenheit should be the oven setting.
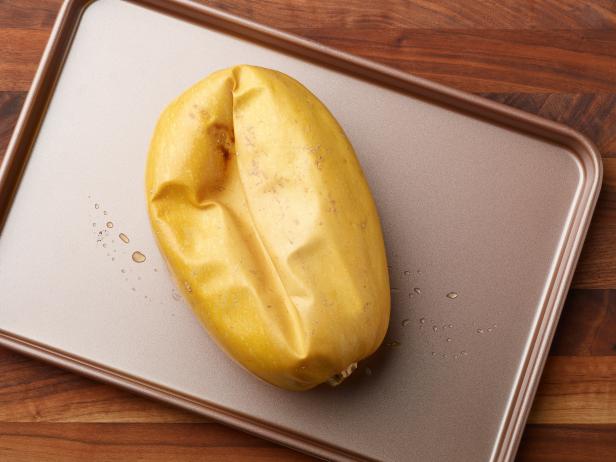
2. Roasting squash is advised. The squash needs about an hour to become pliable, brown, and wrinkled in spots, as well as to yield when squeezed with a kitchen towel.
3. Make strands out of the squash after cutting it in half. When preparing a squash, the flesh should be scraped into long strands after being cut in half, the seeds removed. The skin should be discarded.
In the Microwave
Follow these easy steps if you want to get to squash more quickly.
1. Make a few teeny holes in the squash’s skin using the fork tines. It should only take ten pokes.
2. Microwave the spaghetti squash for 5 minutes at a time. Squash should be turned after each. The squash should be cooked for a total of 10 to 15 minutes, or until it is tender and yields when squeezed with a kitchen towel.
3. Continue to hold the squash with the kitchen towel as you cut it in half. Use a fork to scoop out the spaghetti squash’s seeds from the center.
The Instant Pot Spaghetti Squash Cooking Method.
In a pinch, your Instant Pot can be used to cook spaghetti squash. In a short amount of time, you will get the results of the tender.
- Prepare the Instant Pot. Use 1 cup of water in a 6-quart Instant Pot. Place the rack at the bottom, handles up the sides.
- The squash should be indented. Deeply pierce the squash 12 to 16 times with a fork, then set it on the rack.
intense pressure cooking. See the manufacturer’s instructions for how to lock the lid and get ready to cook. The cook’s note states that 12 minutes of high pressure cooking are scheduled. - Once the squash has been quickly released, carefully remove it from the Instant Pot. Wait until the quick-release cycle has finished before following the manufacturer’s instructions after the pressure-cook cycle. Be careful around any remaining steam as you unlock and remove the lid. Utilizing two kitchen towels, you can take the rack apart and smash it onto a cutting board. Allow the squash to cool slightly.
- Scratch the strands off. By dividing it lengthwise, With a fork, scrape the squash from the interior of the skin after using a spoon to remove the seeds.
How long spaghetti squash should be cooked.
The method you use will greatly affect how long you cook spaghetti squash. Spaghetti squash halves can be dried roasted at 400 degrees Fahrenheit for about 25 minutes. It will take 10 to 15 minutes to microwave an entire spaghetti squash. In an Instant Pot, spaghetti squash will take about 12 minutes to cook on high. Texture should always be considered when producing something, regardless of the method. To easily separate the squash’s fibrous fibers into spaghetti-like strings that are tender but still have an al dente bite, use a fork to pierce the flesh.
Spaghetti Squash Recipes
Spaghetti Squash Carbonara

Chicken Spaghetti Squash

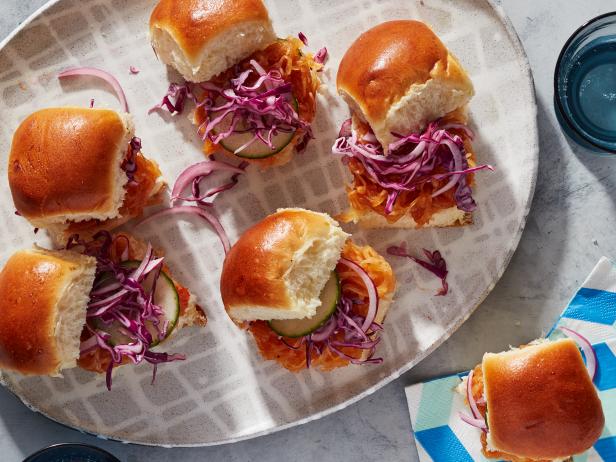
BBQ Spaghetti Squash Sliders
Spaghetti Squash Scampi Boats
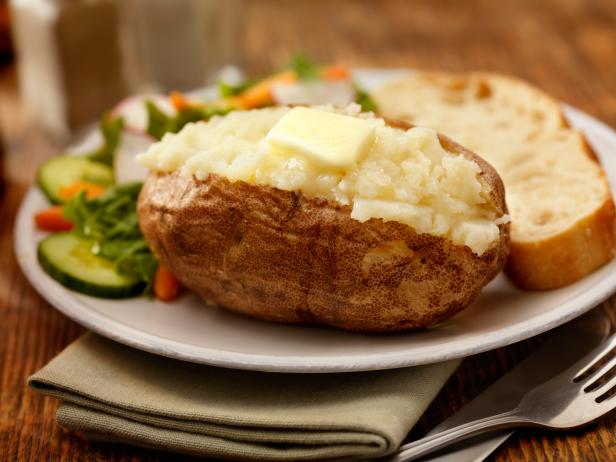
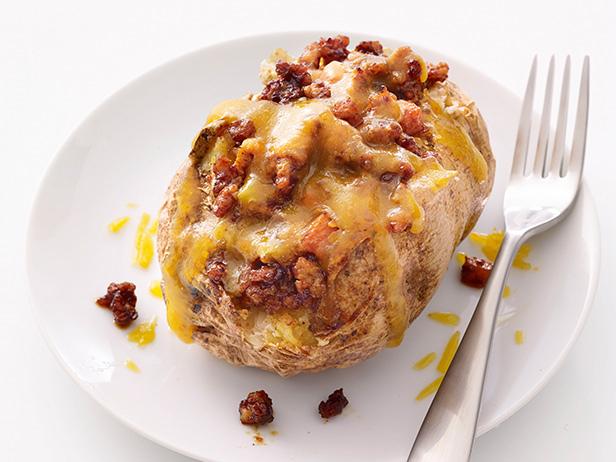
How to bake a potato
How to bake a potato. When you follow all the advice given here for fluffy baked potatoes with crispy skin, you’ll be cooking more than just one or two potatoes.
It’s likely that the steakhouse served you the finest baked potato you’ve ever had. Perhaps all that was on it was butter, salt, and freshly ground black pepper, or perhaps it was covered with sour cream, bacon, cheese, and green onions. In either case, the inside was undoubtedly wonderfully fluffy and crackly-crisp. What is the finest approach to achieving said excellence in baked potatoes? We’ve listed a few particular pointers and instructions for you to remember below.
Baked Potato Cheat Sheet
How long should a potato bake?
Potatoes need 45 to 1 hour to bake at 400 degrees F; they are done when they are tender when squeezed (with oven mitts, of course!). When a potato is finished baking, a paring knife or fork tines should easily slip into it.
What Internal Temperature Should Be Achieved When Baking a Potato?
When thoroughly cooked, a baked potato will read 210 degrees F on a quick-read thermometer. Due to its high sugar content, a sweet potato might reach 212 degrees Fahrenheit.
Should a Potato Be Foil-Wrapped?
Not at all. If you want that mouthwatering, crispy skin, no. The potato’s steam is trapped by the foil, preventing the skin from ever becoming crisp.
How to Shop for Russet Potatoes
Let’s start with the most crucial aspect: a russet potato is required for a fluffy baked potato. Anywhere can grow russet potatoes, which are brown and heavy in starch; however, we most usually refer to them as bakers or Idaho potatoes. A red potato has low starch, making it more better and more solid in a soup, stew, or chowder since it won’t break down easily, but a high starch potato gives you a fluffy baked potato. To ensure that your potatoes bake at the same rate, buy ones that are as similar in size as you can. Choose potatoes that are smooth and sturdy, without any cuts from shovels or emerging eyes.
How to Store Russet Potatoes
Avoid putting potatoes anywhere near onions, which release ethylene gas, which can cause potatoes to sprout, soften, and rot. Instead, store potatoes in a cold, dark, dry location. Potatoes should never be kept in the refrigerator. The potato changes its starch to sugar because the cold temperature deceives it into believing that it is winter and that it must feed itself. Baked potatoes made with sugar won’t be fluffy and starchy; instead, they’ll be thick.
Prep the Potatoes for Baking

To begin, put the oven racks in the bottom and middle and preheat to 400 degrees Fahrenheit. Dry and wash the potatoes. Each potato should have two fork piercings, one on each side. Oil the potatoes and place them on a baking pan.
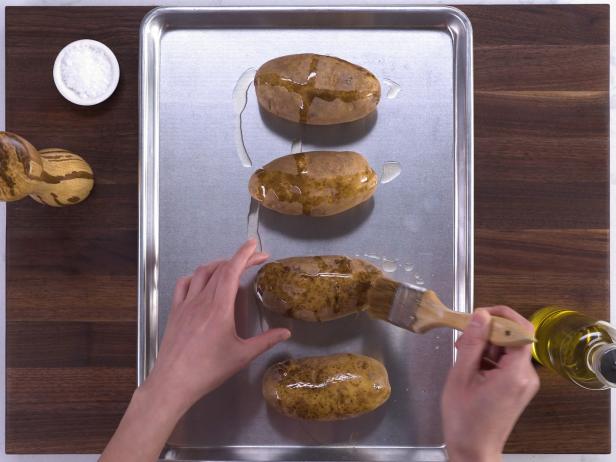
Add oil: Apply the oil to the potatoes in an even layer using a pastry brush.
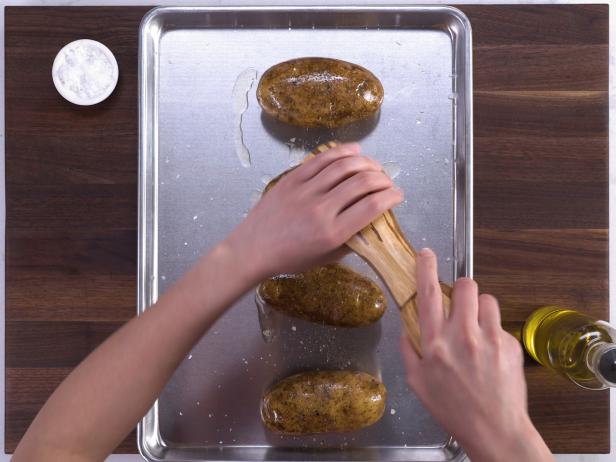
Sprinkle the skin with salt and freshly ground black pepper to season it.
Bake the Potatoes
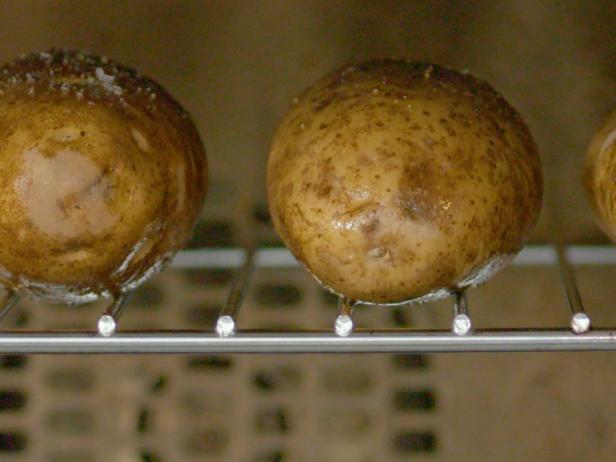
Potatoes should be placed directly on the upper oven rack so that air can circulate freely around them and keep the skin dry to promote crisping. A baking sheet should be placed on the rack beneath the potatoes to catch any drips. Bake for about 45 minutes, or until the skins are crispy and the potatoes are tender to the touch.
Serve the Potatoes
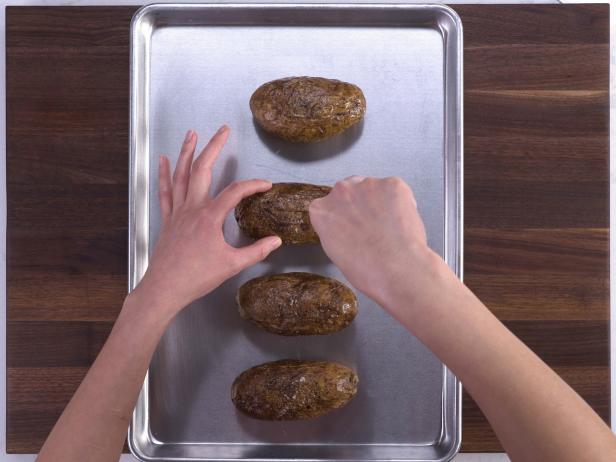
Use your sheet pan to move the potatoes from the oven to the worktop after cutting them down the center. Each potato should have a slit about 3/4 inch long cut into it.
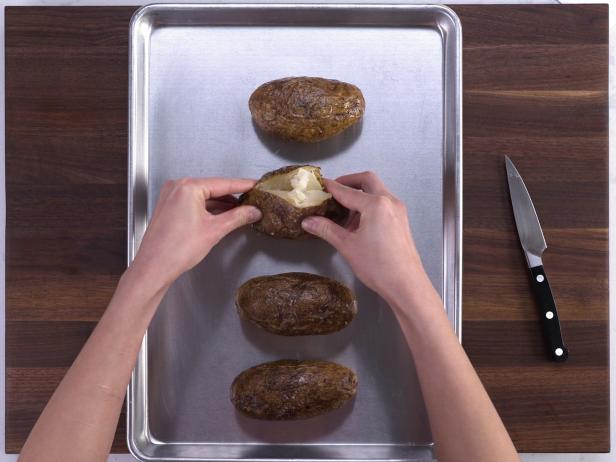
Push the potato open by holding one end in each hand and pushing down and inward to release some of the potato from the skin and fluff it up.
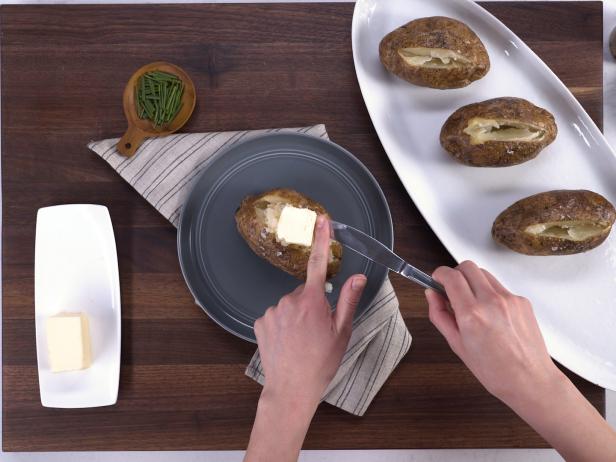
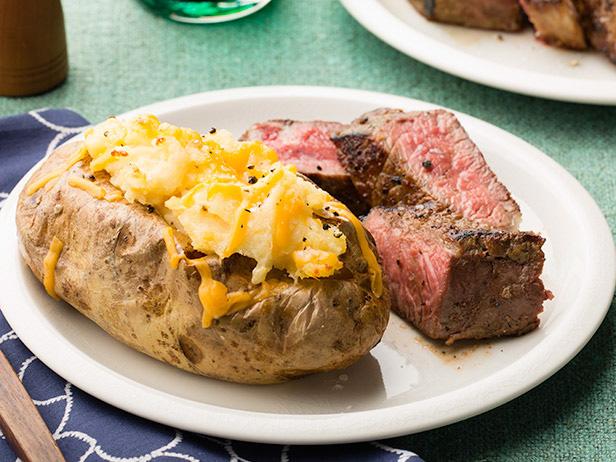
Each split cooked potato should be topped with butter, salt, and freshly ground pepper. Serve loaded baked potatoes with chives and your choice of seasonings.
How to Bake a Potato In an Air Fryer
Fun fact: The skin will crisp better with a high-speed fan than with any other technique.
- Take all the necessary actions to prepare a potato in a standard oven.
- Bake the potato for 50 to 60 minutes at 375 degrees F in the air fryer.
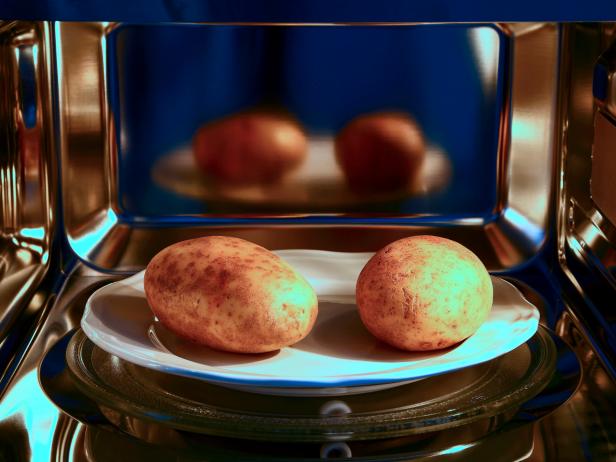
How to Bake a Potato In the Microwave
Although this is the quickest method for baking a potato, the skin won’t be crispy. After being microwaved, place the cooked potatoes in a 425°F oven for five to ten minutes to achieve crispy skin.
- You don’t want the steam to build up under the skin and cause your potato to explode, so prick them with a fork four or five times.
- Add salt and pepper and rub some oil on them.
- In a shallow dish that is microwave-safe, put no more than two potatoes. One potato should be cooked for five minutes. Cook them for five to seven minutes if you’re making two. The potatoes should be done when a fork or knife glides easily into the center. Flip the potatoes over and cook them for another 3 minutes.
How to Bake Sweet Potatoes
Sweet potatoes can be baked almost exactly like Russet potatoes. Oven temperature set at 425 F. After washing, make several fork pricks in the sweet potatoes. Put the sweet potatoes on a sheet pan and bake them there; if you bake them on the open rack, sugar will leak out of the potatoes as they bake and drip to the bottom of the oven. After 45 minutes, assess the finishedness. Visit How to Bake Sweet Potatoes for detailed instructions and illustrations.
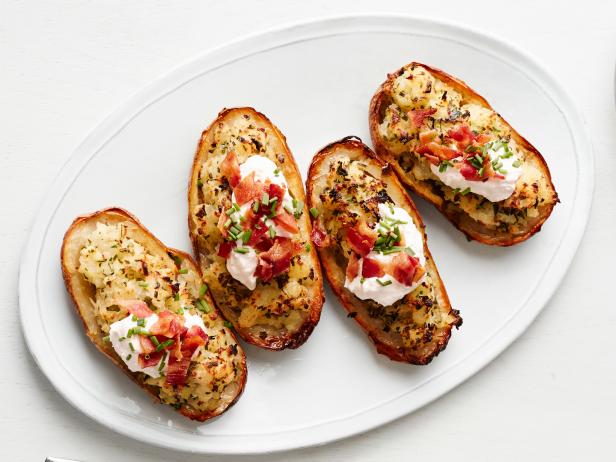
Baked Potato Recipes
Baked Potatoes
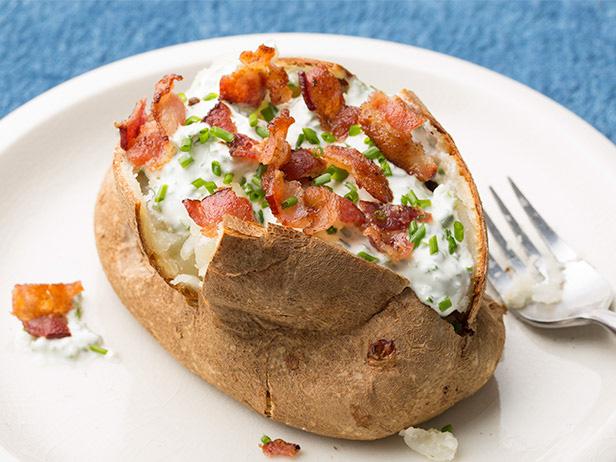
Cheese-Stuffed Baked Potatoes
Sloppy Joe Baked Potatoes
Horseradish-Bacon Twice-Baked Potatoes
Super-Stuffed Baked Potatoes

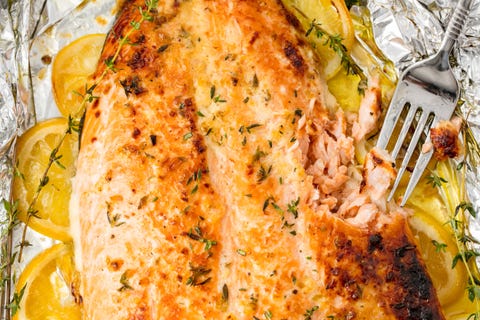
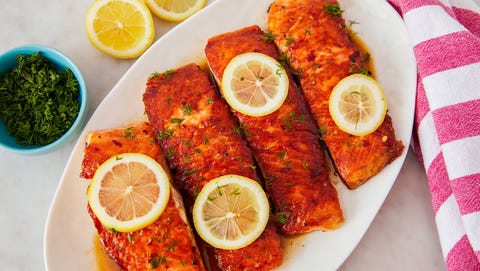
How to bake salmon
How to bake salmon. The ingredients for this recipe are simple: just a few salmon filets, a quick lemon butter sauce, and herbs. Weeknight dinners are all about this juicy, delicious, and flaky baked salmon. Then let the oven work its magic!
In my home, I cook this salmon meal the majority of the time. It is quite simple to make, requires less than 20 minutes, and yields the most delicious, mouthwatering salmon. To put it another way, it’s a simple, wholesome dinner meal that the whole family will enjoy.
A straightforward recipe like this one has the advantage of being adaptable enough to go with a wide range of side dishes. Additionally, you can keep weeknight dinners flavorful and exciting by just swapping up the sides!
Baked salmon Ingredients

- 4 salmon fillets, each 6 ounces
- 2 teaspoons of melted butter
- Additional lemon slices for garnish and 1/2 teaspoon lemon juice
- 3 garlic cloves, minced
- Pepper and salt
- 1 teaspoon of parsley, cut finely.
- 1 teaspoon of dill, coarsely chopped
Instructions


- This incredibly juicy and flakey salmon is done in about 15 minutes! Because it bakes so quickly, be careful to prepare and plan your side dishes in advance. Pre-heat your oven to 375°F before beginning by following the instructions below.
- The salmon should be allowed to warm up. Your fillets should remain on the counter for about 15 minutes after being removed from the refrigerator.
- Create the butter mixture. Combine the melted butter and lemon juice in a small bowl.
Following that, apply the butter mixture to the fillets in the baking dish. - It’s time to bake. Salt, pepper, and minced garlic are sprinkled on top. Bake for 12 to 15 minutes.
- Willing to service! Before serving, add a little parsley and dill for the final touch.
How to bake salmon Tips
- A few minutes before baking, season the fillet. To allow the flavors to meld, it is preferable to marinade beef and chicken for at least an hour. However, condiments, especially salt, can quickly pull away moisture from fish. Therefore, season just before placing the pan in the oven for extra moist results.
- It is recommended to leave the salmon’s skin on. Regardless of whether you enjoy salmon skin, leave it on before baking. It will aid in shielding the fillet from the heat of the pan, allowing the salmon to cook more evenly and preserving its mouthwatering juices. The skin can then be removed with ease once you’re ready to serve.
- Don’t use water to rinse fish. Similarly to chicken, avoid washing raw fish. It can spread to adjacent kitchen surfaces, such the sink or countertop, raising your risk of contamination. Additionally, as it cooks inside a hot oven, the bacterium is destroyed.
- Just before the timer goes off, remove it. Bear in mind that as the salmon sits, it will continue to cook. So another approach to avoid overcooking is to remove it just before it’s “done” if you’re keeping a tight watch on the time.
- Not to worry about the white ooze! Don’t freak out if you see a white, slimy material on top of your baked salmon. Actually, it’s just the salmon’s albumin protein, which solidifies when heated. Salmon will release more albumin when it cooks at a higher temperature. So cook your salmon at a low temperature to avoid a dense white covering.
How to roast pumpkin seeds
There are numerous ways to season and roast pumpkin seeds, but this easy method is favored by a large number of Allrecipes users. If you’re anything like us, you think the best part of carving a pumpkin is saving the seeds to roast later. Get tips on how to season or sweeten roasted pumpkin seeds as well as information on how to prepare them for roasting.
Pumpkin seed cleaning instructions.
The most difficult step in the roasting process is preparing the pumpkin seeds. The goopy interior of the pumpkin must first be removed before the seeds can be harvested. Fortunately, we have a ton of tricks up our sleeves to make this process as painless as possible:.
1. Obtain the seeds. Use a sturdy metal spoon to remove as many of the pumpkin’s seeds as you can at first. Don’t allow the pulp to dry out before cleaning the seeds.
2. seed soaking is done. Place the pulp and seed mixture in a large bowl. Run water over the seeds and swish them around in your hands to remove any lingering pieces of pumpkin. The flesh and seeds will be simpler to separate as a result. Excess water should be disposed of.
3. Clean the seeds. Clean seeds should be placed in a colander and rinsed to get rid of all flesh.
4. The seeds may also be boiled. For ten minutes, clean seeds should simmer in salty water. (The advantages of doing so are discussed below. ).
5. You must dry the seeds. Drain the cleaned/boiled seeds in a colander, then dry them as completely as you can with a towel to ensure that they bake up nice and crispy.
Pumpkin seed roasting instructions.
:max_bytes(150000):strip_icc():format(webp)/13768-Roasted-Pumpkin-Seeds-4438ec69950f4d6da2e3cde0cc9b33e7.jpg)
Once your seeds are prepared and ready to go, follow these basic instructions and ingredient measurements for roasting.
Start by preheating the oven.
To start, preheat the oven to 300 degrees F (150 degrees C).
Step two is coating the seeds.
Add melted butter (or oil), salt, and any additional seasonings you like to clean, dry seeds.
Arrange the seeds in Step 3.
Distribute the seeds evenly across a baking sheet. Avoid having the seeds overlap for the greatest chance of a crispy finish.
For less mess, line the baking sheet with parchment paper.
Four: Bake.
Bake for about 45 minutes, or until golden brown. Stir your seeds, take the baking sheet off the oven, and spread them out once more after every ten minutes.
Pumpkin seeds are only one type of winter squash seed that can be roasted.

How to negotiate salary. It’s not unexpected that many people find it difficult to request higher pay once their job hunt is over and they are in possession of an offer. They don’t want to risk the opportunity now that they’ve made it this far, especially if the pay is fair. However, as the 2023 […]

How to increase milk supply. Most of the time, even if you are unaware of it, your body produces just what your baby needs, despite the concerns of many mothers who worry about poor milk production. There are several techniques to determine whether your infant is receiving enough milk. There are methods you can use […]

How to buy bonds. It’s not as difficult as it might seem to purchase bonds. But before you buy, you must understand the various varieties and know what to look for in a bond. One option to invest is through bonds, which involve lending money to a government or firm rather than purchasing stock (like […]

How to answer tell me about yourself. The interview question “Tell me about yourself” may seem frightening, but it doesn’t have to be. Here are our top suggestions for a terrific response. When asked in an interview, “Tell me about yourself,” it can be challenging to respond if you are unprepared. Finding a job can […]

How to uninstall apps on mac An app can be deleted or uninstalled from your Mac in order to free up storage space for other things. Launchpad or the Finder are two options for doing this. Use Launchpad to delete apps that were downloaded from the App Store Launchpad offers a convenient way to delete […]

How to Unblock a Number on an Android Phone Here’s how to restore calls and texts from a blocked number on an Android device: Get the Phone app open. The More icon, which resembles three vertical dots, should be tapped. Select Blocked Numbers under Settings. The contact you want to unblock has an X next […]