


How to draw
How to draw for beginners
Start drawing figures instead of stick figures.
Early childhood education is often associated with crayons and sketching, but many people lose interest in it as they become older. Some people are interested in it, although it tends to wane over time due to the misconception that drawing is a natural talent. You either have it or you don’t. Actually, it’s an acquired ability that takes years of constant practice to develop. If you are passionate and dedicated, you can turn your talent for making notes in the margins into a serious drawing practice.
Draw inspiration for drawing activities from the environment.
Drawing has to begin somewhere, and you can do so by taking a sketch of your immediate surroundings.
“Draw what’s in front of you. No matter what you do, your act of trying to capture what’s in front of you will help,” editorial artist Chris Kindred says. “Every single bit of effort counts. There is no such thing as wasted effort in drawing.”
You are surrounded with models you can utilize to perfect your talents, from flowers to figures, whether it’s a puppy at the park or a fellow traveler on the metro. To practice whenever you want, Kindred advises carrying a sketchbook with you wherever you go. You may also use a tablet for digital on-the-go sketching.
“Every single bit of effort counts. There is no such thing as wasted effort in drawing.”
“Do life drawing. A lot of cities and colleges offer classes to the public that are actually really cheap,” artist Mildred Louis says. “It’s a good idea to understand what goes into building that structure. The more you understand proportions, the better you can mess around with them if you want to go super stylistic or more realistic — build that basic foundation first.”
4 ways how to draw
Things You Should Know
- Before learning to shade a shape and add depth, practice drawing simple lines. Learn about perspectives, contour sketching, and proportions using a grid.
- Draw a broad oval to represent a face, then cross it to represent its features. The rest of the body should be drawn by first sketching broad strokes, then adding details.
- To sketch a landscape, use reference photos. Draw the horizon line first, then a focal point, and finally the perspective of the landscape.
- Learn several drawing techniques, such as cartooning and still-life drawings, or just draw your favorite animal to practice included details in your artwork.
Method 1. How to Practice General Drawing Techniques
1. Start by tracing simple curves and lines. If you’re just learning how to draw, begin by carefully drawing a straight line across the sheet with the pencil. To determine which angle provides you the most control over the pencil and which feels most comfortable, experiment with holding your hand at various angles. Once you are confident drawing straight lines, try practicing sketching curves by twisting your wrist as you draw. Try drawing a sequence of thick loops on the paper, followed by a layer of fine swirls. Your hand-eye coordination will improve as a result, enabling you to produce the desired effects on the page.
- Practice drawing lines with various widths, densities, and textures. Make an effort to create wavy, zigzag, and tangled, scribbly lines.
- Draw several forms after you feel at ease with lines and curves. Try packing circles, squares, or triangles—or any other two-dimensional shape—onto a page, for instance.
- Visit How to Draw Neat Lines for further details on how to draw a straight line.
2. By adding shading to a shape, depth can be created. On your page, doodle a straightforward shape—perhaps a circle—and include a fictitious source of light. The parts that are farthest from your light source should be gently shaded with a pencil, while the area that is closest to the light source should remain un-shaded. The shading should be increased until it gently fades. You have a gradient where the values get lighter as you get closer to the light source and get darker as you get farther away from the light source.
- Consider the possibility that a lamp is shining downward from the page’s upper left corner. If so, your shape’s top-left corner would be completely shadeless. Add some light shading just below that, then move on to really deep shadows in the bottom right corner of your page.
- To soften your shadows, try blending them using your finger, an eraser, or a cloth.
- Visit How to Shade Drawings to find out more about shading. More sophisticated shading methods are covered in How to Cross-Hatch and How to Stipple.
3. Use cast shadows to give an object a sense of reality. Draw a shadow on the side of the object that is not facing the light source after visualizing your light source. Although it could be longer or shorter than the object itself depending on how close or how far away the light source is, the shadow should have the same shape as the object. [4]
- For instance, if you place a bowl of fruit on a table, the fruit will also throw a shadow inside the bowl as well as shadows on the table and the floor.
- For a more realistic appearance, blur the edges of the shadow using your finger or an eraser.
- To find out more, visit How to Draw a Shadow!
4. If you need assistance with proportions, draw a grid on the page. Create a grid on your paper by drawing many regularly spaced vertical and horizontal lines if you’re drawing something from a source image. the identical lines on your source image after that.
Copy each square from the source image into the corresponding square on your paper after carefully studying it. The final image you create must match the original in scale!
- To create a 4×3 grid, for instance, you might draw 3 vertical lines and 2 horizontal lines.
- It’s acceptable if the squares on your source image and your paper are different sizes. As you duplicate the image that you see in each grid, you will inevitably modify the size. This method is frequently employed to resize a drawing.
5. Using perspective, demonstrate the dimensions of an object. Draw a horizontal line across your paper to represent the horizon to begin practicing perspective. Create a little dot along the line. You will disappear at this point. Then, make two angled lines that converge at the vanishing point and extend all the way to the bottom of the paper. This might stand in for a train track, a road, a creek, or any other kind of walkway. The vanishing point will appear to be very far away, while the path’s broadest section near the bottom of the page will appear to be closest to you.
- According to perspective, nearby things appear to be larger than distant ones. While more intricate drawings could have two or even three vanishing points, simpler perspective paintings just have one.
- Your shading and cast shadows will look more realistic if you have a solid understanding of perspective.
- Visit How to Draw Perspective to discover more. A different method of learning about perspective is to read How to Draw a 3D Box.
6. Construct a piece using several shapes. Once you’ve learned the fundamentals of drawing and coloring forms, you can break down more complicated objects into simpler shapes to draw them. Try to sketch out the basic shapes that make up whatever you’d like to draw, such as a human figure, an automobile, or your hand.
- You can practice by drawing the various forms directly on an image, such as a picture from a magazine or newspaper. Take a photo of an automobile, for instance, and draw the tires’ circles, the windshield’s rectangle, and other details.
- After roughing out the shapes that will make up your image, add shading to give them dimension.
- Connect the various shapes with lines to form a cohesive whole to give your drawing a more polished appearance. The various forms that you drawn in can then have their outlines removed.
7. Consider drawing contours. Drawing contours is a practice that teaches you how to make intricate, realistic outlines. Choose an object to draw, then while drawing it, use your eye to trace the outline of the thing. Instead of focusing on the hand that is drawing, try to keep your eyes as much as you can on the item you are sketching. Just attempt to capture the general shape of whatever you’re looking at on the paper, and don’t worry if the drawing isn’t flawless.
- Try a continuous contour drawing as a game; try to connect all the outlines of what you see without taking your hand off the paper or going over what you’ve already sketched.
8. To keep your drawing proportionate, sketch out your design first, then add details. Don’t stress about the finer points right immediately when converting a sketch into a final drawing. Fill in the fundamental shapes and values first, then clean up your drawing as you go and add details. Early attention to minute details runs the risk of making one area of your drawing excessively large or too little, which will throw the composition out of balance.
If you’re drawing a flower, for instance, you might begin by tracing the contours of the petals and stem. After completing it, you might begin including details like the flower’s center and the arcs of its leaves and petals. Finally, you would add shading and any remaining minute details.
Method 2. How to Draw People and Faces
1. To draw a person’s face up close, draw a huge oval and a cross. Draw an upside-down egg with a top and bottom that are slightly different sizes. The oval should then have a faint vertical and horizontal line drawn through it.
- You can use these lines to balance the face’s proportions. Since you don’t want them to appear in the final image, only barely sketch them in.
- Read How to Draw a Face for additional information.
2. Draw a rough drawing of the person’s face using the lines. Place the nose roughly midway between the eyes and the bottom of the chin and draw the person’s eyes along the horizontal line. Draw eyebrows above the eyes, then add the ears so that the tops of the ears match the eyebrows and the bottoms of the ears match the nose.
- Place the mouth on top of the imaginary line that runs from the chin to the bottom of the nose.
- From here, you can add shading, additional details, and details like the person’s eyelashes, pupils, and hair.
- Once you’re done, remove the vertical and horizontal lines.
3. To create the head’s silhouette, place a circle on top of a trapezoid. If you draw the outline of a skull when drawing someone from a distance, the image will appear more lifelike. To do this, first draw a circle, then slightly below the circle, draw a short horizontal line. By drawing angled lines from the circle’s sides that descend to meet the horizontal line, you may create the jawline.
- Males typically have a wider jawline, whilst females typically have a narrower chin.
- As you add details to the subject’s face, you may still use the crossed directional lines from the close-up design to help you maintain proportion.
- To prevent them from showing up in your final drawing, draw these lines gently.
4. To build the core of the human, draw an oval and a rounded rectangle. Make a long rectangle that will serve as the person’s torso just below the head. If the person is thin, make the rectangle very small; if they are large, make the rectangle wider. Next, draw a horizontal oval overlaying the rectangle’s base. These are the individual’s hips.
- Draw a thin rectangle from the subject’s head to their core if their neck will be seen in the image.
- The rectangle should be perfectly up and down if the individual is standing stationary. To indicate that someone is leaned over or moving, such as someone sprinting, tilt the rectangle slightly or dramatically if they are leaning somewhat.
5. Draw the person’s limbs using circles and straight lines. Each component of the person’s limbs, such as the upper and lower arms and legs, should be represented by a straight line. After that, make little circles wherever on the subject’s body where they flex, such as their shoulders, knees, elbows, and wrists.
- Since they are only there to aid in your ability to picture the person’s body, draw the lines and circles very loosely. After you’ve added detail to the drawing, you’ll remove them.
6. After you’ve sketched out the person’s body, add clothing and other details. It’s time to add detail after you’ve sketched the person’s outline. You can now sketch the specifics of their face, along with aspects like their hair, clothing, and hands, if you haven’t before.
- Just keep in mind that the farther away someone is, the less information you need to provide. If you’re drawing a huge group of individuals, concentrate on the silhouettes.
- Read How to Draw Clothing, How to Draw Realistic Hair, How to Draw Shoes, and How to Draw a Hand for additional pointers on adding details.
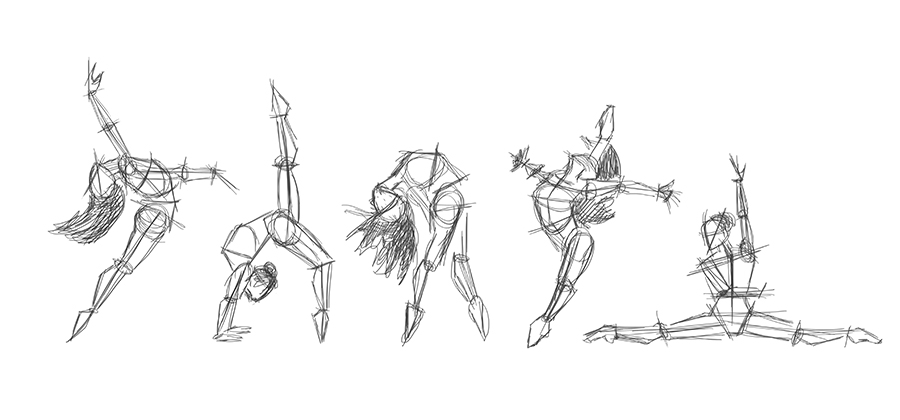
7. To capture the spirit of positions and motions, try drawing gestures. A gesture drawing is a simple sketch that expresses form and motion. To capture the shapes and movements you perceive, start by doing several very short sketches (for example, in 30 to 60 seconds) with just a few basic lines. Maintain loose, sketchy, and curved lines. Instead of neat and polished, the goal is to produce something that seems dynamic and natural.
- Try drawing a line through the middle of the human form, from the top of the head to the weight-bearing foot, if you’re sketching one. Create the rest of the figure around it, adding more lines to represent the hips’ and shoulders’ angles.
- Don’t worry about correctness or specifics; just keep your hand moving.
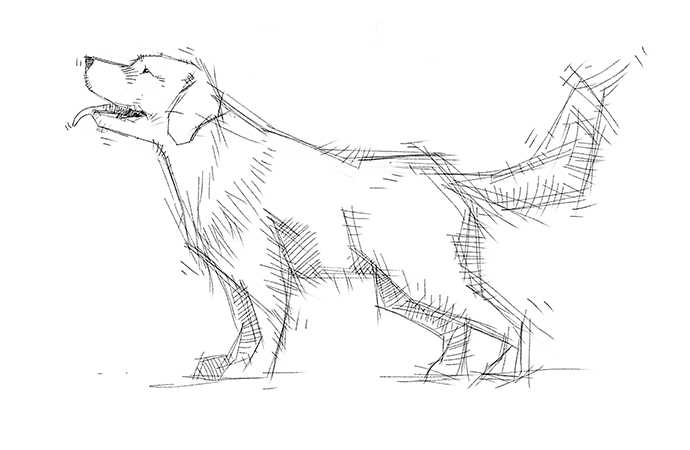
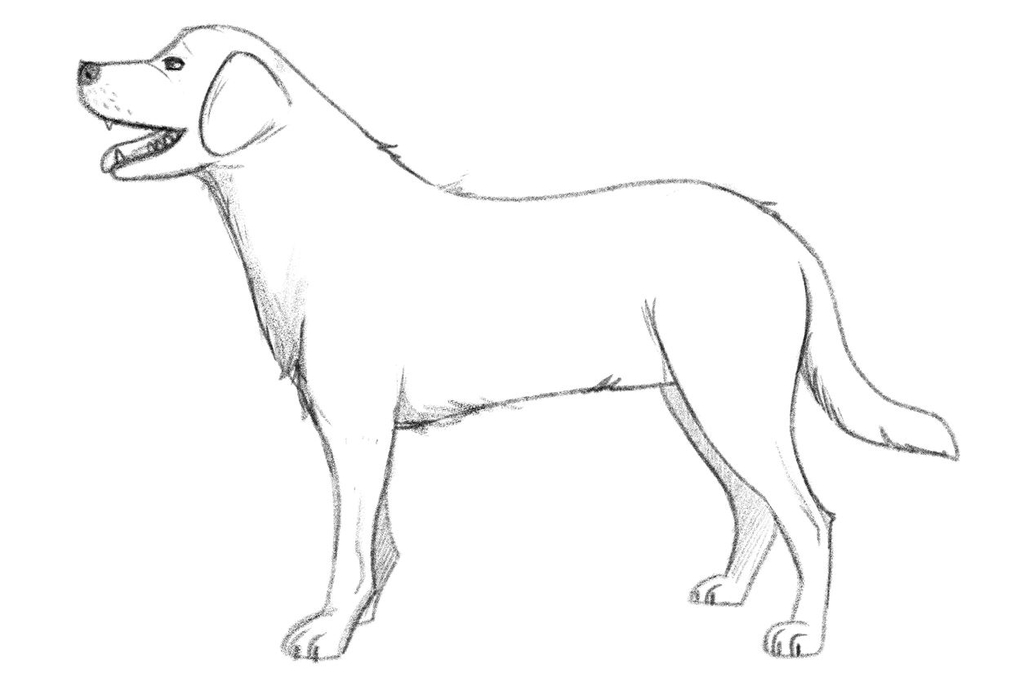
How to draw a dog
Despite how adorable they are, drawing dogs may be difficult.
We understand if you can’t accurately depict the size and shape of their physique. And we can assist!
You can learn how to draw a cat and a horse from our earlier classes. Let’s now add to your animal kingdom or add a new sidekick to your comic book character! We’ll walk you through a few basic steps on how to draw a dog.
An expert artist demonstrates how to draw a dog.
We requested the lead BioWars artist, Gonçalo Lopes, to provide a user-friendly video lesson to demonstrate how to design a dog step-by-step.
He guides you through the steps involved in drawing a dog, starting with sketching the general outline and body outlines before adding finer details and shading.
Before you begin, keep in mind to go slowly and not obsess about producing the ideal drawing on your first try. To perfect the art of drawing a dog, be kind to yourself and put in as much practice as you can.
Have you read the BioWars comic book while we’re talking about art? It explains the conflict between the immune system’s fighters (known as BioWarriors) and microorganisms that put its security in danger. The cartoon illustrates the extremes to which the BioWarriors must go in order to protect us because the conflict actually occurs daily in each of us.
To allow you to study the video instruction at your own pace, let’s now divide it into various parts.
How to draw a dog
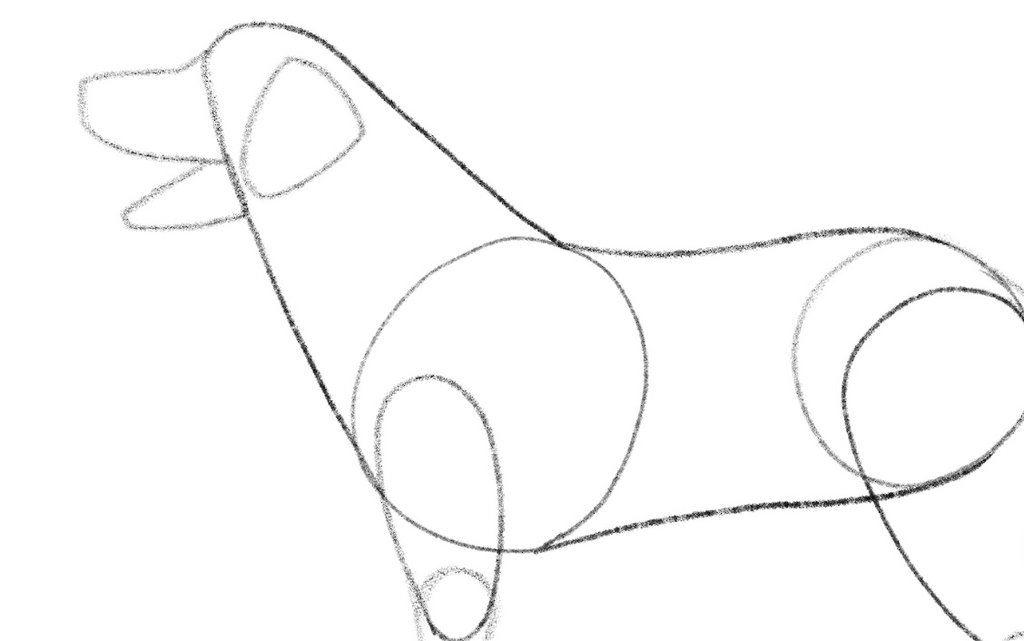
1. Draw The Base Of The Dog’s Body
Many individuals have a tendency to start at the head when painting a dog. However, if you’re just starting out, you could find it challenging to obtain the head shape straight away.
We’re going to streamline the procedure because of this, so stop sketching the head just yet!
Let’s choose the perspective from which we will sketch the dog before you begin.
For novices, it is simplest to master the side angle, thus we advise you to choose it like Gonçalo.
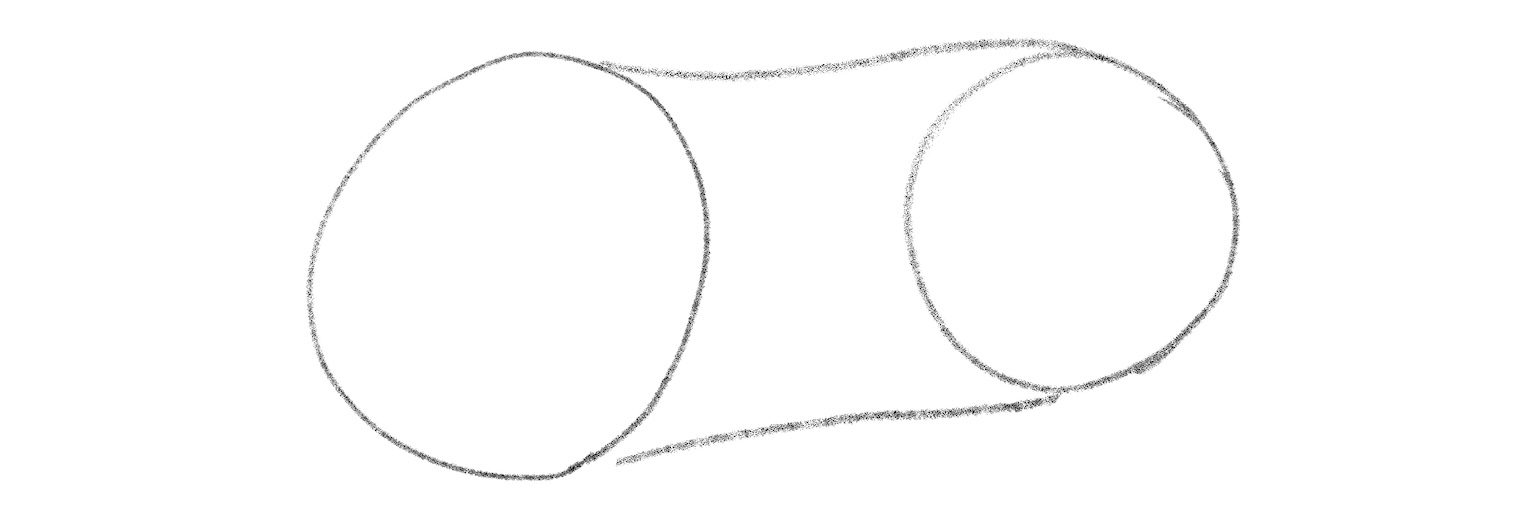
Sketching the framework for a dog’s body is the first step in sketching one.
Those are two circles, as shown here:
The circle on the left-hand side is larger because the dog in our illustration is tilted to the left.
The dog’s chest will be there.
The tips of both circles should coincide, but the circle on the right should be smaller.
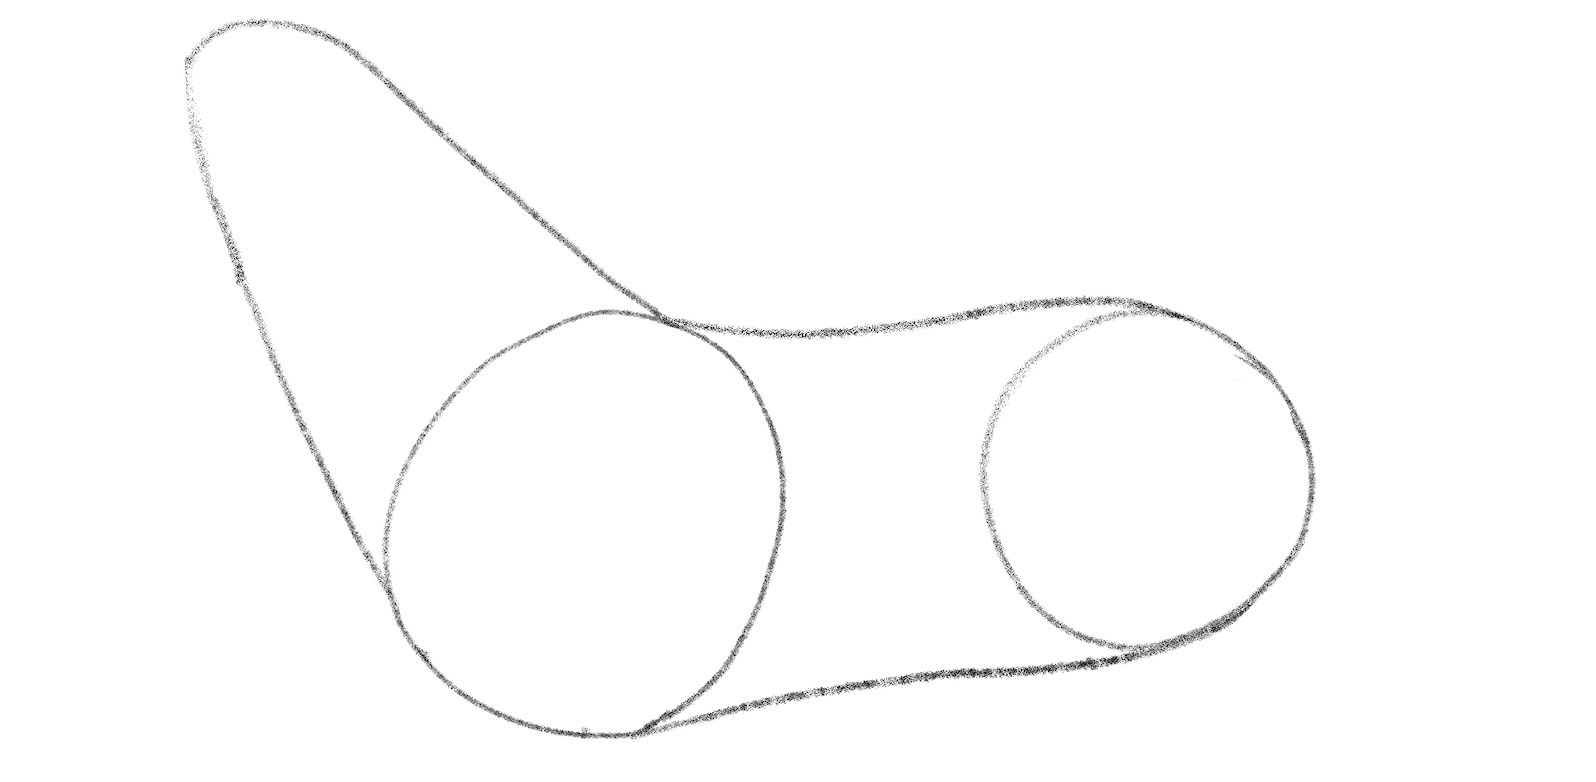
2. Connect The Circles To Create The Torso
Now let’s join the two circles you previously drew together.
The dog’s back is located along the line that links their tops.
You may obtain the dog’s tummy by joining the bottom two circles:
You completed sketching the canine’s torso in just four easy lines!
3. How to draw Draw The Neck a dog
It’s time to draw the dog’s neck after you’ve finished designing its torso.
Draw a line that rises from the dog’s chest and down toward its rear.
Consider the dog’s neck’s length when presenting this stage.
Observe the length of the dog’s torso to make sure it isn’t excessively long or short; the neck should be a little shorter, like this:
4. Outline The Upper Arm And Upper Thigh
The dog’s top arm has the shape of a loaf of bread. Draw a single, adorable loaf, covering almost two-thirds of the front circle.
The rear circle should be mostly covered by the upper thigh’s shape. Again, don’t worry about drawing the ideal shape since we’ll show you how to adjust it and make it appear more like a dog leg later:
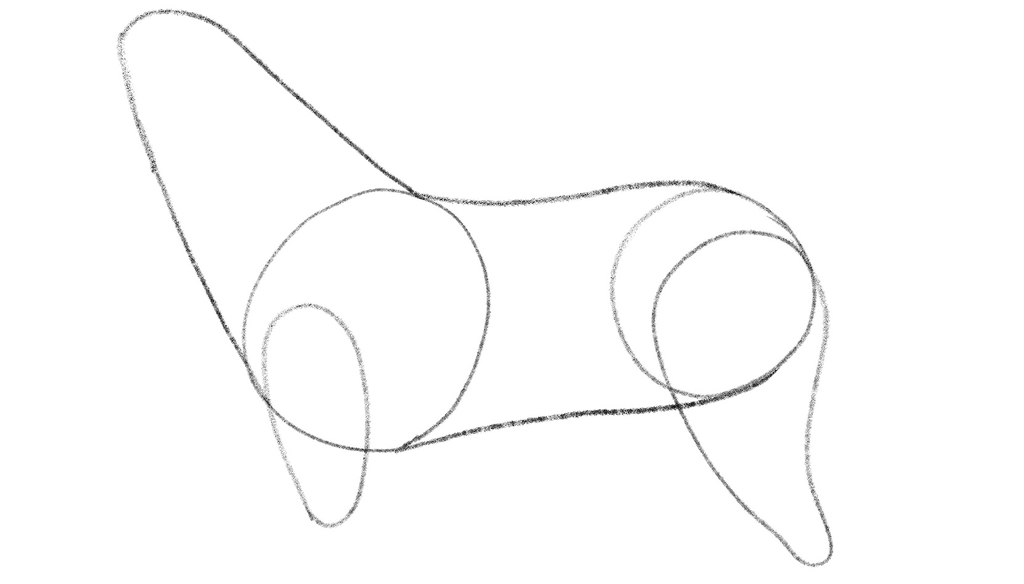
5. How to draw a dog: Sketch The Head
The dog’s forehead, snout, lower lip, and its flews (which is just a fancy word for the dog’s top lip!) will now be illustrated.
Once more, Gonçalo used basic lines and curves to depict various body components. The jaw is open because every dog almost always looks at you with their mouth open in adoration (orrr the food).
The lower lip has a triangular shape with a gentle point.
Draw the forehead first, then extend that line towards the lips while creating the upper lip and muzzle.
6. Add The Dog’s Ear
You can only see one of a dog’s ears because you’re drawing it from the side.
Although this varies naturally based on the breed and the dog’s attitude, many dogs have triangle-shaped ears. For instance, a dog in a defensive posture will typically perk up its ears, making them stick out and appear more menacing than usual.
The dog’s ear is drooping because Gonçalo is depicting a contented, good puppy:
Although this ear doesn’t quite like a triangle and has a rounded tip, it does.
7. Outline The Forearm, Lower Thigh And Tail
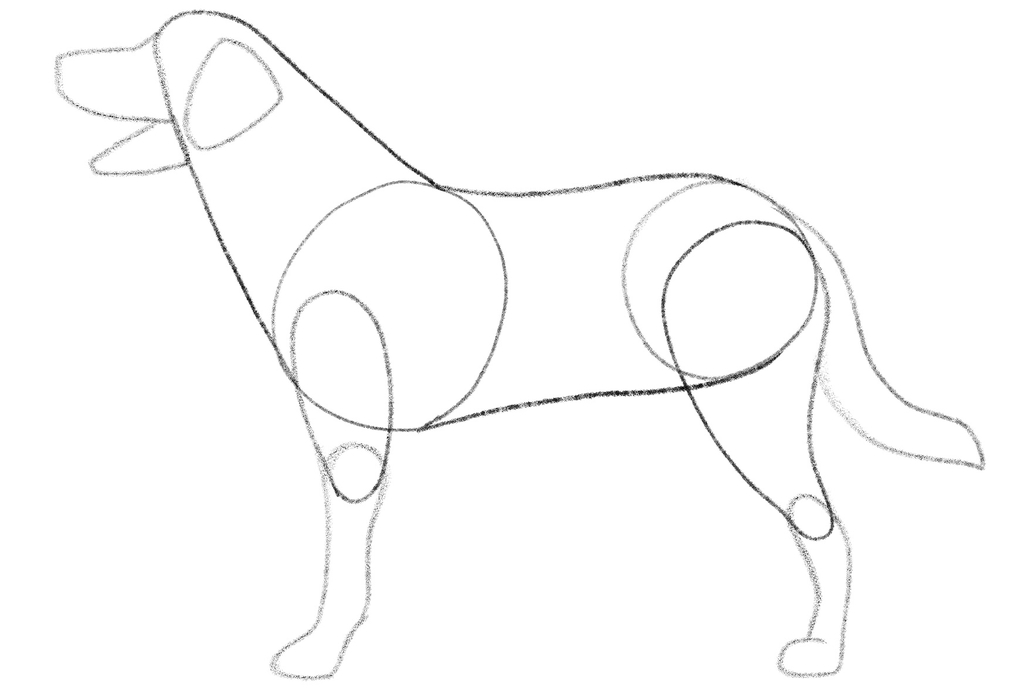
Gonçalo delicately crossed the dog’s upper arm and upper thigh with his forearm and lower arm. That’s because the dog’s joint is located where the two portions of its leg overlap, like in the following:
Give this dog a tail right now!
Again, a dog’s tail size and form vary by breed; nonetheless, we chose a somewhat longer tail in the Labrador manner.
And with that, the basic framework for a dog drawing is complete!
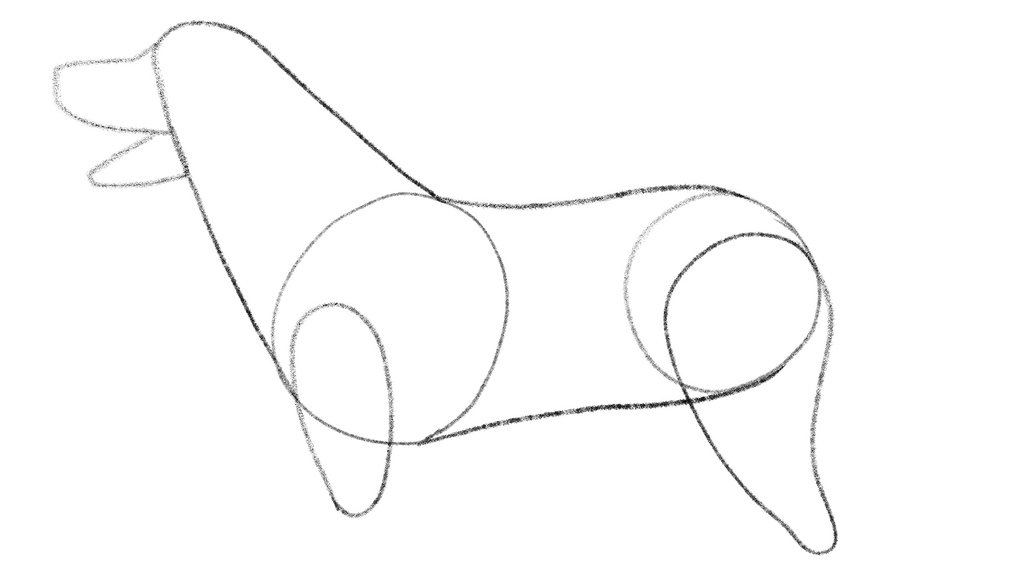
No, let’s give the dog’s head a little more information.
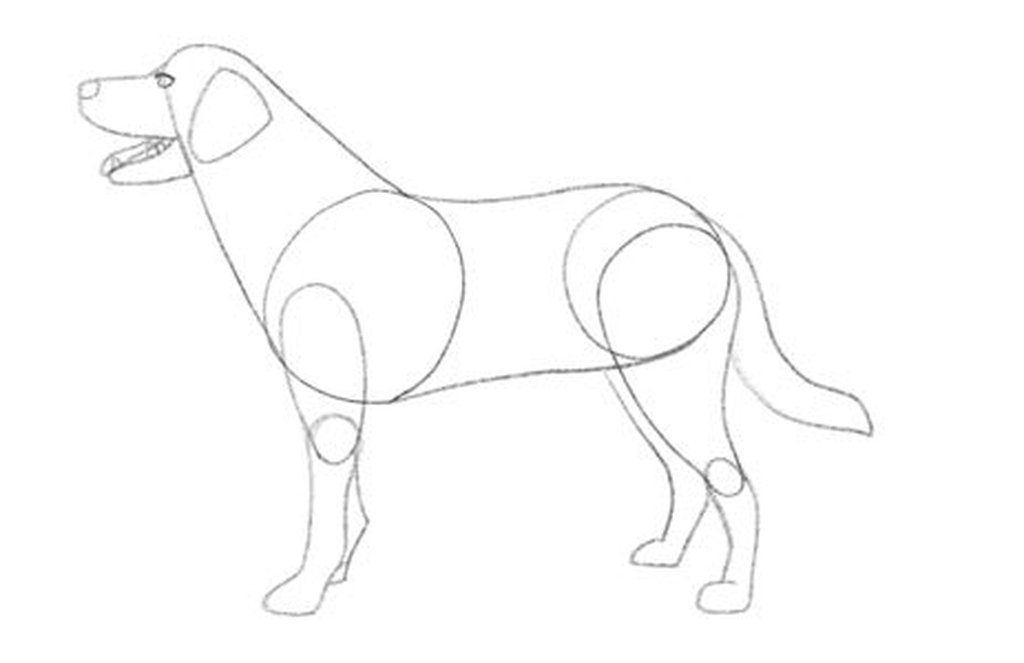
8. Outline The Dog’s Eyes, Nose And Teeth

It’s time to add the dog’s eyes, nose, and teeth in order to give it life.
Did you know that dogs have three eyelids, by the way? Under the two eyelids we all know are there, there is an additional eyelid that serves as protection and moisture retention for the dog’s eyes.
If you want to lessen the sharpness of an eye, then create an oval shape for it, then add more angle to the dog’s lower eyelid.
You can draw a circle for the canine’s boop-y nose.
Also possible are a few teeth. For instance, you may highlight a few premolars and molars as well as the canines.
Oh, and remember to draw your tongue!
Dogs usually often have theirs slightly turned out, and the illustration by Gonçalo is no exception!
9. How to draw a dog: Draw The Forearm And The Thighs On The Other Side
You should now add the second set of dog legs.
Only a small portion of the dog’s right leg is visible because it is being drawn with its head inclined to the left.
Gonçalo’s drawing shows how the left thigh is somewhat more noticeable and the right forearm just barely peaks in the back.
10. Start Shading
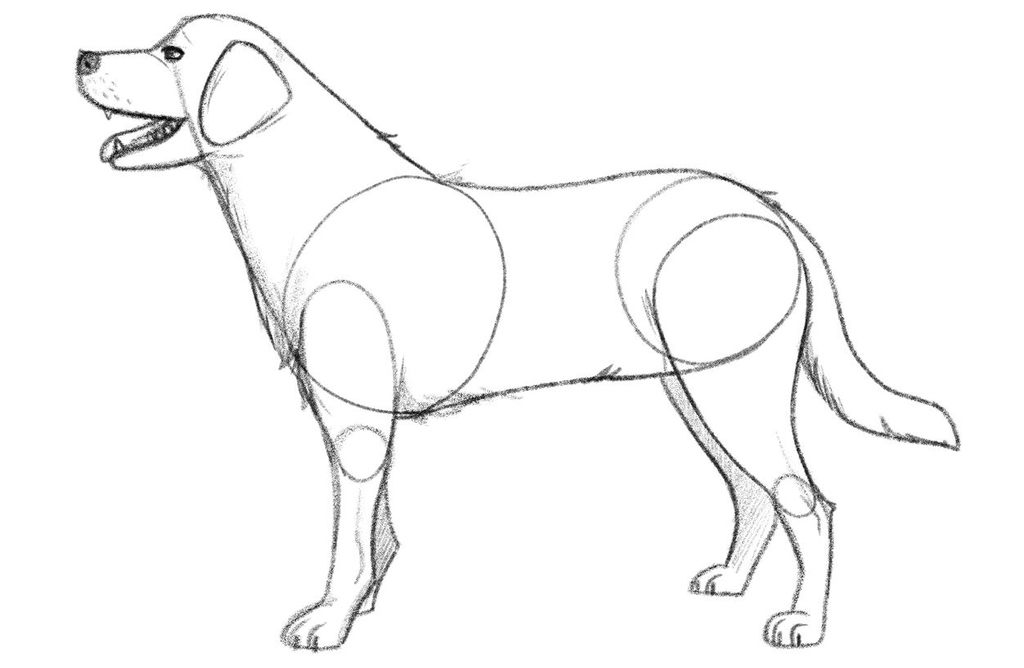
You’re nearing completion of your drawing now!
It’s time to add some final touches to the illustration now that the outline is complete and all the details are included.
To make the shape of the dog’s body darker and more distinct, take a 4B pencil and press down on it.
Don’t forget to shade the dog’s chest and belly even though the shade is primarily falling on its right forearm and thigh!
11. Add The Dog’s Hair
How about including hair in your drawing of a dog to make it seem more realistic?
Feel free to scribble a few brief zigzags on the dog’s neck, back, and tummy.
Then, draw a few dotted lines for the whiskers and add the pupil and nostril.
Don’t forget to include two lines to depict the dog’s wrist and hock, too!
Its legs and limbs will appear lifelike if you do this.
Draw two brief lines on each paw of the dog to represent the fingers. After that, create even shorter, darker nail lines!
12. Eliminate Extraneous Information
Getting rid of the components we no longer require is the last stage in designing a dog.
Take your kneaded eraser, and gradually erase all sketch lines until the finished product resembles this:
How to draw a rose
How to draw a rose. In reality, these flowers are just a few straightforward forms, thus sketching roses will take you no time at all.
Roses are such lovely flowers, and using this step-by-step drawing instruction makes it simple. It makes floral painting simple and is ideal for novices.
The tutorial also includes a printable guide at the end.
Take this template with you so you can start practicing wherever you are.
Visit our watercolor and pencil classes for further tutorials featuring additional flowers.
You must follow the VERY DETAILED instructions in this guide. They are incredibly easy to use and many beginners have tried them. They were pleased with the outcome.
Let’s gather our supplies:
You’ll need a few things, like these. Supplies ARE important, so be sure you have them.
- Sketchbook: Canson and Arteza are two of our favorite manufacturers.
- Penicle: Arteza has a wide selection at reasonable prices. also excellent, Artzmore
- Eraser: In order to correct all of your mistakes as a beginner, a decent eraser is essential. Acurit is a smooth, 4-in-1 eraser that also removes colored pencil and charcoal. a need!
How to Draw a Rose Step By Step for Beginners Easy:
Step 1: Commence with the Rose Outline

To properly fit our drawing of a rose on the piece of paper, let’s start with some simple shapes.
Create a polygonal form. This shape aids in planning the page’s layout. The flower needs considerable room if it is open.
Next, sketch the stem and the leaves in broad strokes.
Step 2: Include a rosebud with the rose.

Draw the rosebud’s outline first. Where the flower’s center will be is where it will be.
Draw using really fine lines to make it simpler to later refine shapes.
Step 3: Sketch the First Petal
Then, begin tracing petals from the bud’s center. The first one is shaped like a semicircle.

Step 4: Increase the Rose’s Petals by Two.
It is covered by the second, and they are both covered by the third.

Step 5: Begin Adding Additional Petals.
Add petals gradually, moving them in a light overlap around the rosebud.

Pay special attention to the reference photograph and note how things appear, not how you imagine they seem.
Step 6: Expand the Rose’s Petals
To better comprehend the shape of the petal, mark its central line. You can create the flower’s volume in this manner.

It will boost the rose’s perspectiveal appearance.
Step 7: Add petals from the bud’s center.

Add petals gradually, moving them in a light overlap around the rosebud.
Step 8: Insert Bigger Petals Bigger petals should be added with a slight bend outside the bud.

Make the lines less straight and a little wobbly to give them a more organic appearance.
To better comprehend the shape of the petal, mark its central line. petals’ bottoms bend even further.
Step 9: Clean Up and Erase
Removing extra lines. Outline the stem and leaves with greater detail and accuracy. Before shading, use the eraser to make all of the lines slightly lighter (if you want to shade.)
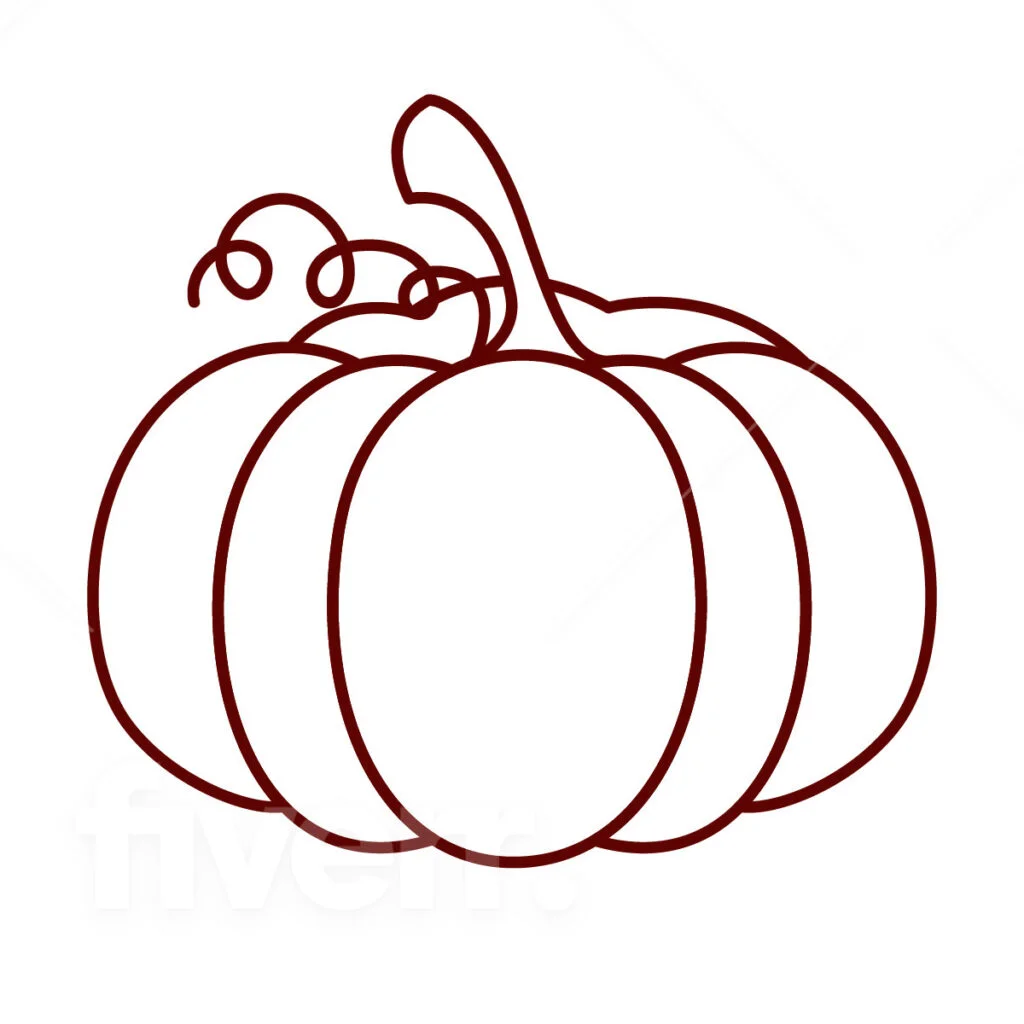
How to draw a pumpkin
If you’ve never drawn one before, drawing a pumpkin might seem difficult, but once you get going, I can assure you that it’s really quite easy. You only need some curved lines and an eraser in case you make a mistake. Although using a pencil is the simplest method, you might also enjoy drawing with markers. To draw the ridges and stem of the pumpkin, follow these step-by-step directions.
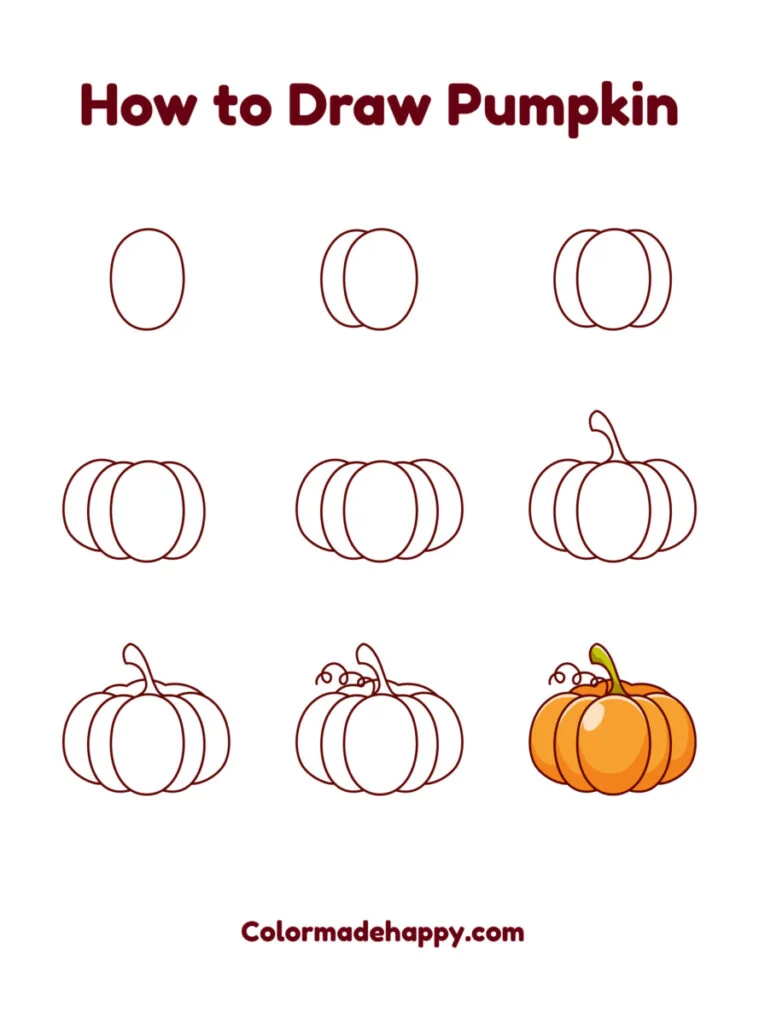
Step by Step Pumpkin Drawing Instructions
Step 1.
On your page, start by drawing a vertical oval.

Step 2
Next, on the left side of your oval, draw a semicircle from the top to the bottom.

Step 3
From the sop to the pumpkin’s base on the right side, draw a second semicircle.

Step 4
Repeat these steps on either side of the pumpkin, but this time make sure the semicircle is a little higher than the previous one to add depth behind the pumpkin. These will result in the pumpkin’s ribs.

Step 5
The top of the pumpkin will now have a stem attached to it. The stem can be round, oblong, or any other shape in between.

Step 6
The back of the pumpkin will now be formed by adding a wavy, bumpy addition behind the stem.

Step 7
If your pumpkin still has any vines on it, draw a sweet little squiggle at the base of the stem to represent them. You could even add some leaves to the stem if you’d like.
Step 8
Then, use markers or colored pencils to finish coloring your pumpkin. You could even draw your pumpkin on watercolor paper and color it with watercolors. While orange is the traditional pumpkin color, with this simple tutorial, you can make a whole colorful pumpkin patch with pumpkins of all different colors. carving a pumpkin.


How to negotiate salary. It’s not unexpected that many people find it difficult to request higher pay once their job hunt is over and they are in possession of an offer. They don’t want to risk the opportunity now that they’ve made it this far, especially if the pay is fair. However, as the 2023 […]

How to increase milk supply. Most of the time, even if you are unaware of it, your body produces just what your baby needs, despite the concerns of many mothers who worry about poor milk production. There are several techniques to determine whether your infant is receiving enough milk. There are methods you can use […]

How to buy bonds. It’s not as difficult as it might seem to purchase bonds. But before you buy, you must understand the various varieties and know what to look for in a bond. One option to invest is through bonds, which involve lending money to a government or firm rather than purchasing stock (like […]

How to answer tell me about yourself. The interview question “Tell me about yourself” may seem frightening, but it doesn’t have to be. Here are our top suggestions for a terrific response. When asked in an interview, “Tell me about yourself,” it can be challenging to respond if you are unprepared. Finding a job can […]

How to uninstall apps on mac An app can be deleted or uninstalled from your Mac in order to free up storage space for other things. Launchpad or the Finder are two options for doing this. Use Launchpad to delete apps that were downloaded from the App Store Launchpad offers a convenient way to delete […]

How to Unblock a Number on an Android Phone Here’s how to restore calls and texts from a blocked number on an Android device: Get the Phone app open. The More icon, which resembles three vertical dots, should be tapped. Select Blocked Numbers under Settings. The contact you want to unblock has an X next […]