


How to knit
How to knit. Do you want to pick up knitting? In that case, you’ve found the proper site!
The idea of picking up needles and yarn may seem scary if you are a new knitter. Be at ease, though! We assure you that it’s not as challenging as it seems. In fact, knitting can be enjoyable and calming once you get the hang of it.
We will show you how to knit from scratch in this manual. We’ll go over all the fundamentals, such as how to cast on and bind off stitches, how to knit, and how to hold your needles and yarn. After reading this article, you will be prepared to begin knitting your very first item. Are you prepared to begin? Move along!
All About Knitting
What is Knitting?
A popular craft that has been practiced for centuries is knitting. In actuality, knitting dates back to Egypt in the fifth century B.C. Today, knitting is a pastime practiced by people everywhere.
Knitting is the process of creating cloth by weaving yarn through interlocking loops on needles. While knitting can be done with a machine or by hand, most hobby knitters like hand knitting.
Knitters can produce a variety of textures, including ribbing, cables, and lace, by combining the two fundamental stitches, the knit and purl threads, in various ways.
Is it easy to learn how to knit?
Yes! It’s not particularly difficult to learn how to knit. Even if you’ve never knitted before, you can pick up the fundamentals in a matter of hours.
Once you master the fundamental stitches, you can make everything from straightforward scarves to intricate sweaters and comforters.
What do I need to start knitting?
Knitting is more accessible than some other crafts. Just some yarn and some needles are all you need to get started. You don’t need many expensive materials.
Other necessary tools like scissors, a tapestry needle, a tape measure, and a project bag to store everything in may also be useful.
What is the easiest thing to learn how to knit?
You will require a pattern in addition to your materials.
If you’re a newbie, start with something tiny and basic, like a dishcloth or scarf made in garter stitch. You can go to bigger and more sophisticated projects once you’ve mastered the fundamentals. For more simple beginner knitting designs, click here.
Let’s move on to the next topic now that we’ve clarified the definition of knitting: how do you knit?
How to Knit: The Basics
Basic knitting techniques will be covered in this part. We’ll start by discussing the knitting materials you’ll require for your first project. After that, we’ll discuss how to handle your yarn and needles, how to work the fundamental stitches, and how to cast on and bind off. All knitting projects are built on the foundation of these basic skills.
Knitting Supplies You’ll Need
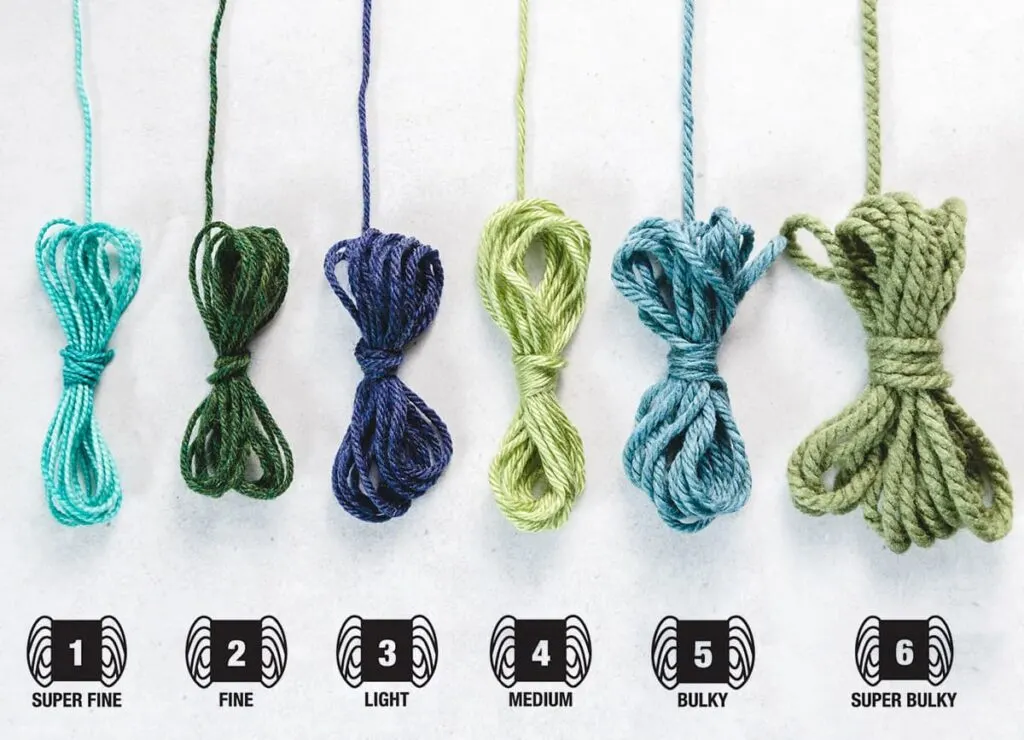
Yarn
Beginners should pick a smooth, light-colored yarn in a medium weight, in my opinion. With this kind of yarn, it will be simpler to see your stitches and monitor your development.
Look for yarn with the designations “worsted weight yarn” or “aran weight yarn” when buying. Another name for this kind of yarn is Category 4/Medium.
In terms of fiber content, I advise beginning with acrylic or wool yarn. Personally, I like wool and wool blends better because they are more forgiving and have a little elasticity. But there are also lots of lovely, inexpensive acrylic choices.
In either case, I would advise you to stay away from the most cheapest yarns because they are frequently scratchy and unpleasant to knit with. You should also avoid novelty yarns with fuzzy fibers and anything that is too lumpy or bumpy.
Knitting Needles
I advise beginners to get a set of straight needles made of bamboo or wood for their initial project. These needles are convenient to use and low in weight. You won’t have to worry about your stitches slipping off because they also have a little bit more traction than metal needles.
Make sure to choose the right size needle for your yarn when you’re shopping. If you want to know what size needle to use, look on the back of the yarn label.
For instance, you’ll probably need a pair of size US 8 (5mm) needles if you’ve decided to use worsted-weight yarn.
As you get experience knitting, you might wish to experiment with different needle kinds, such as stainless steel. However, bamboo or wood will work for the time being.
Stitch Markers
Small rings known as stitch markers are useful for keeping track of your position within a pattern. For your practice swatch, you might not need them, but you’ll need them for your first real project. In most craft stores, stitch markers are available.
Tapestry Needle
A large, blunt needle called a tapestry needle is used to stitch together sections of yarn and weave in loose ends. Most craft stores carry tapestry needles.
Straight tip and bent tip, plastic, and metal tapestry needles are some of the several varieties that are offered. Pick a tapestry needle with a big enough eye to accommodate your yarn when you’re shopping.
Scissors
Last but not least, a pair of scissors are necessary to cut your yarn. Any pair of scissors will work, although you might want to buy a smaller pair of scissors specifically for your craft to keep in your project bag.
Other Supplies
A tape measure to measure your swatch, a notebook to record your designs, and a project bag to store everything in are all other basic tools that you can find useful.
You’ve gathered all of your materials and are ready to begin knitting. We’ll show you how to hold your needles and yarn in the following section.
How to Hold Your Needles and Yarn
How should I hold my needles and yarn is one of the most often asked topics by novice knitters. The good news is that there are many different approaches you can take, and you can experiment with them all until you find one that feels natural to you.
Needles
Let’s start with a couple different needle holding positions.
The “overhand approach” is the first option. Hold the needles in your hands palms down as you perform this. Hold the needles in the same way that you would a knife and fork during a meal.
The “underhand approach” or “pencil grip” is the second way to grasp the needles. As though holding pencils, place the needles between your thumb and index finger.
Some knitters alternate between holding the left needle in an overhand grip and the right needle in a modified underhand grip when holding their needles.
The manner you hold the needles actually doesn’t matter as long as you’re comfortable and having fun knitting. Therefore, don’t be hesitant to try different things and see what works for you.
Yarn
It’s time to learn how to hold the yarn now that you know how to grasp the needles. The English manner and the Continental style are the two most popular ways to hold the yarn.

English Style
The English (or American) technique is the first. In this technique, you’ll hold the yarn in your right hand and wrap it around the needle with your right hand.
Because the knitter flicks or throws the yarn in a counterclockwise motion around the needle, the English method is also known as flicking or throwing.
When holding your yarn in the English manner, tension it by passing it through the right hand’s fingers.
Continental Style
The Continental method is the second way to grasp the yarn. This method involves holding the yarn in your left hand and grabbing it with your needle from your left index finger.
Because you use the needle tip to “pick” the yarn from the left index finger using the Continental method, it’s frequently referred to as “picking.”
To tension your yarn while holding it in the English manner, weave it between the fingers of your left hand.
It will take some practice to feel comfortable with this new ability, so keep that in mind as you practice holding your yarn and needles. Even while it could seem strange at first, with a few practice sessions, you’ll acquire muscle memory. Continue forward and eventually things will “click” for you.
Which way should beginners learn how to knit?
The majority of beginners learn to knit in the English way, at least in the US and UK. For beginners, holding the yarn in their right hand may make it simpler to regulate their tension. Additionally, holding the yarn in your right hand can be more natural for you if you are right-handed.
On the other hand, a lot of people believe that the Continental method is a little quicker, particularly while working knit rows. Additionally, whether knitting ribbing or seed stitch, the Continental method makes it simpler to move between knit and purl stitches.
Here are some things to think about:
- You might find it simpler to learn the Continental way of crocheting if you already know how to do it and are accustomed to holding the yarn in your left hand.
- It could be simpler to hold the yarn in your left hand if you are a left-handed person. Many lefties do, however, knit in the English style.
All things considered, knitting technique is a matter of personal taste. I learnt to knit using the English method, and I was content knitting that way up until I discovered the Continental Method. I advise experimenting with both knitting techniques to determine which is more comfortable for you.
You are prepared to begin knitting now that you know how to hold the needles and yarn. You’ll learn how to tie a slip knot and cast on your first stitch in the segment after this one.
How to Cast On
Making your first row of stitches is known as casting on. There are numerous cast-on methods, and each one produces a distinctly different appearance. While some cast-on processes provide a soft and stretchy edge, others produce a solid, durable edge.
We’ll be learning the Long-Tail Cast On in this session. This method can be used for practically all of your knitting projects and is highly flexible.
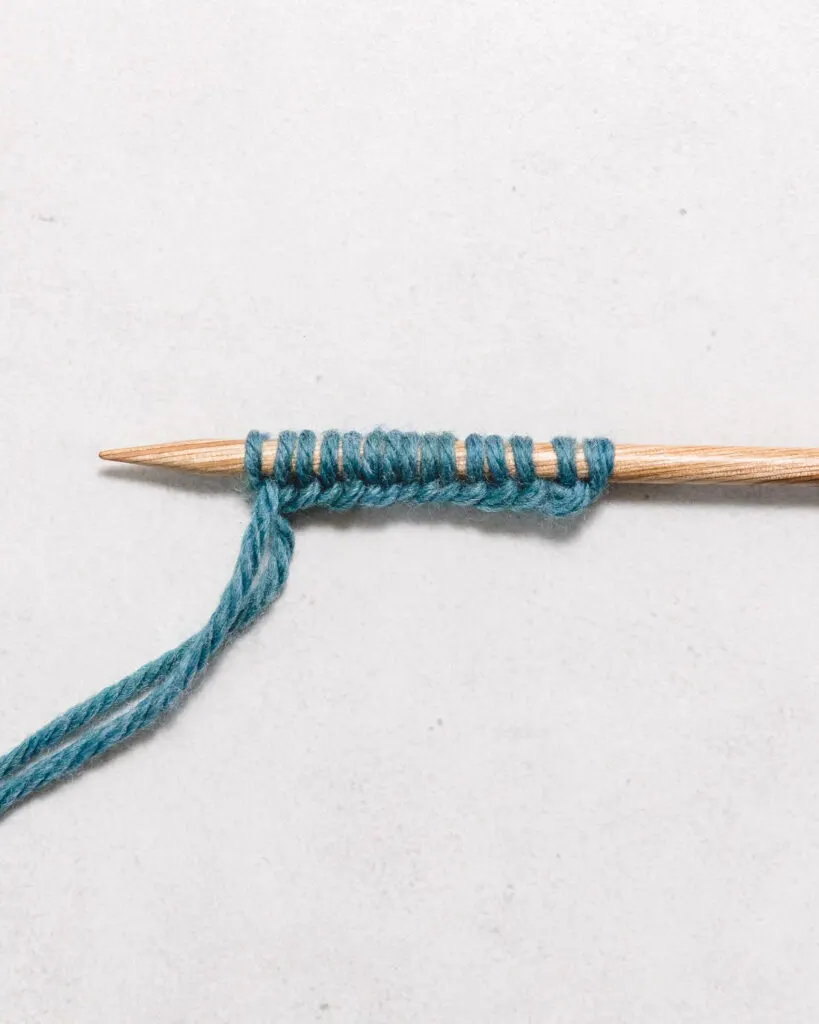
Long Tail Cast On
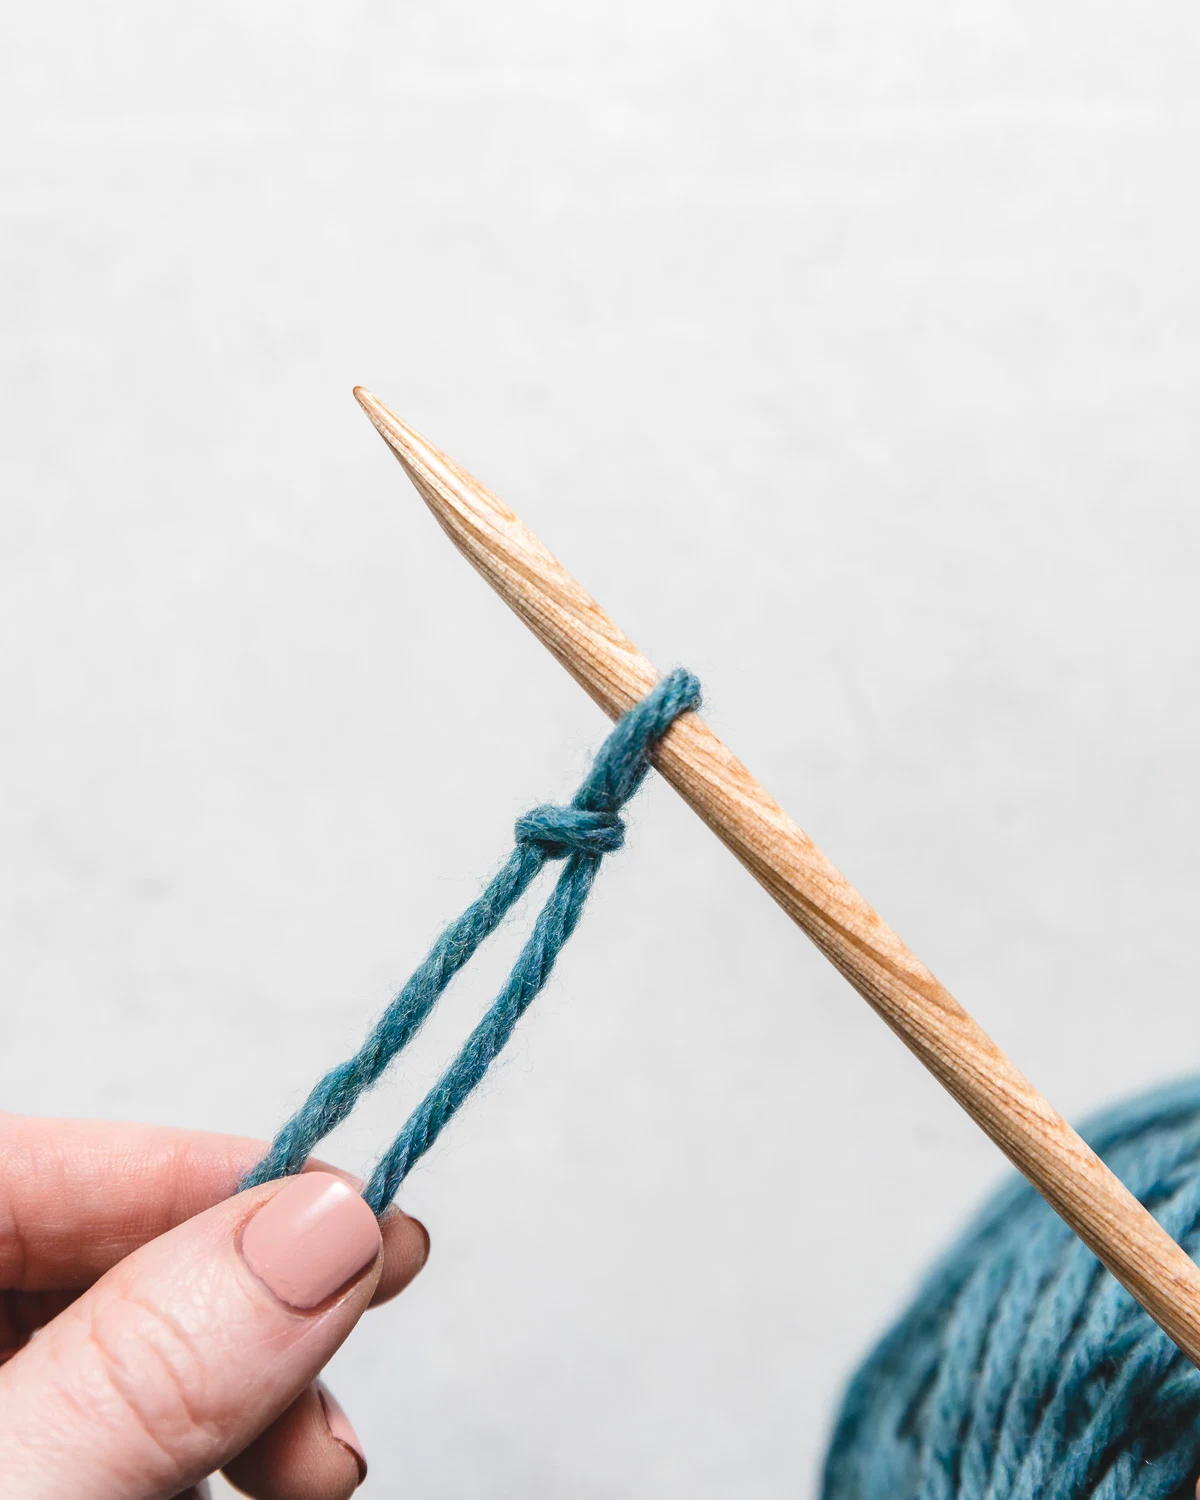
The working yarn, which is the strand of yarn tied to the ball of yarn, and the tail end of the yarn are used in the long-tail cast on, which is done on one needle. The cast on gets its name from this “long tail”
- Measure out a length of yarn that is three to four times the project’s breadth. For instance, measure out a 24-inch piece of yarn if you plan to make a 6-inch practice swatch.
- Make a slip knot next. Create a loop, then tuck the yarn’s tail beneath the loop. Take hold of the tail yarn and tighten by slipping it through the loop.
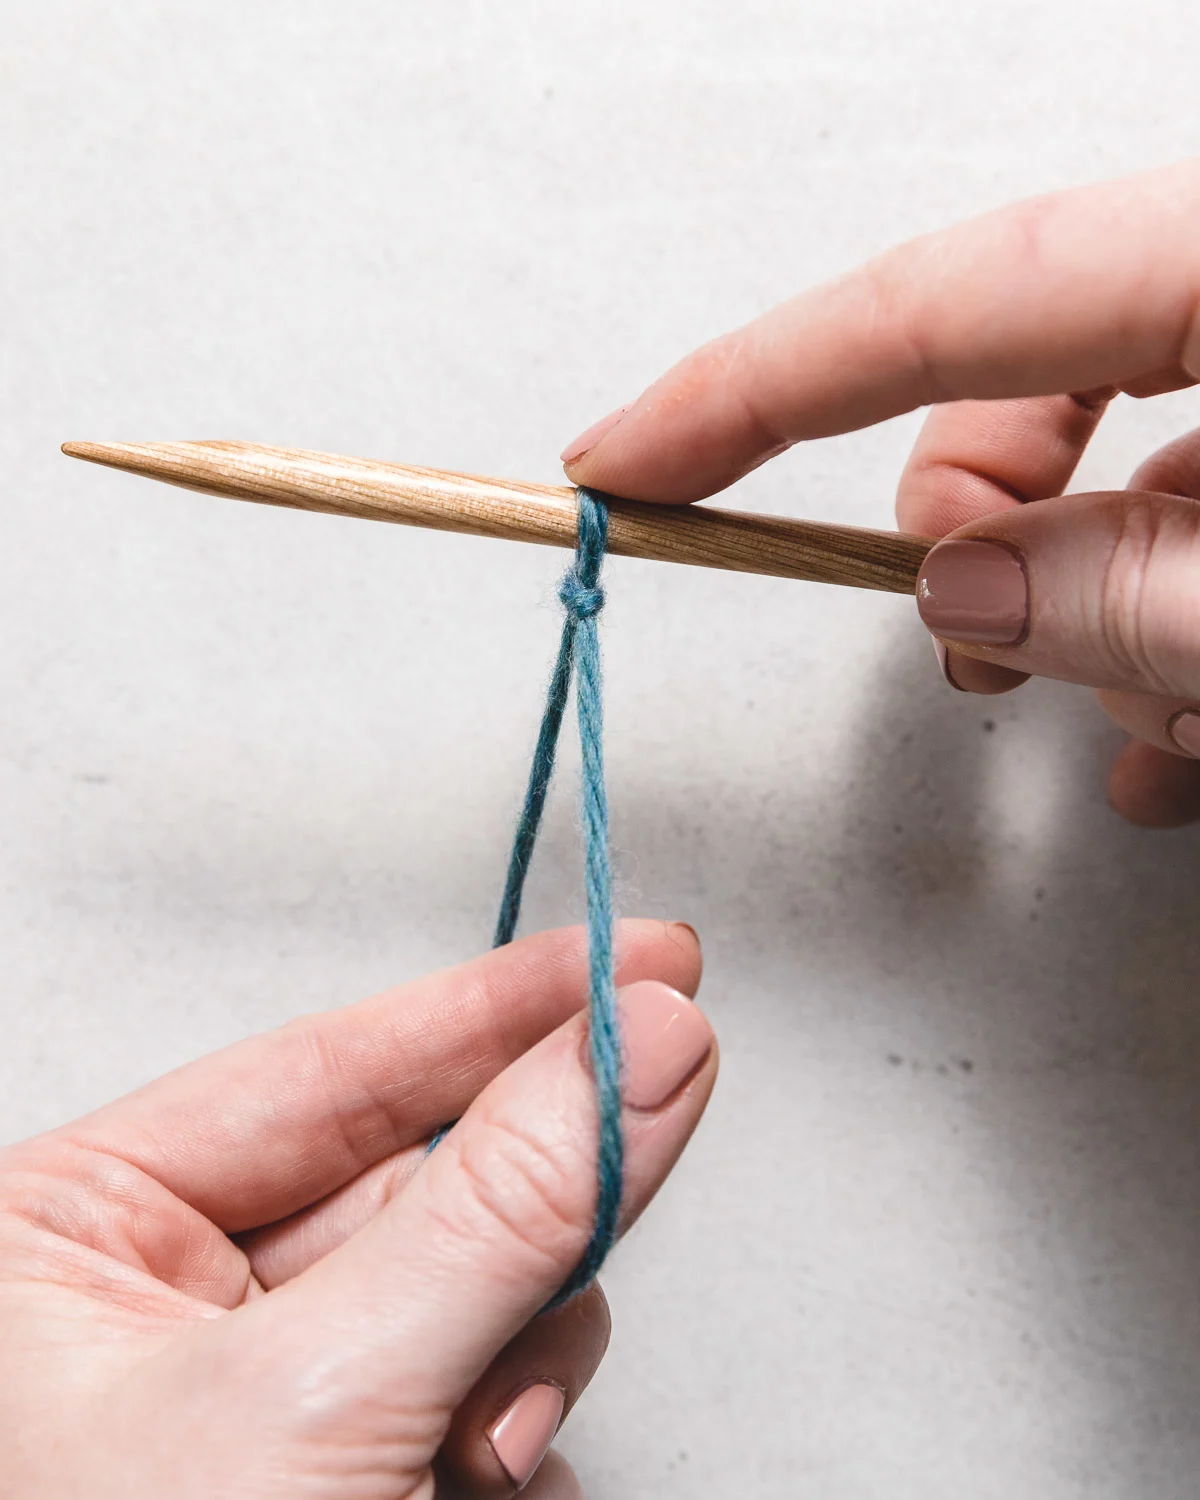
- The yarn tail should be closest to you when you place the slip knot on the needle. Use your right index finger to secure the slip knot while holding the needle in your right hand.
- With your left hand, hold the yarn in both strands. Spread the yarn apart by sliding your thumb and index finger between the two strands. Create two yarn loops by tilting your hand back and wrapping one around your thumb and the other around your index finger. The loops ought to resemble a “Y” or a “slingshot.”
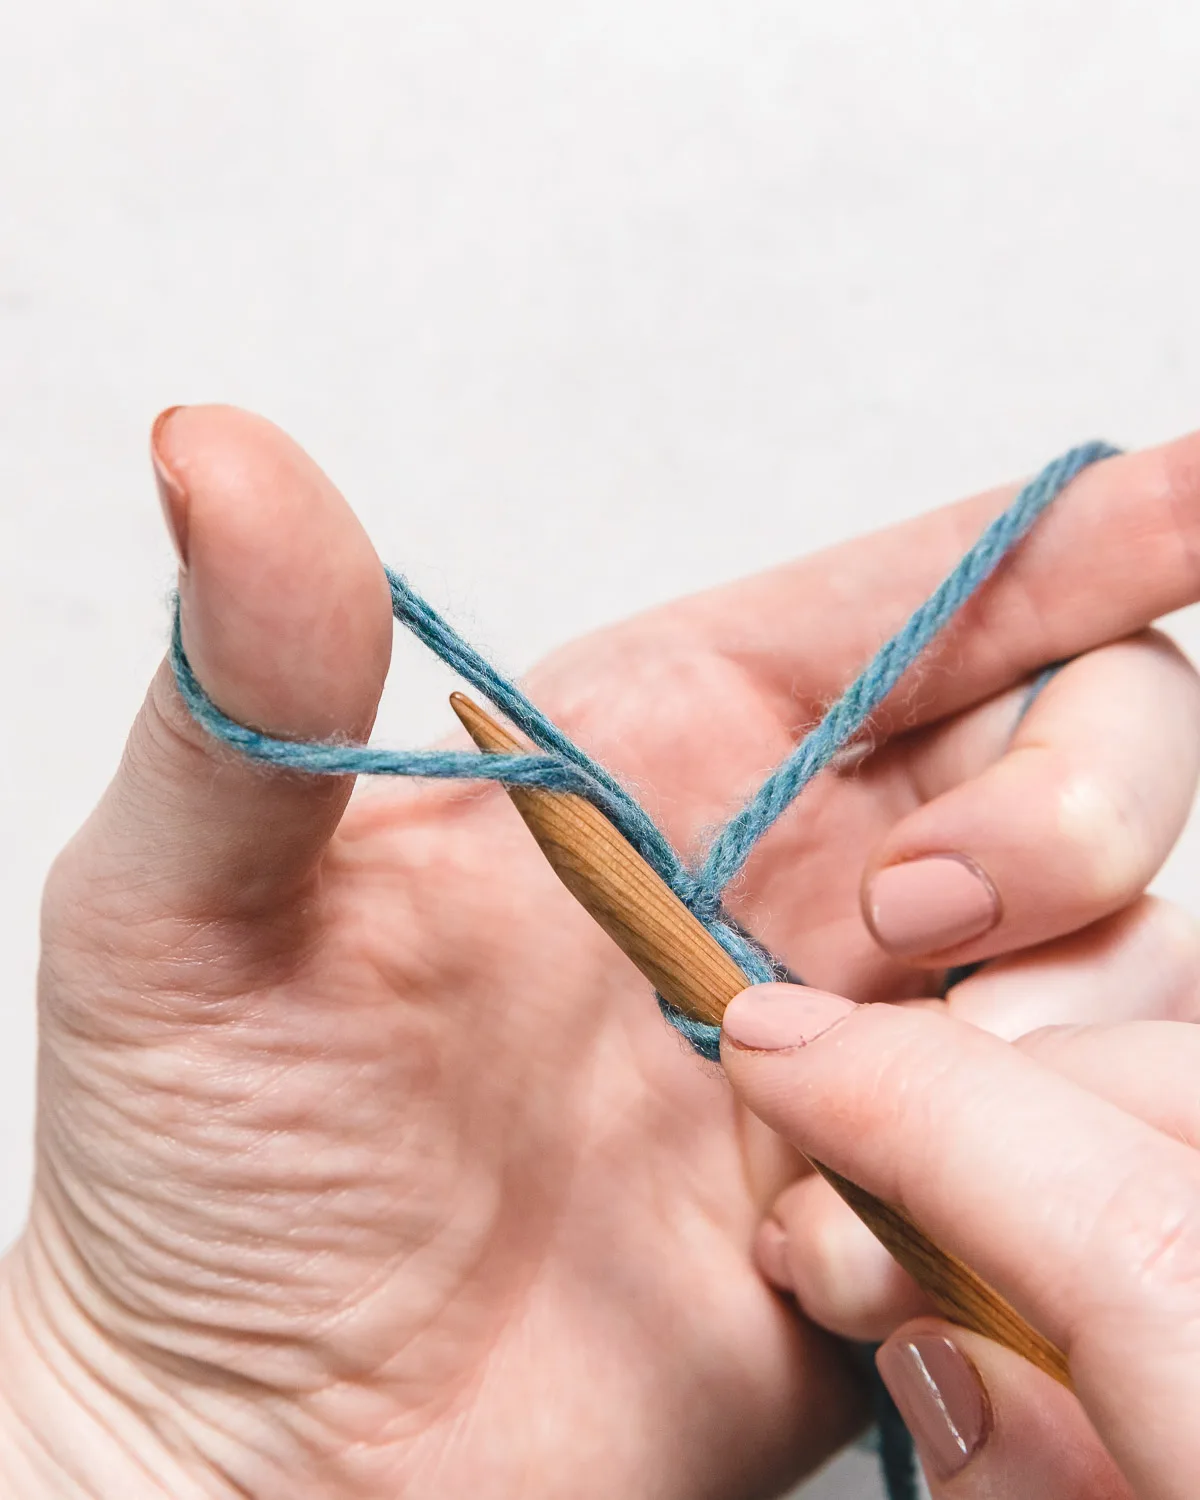
- Next, pass the needle’s tip up through the thumb loop’s middle and under the thumb’s outer strand.
- Then, capture the inside strand of the index finger by swinging the needle up and over it.
- The needle should now swing in a sideways motion over the thumb’s inside stand and downward through the thumb loop’s middle.
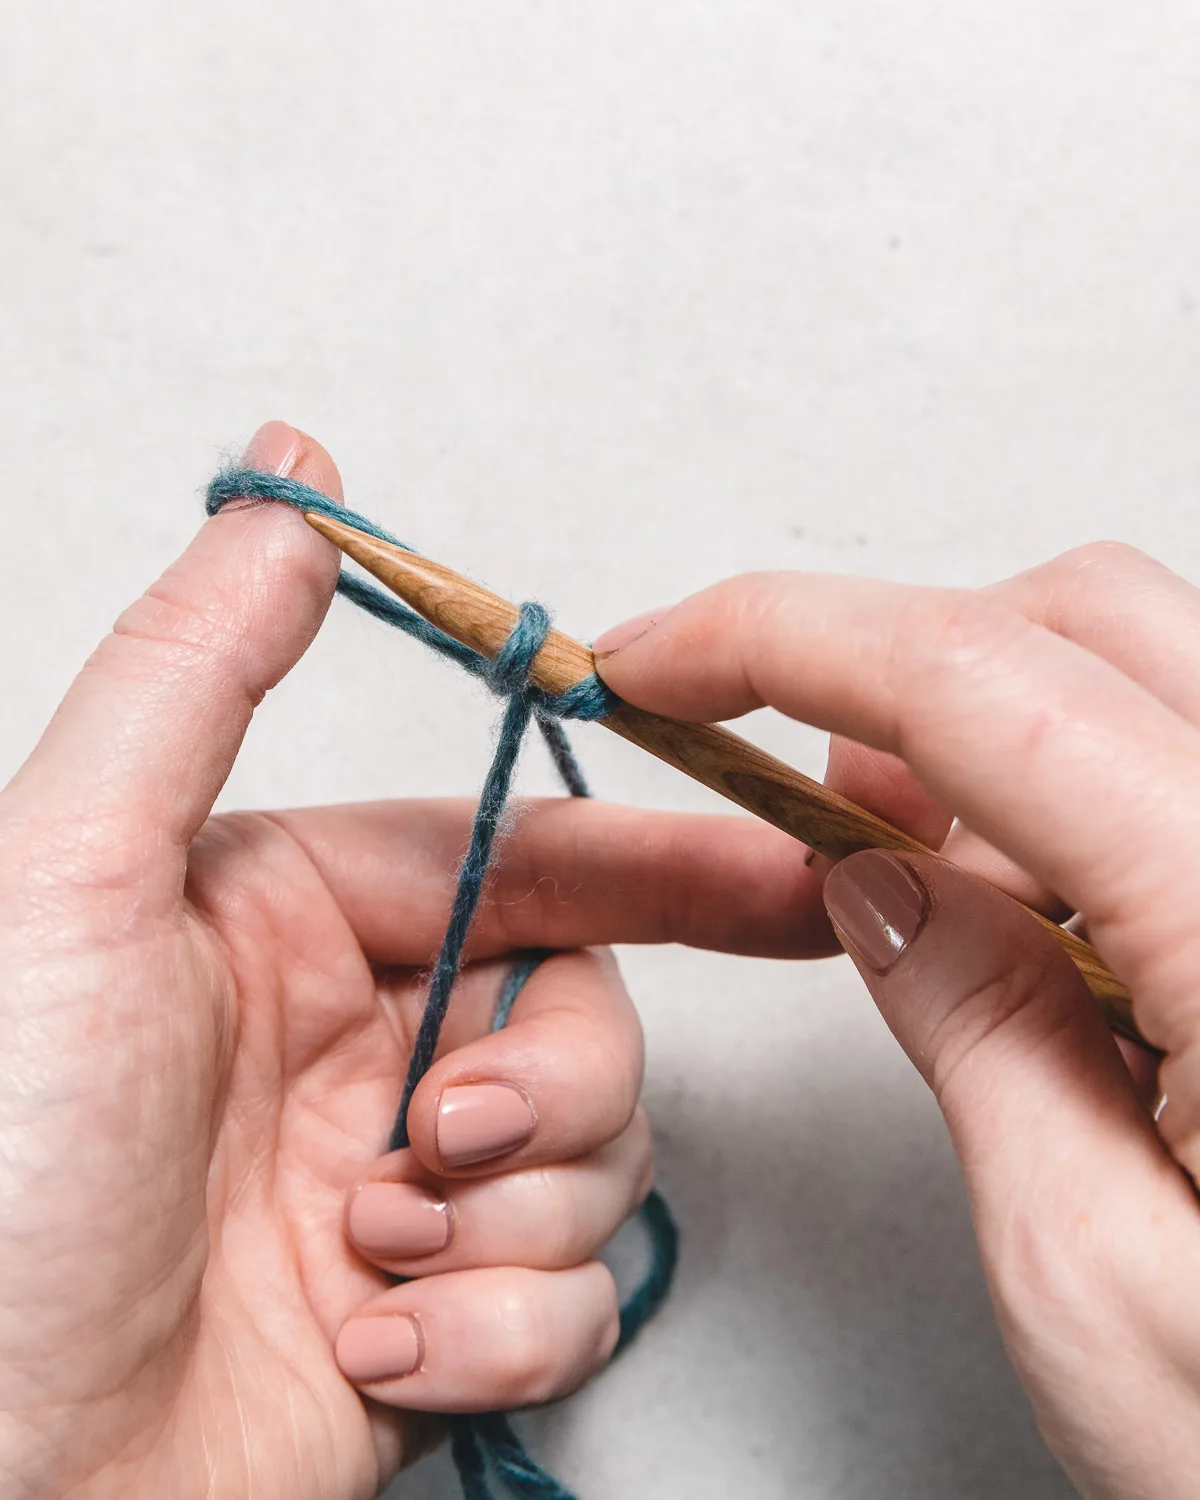
- Release the loop from your thumb after that. To tighten the loop on the hook, pull the two strands of yarn together just a little. You just completed your first cast-on stitch, which is an accomplishment.
- To cast on as many stitches as necessary, repeat these procedures. For your practice swatch, cast on 15 to 20 stitches if you want to follow along with me. (Keep in mind that the slip knot counts as a stitch when counting your stitches.)


How to Make a Knit Stitch
The most fundamental of all stitches is the knit stitch, often denoted by the letter “k” in patterns. You’ll use it for practically all of your knitting projects.
Here is a tutorial for the fundamental knit stitch.
- Hold the empty needle in your right hand and the needle with the cast-on stitches in your left hand. (The working yarn must originate from the stitch furthest to the right on the left-hand needle.) Hold the working yarn behind the completed project.
- Next, from left to right, place your right needle into the first stitch on the left-hand needle. From front to back, the right needle should pass through the first stitch’s center and under the left needle.
- Next, take the working yarn in your right hand and begin wrapping it counterclockwise around the right needle. On the right-hand needle, a loop of yarn will result from doing this.
- The yarn loop should now be drawn through the stitch on the left needle using the right needle’s tip. To pull the new loop of yarn through the middle of the stitch, imagine sliding it under the left-hand needle. The left needle will be behind the right needle at the conclusion of this stage, and the right needle will have a loop of yarn on it.
- In order for the stitch to come off the left needle, finally, slide the right needle up and to the right. You just completed your first knit stitch—congrats!
- Continue in this manner until you have knit every stitch on the left-hand needle.
That’s all, then! You have mastered the knit stitch at this point. It’s a good idea to count your stitches at this point to make sure you haven’t added any stitches or dropped any stitches.


Turning Your Work
It’s time to turn your work and start the following row when you’ve done knitting the first row.
All of the stitches will be on your right-hand needle at this time, leaving your left needle vacant.
Switch the needles so that you are holding the needle with stitches in your left hand and the empty needle in your right hand. This will allow you to turn your work.
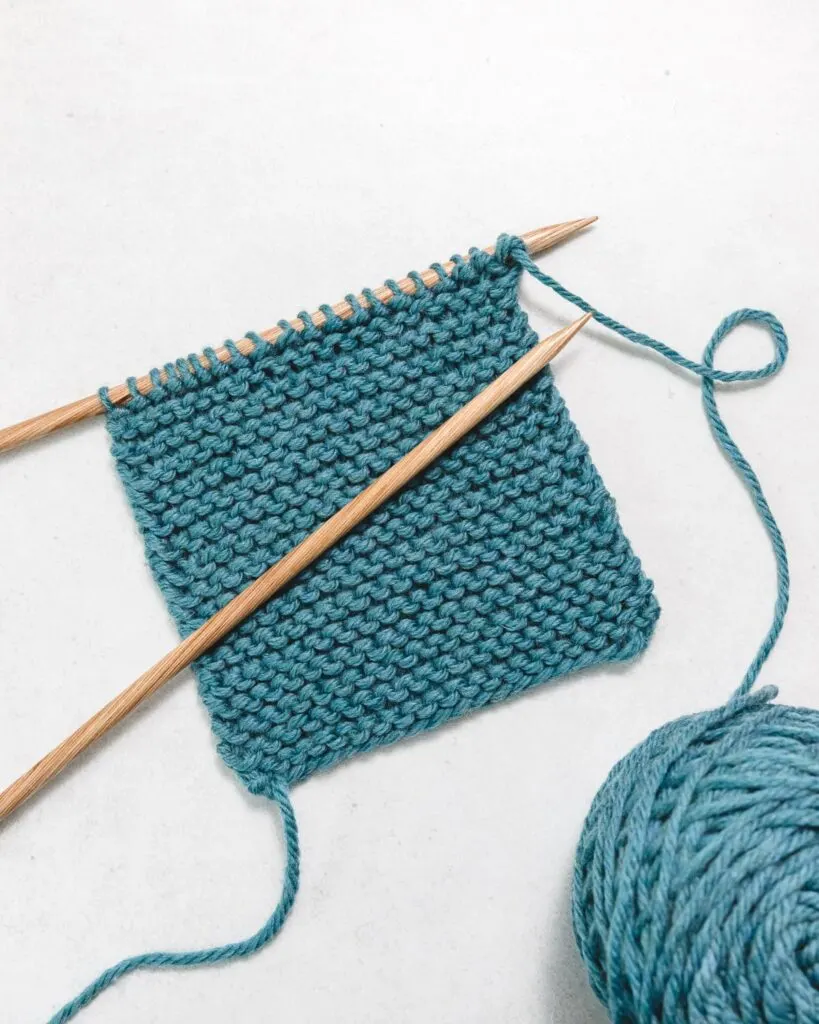
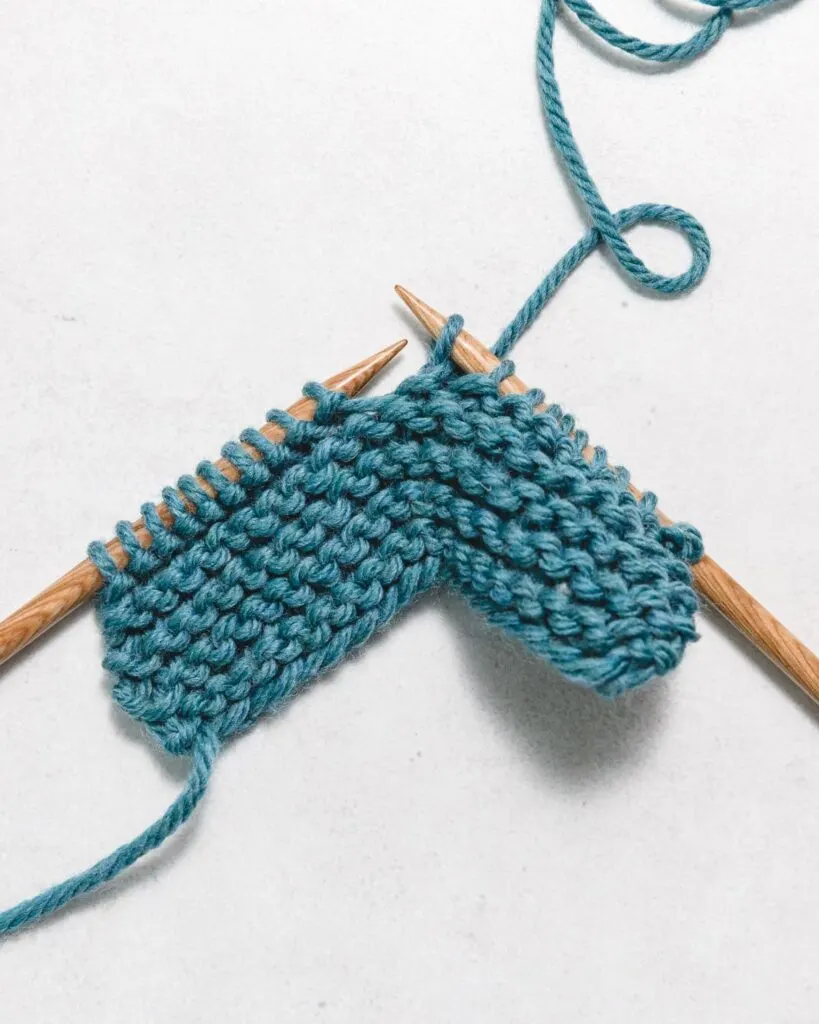
You are now prepared to knit the following row. Keep knitting until your swatch is the desired length. (If you keep knitting every row, you’ll be creating garter stitch.)
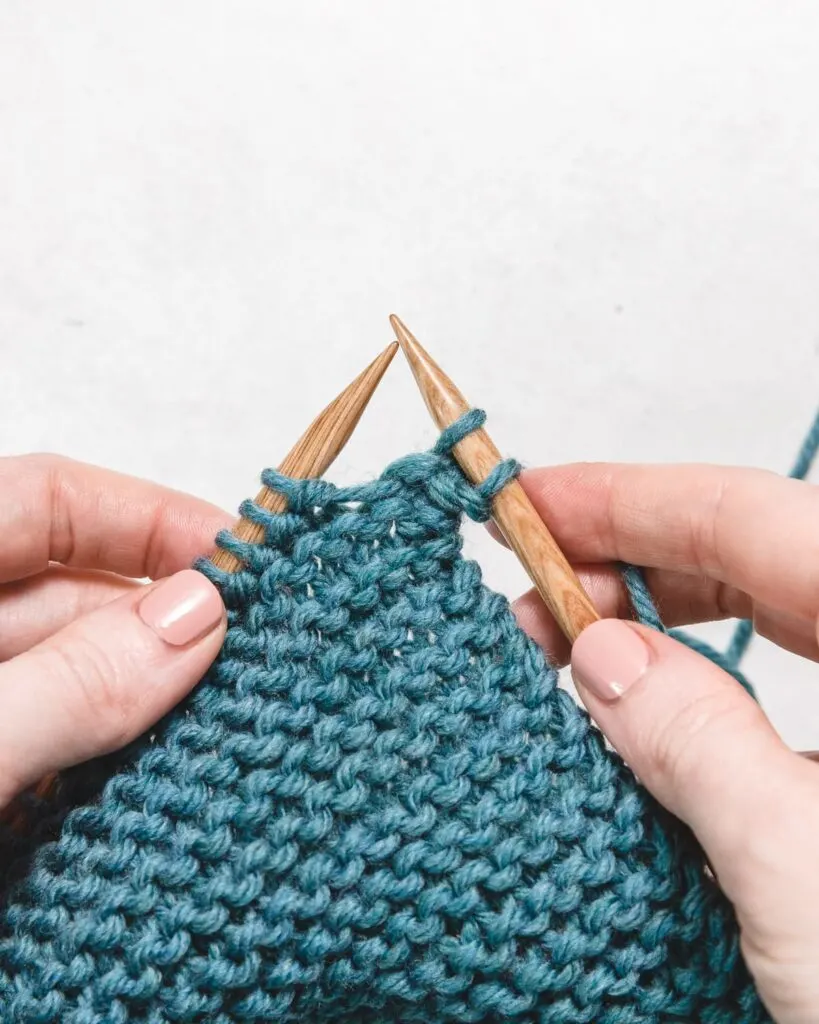
How to Cast Off (aka Bind Off)
It’s time to take those stitches off the needles once your practice swatch is the desired length. Casting off or binding off is the term used to describe this action. Your work’s edge is held together by the cast off so that it won’t unravel.
Like the word “cast on,” “cast off” refers to a group of techniques you can use to complete your last row of knitting rather than a single technique.
This lesson will teach you how to cast off in its simplest form. The cast off method that is used the most frequently is effective for many tasks.
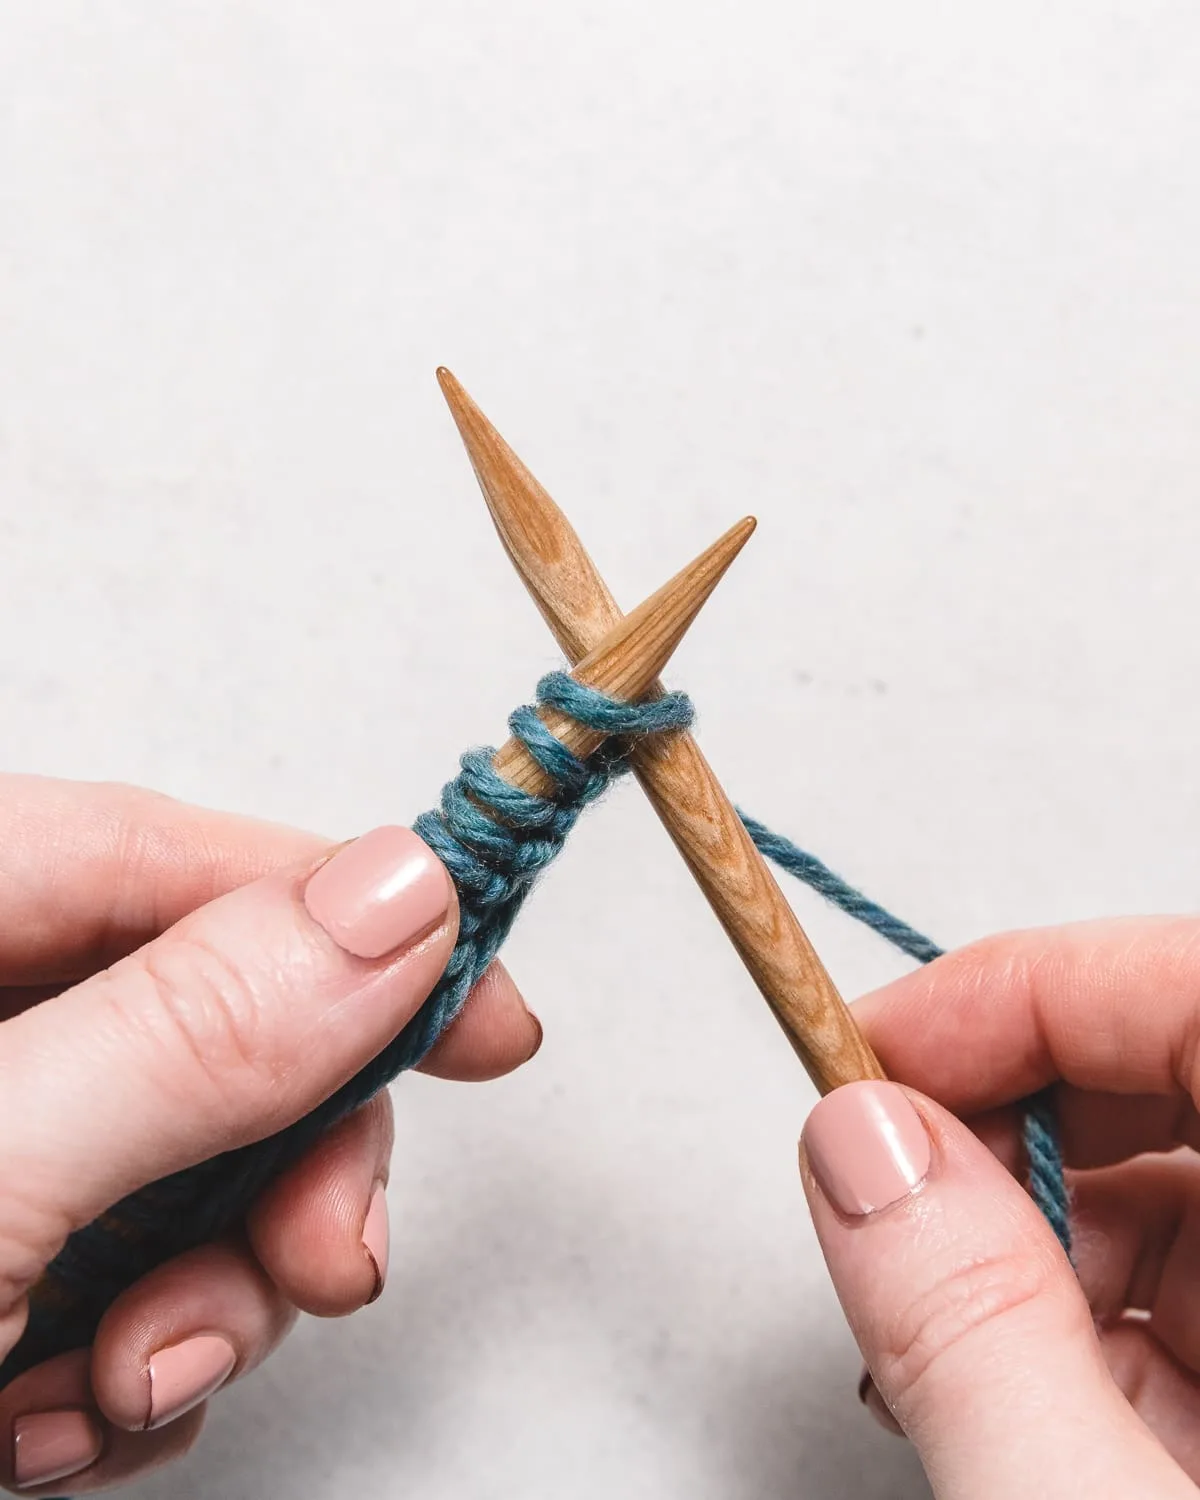
- Knit the first two stitches on your needle as usual to begin. To prevent your cast off from being too tight, keep your tension at a moderate level.
- Next, put the left needle into the right needle’s first knit stitch.
- Next, raise the first stitch (the one on the right) over the second stitch using the needle tip (the one on the left). Let the needle go after this stitch. On your right-hand needle, there will only be one stitch left. You’ve just cast off one stitch, hurrah!
- Knit the subsequent stitch on your left-hand needle as usual. On your right-hand needle, there should be two stitches at this point.
- Next, raise the right stitch over the left stitch using the left-hand needle before letting it come off. Ta-da! You have removed yet another stitch!


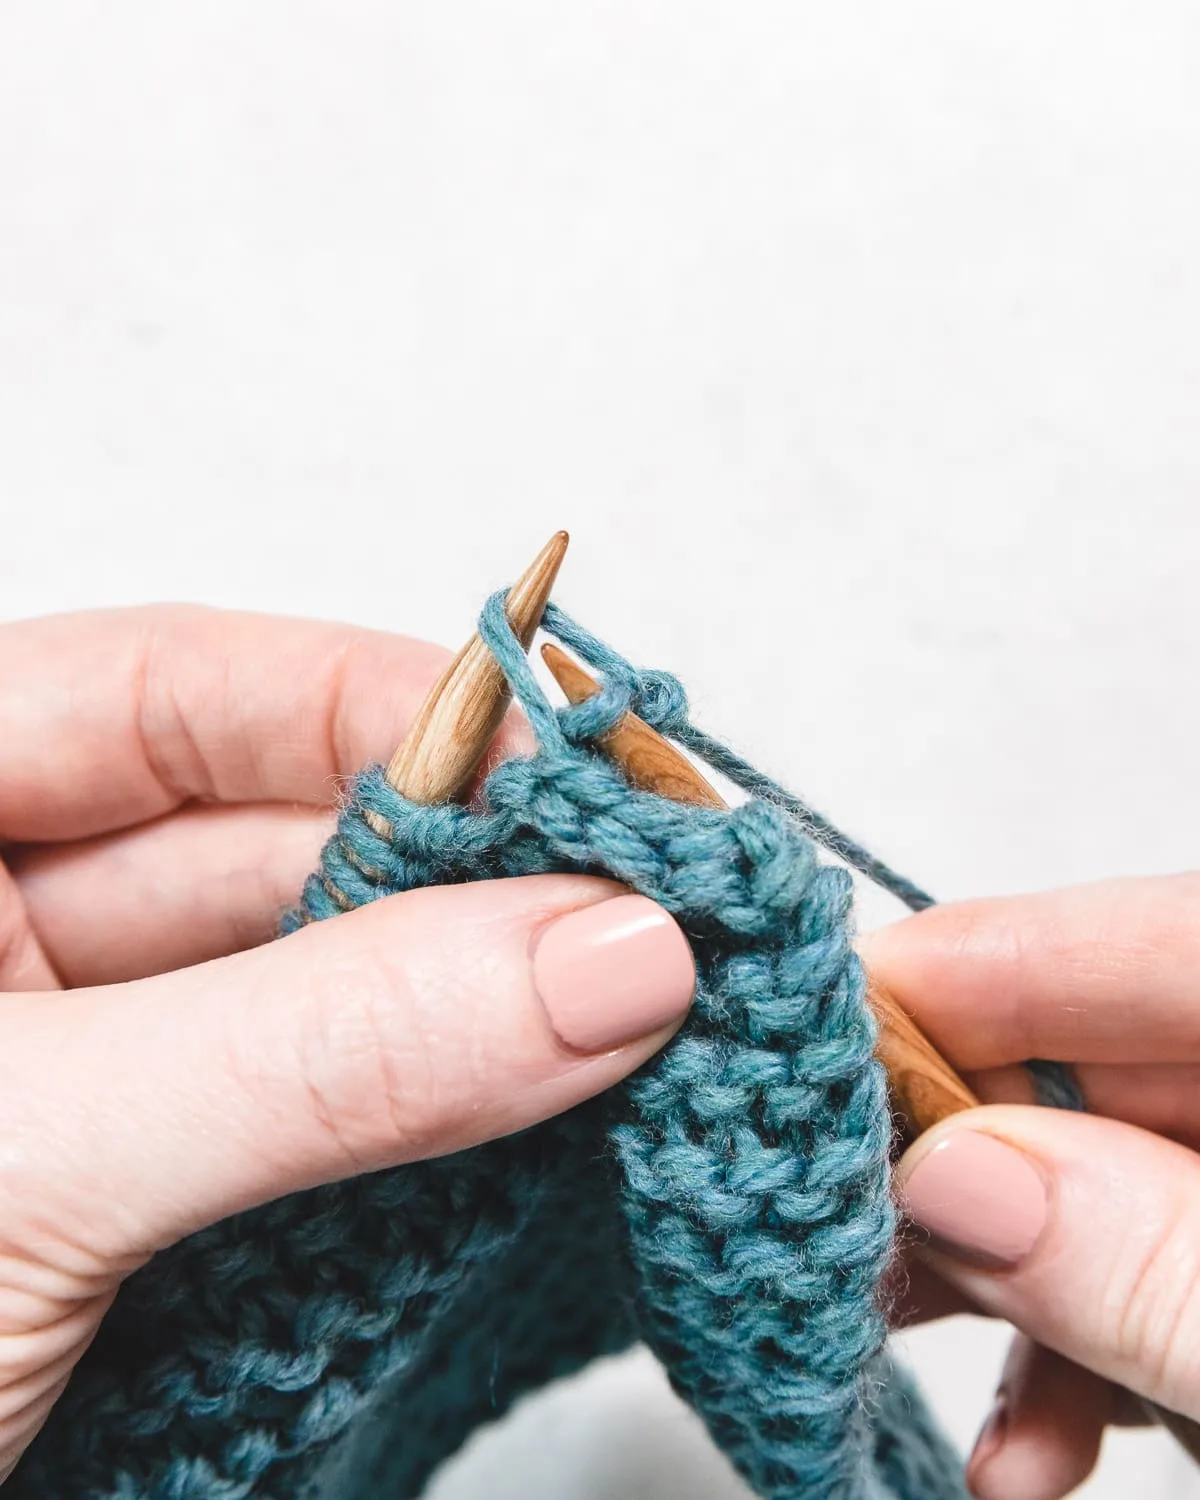

Up until there is just one stitch left on your right needle, repeat the previous two stages.
In other words, knit one stitch, cast off one stitch, knit one stitch, cast off one stitch, and so on, until there is only one stitch remaining on the right needle.
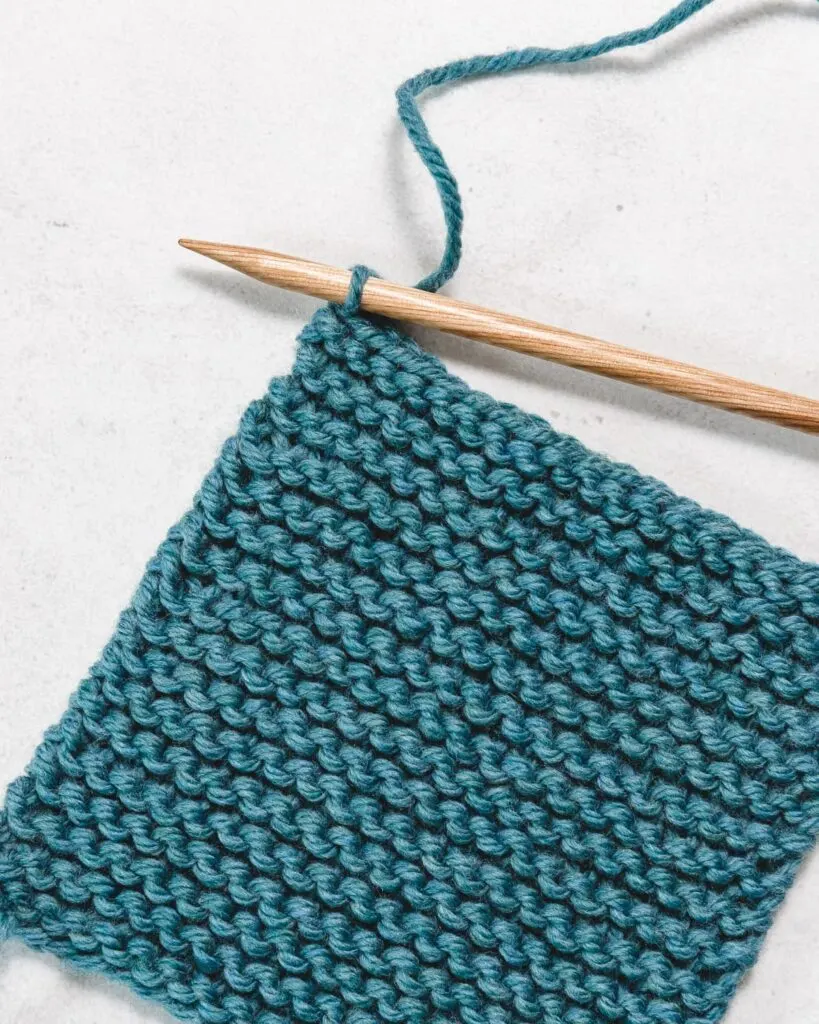
How to knit: Finishing Off

How to make the final stitch is shown below. Leave a 6-in tail after cutting the yarn to weave in later. After dropping the stitch from the needle and pulling the yarn tail tight, thread the tail through the stitch. After that, enclose the yarn tail by weaving it in.
Congrats! You’ve now mastered the knitting cast-off technique.
How to Weave in the Ends
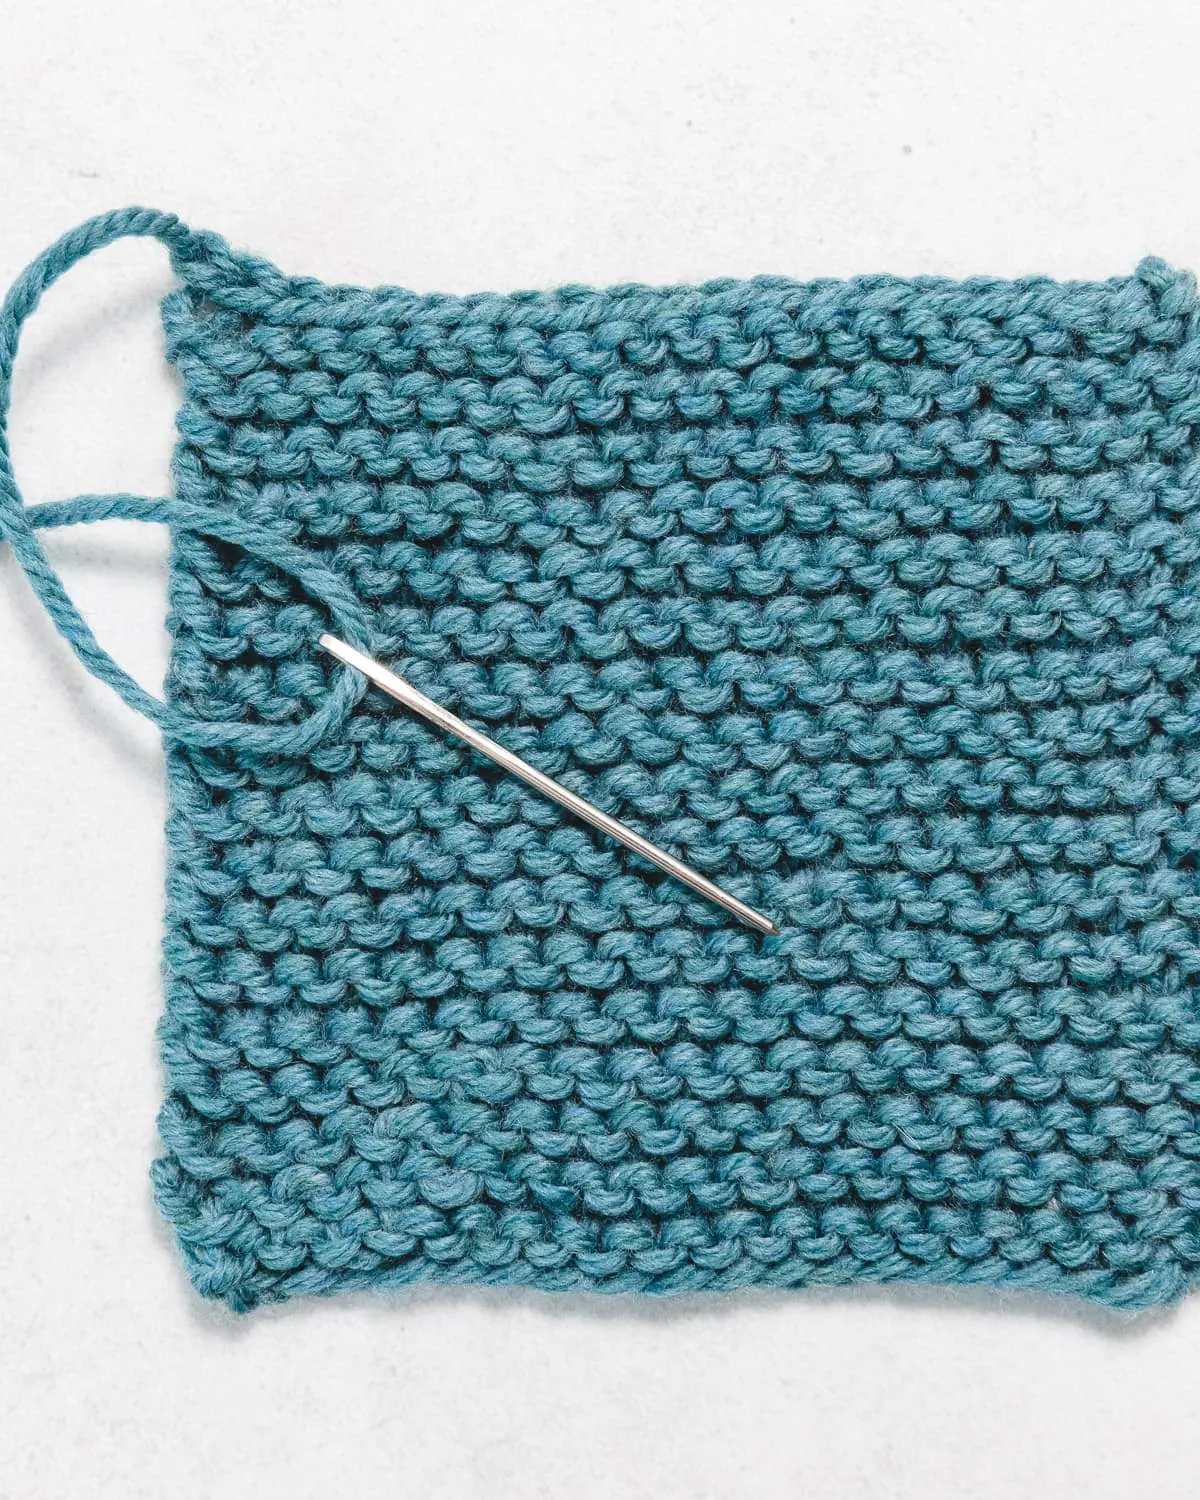
After casting off is complete, you must deal with the yarn tails. The yarn tails are held in place and your knitting is kept from unraveling by a procedure known as weaving in the ends.
Use the yarn tails to thread a tapestry needle for weaving in the ends. Then, to make it less obvious, weave each yarn tail through the fabric from the “wrong side.”
What about Purl Stitch?
One of the most fundamental knitting stitches is the purl stitch, which is frequently taught to beginners straight after the knit stitch. You’ll be able to pick it up with only a little practice, despite the fact that it might initially seem frightening.
Since it’s required for many designs like ribbing, stockinette stitch, and moss stitch, purling is a great skill to acquire at a young age.
More Knitting Stitches to Learn
You are prepared to begin investigating more stitch patterns once you have mastered the knit and purl stitches. Here are some of our top beginner-friendly stitch patterns.
- Garter Stitch: To make a garter stitch, knit every row. As a result, a stretchable fabric with a faintly ridged surface is produced.
- A knit row and a purl row are alternated to make the stockinette stitch. As a result, the cloth has a surface that is smooth on one side and somewhat ridged on the other.
- Seed Stitch: Within a single row, the knit and purl stitches are alternated to form the seed stitch. As a result, the fabric gets a textured finish.

How to negotiate salary. It’s not unexpected that many people find it difficult to request higher pay once their job hunt is over and they are in possession of an offer. They don’t want to risk the opportunity now that they’ve made it this far, especially if the pay is fair. However, as the 2023 […]

How to increase milk supply. Most of the time, even if you are unaware of it, your body produces just what your baby needs, despite the concerns of many mothers who worry about poor milk production. There are several techniques to determine whether your infant is receiving enough milk. There are methods you can use […]

How to buy bonds. It’s not as difficult as it might seem to purchase bonds. But before you buy, you must understand the various varieties and know what to look for in a bond. One option to invest is through bonds, which involve lending money to a government or firm rather than purchasing stock (like […]

How to answer tell me about yourself. The interview question “Tell me about yourself” may seem frightening, but it doesn’t have to be. Here are our top suggestions for a terrific response. When asked in an interview, “Tell me about yourself,” it can be challenging to respond if you are unprepared. Finding a job can […]
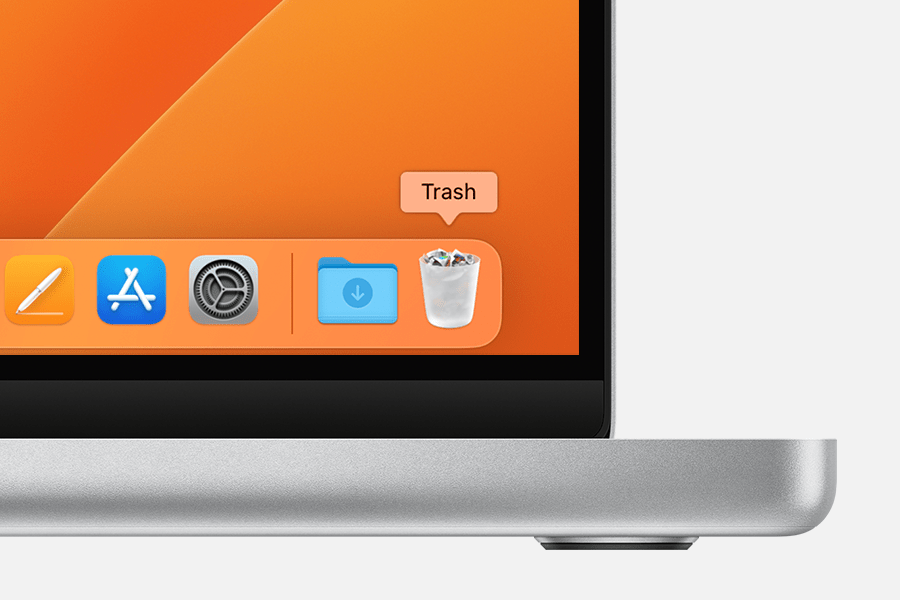
How to uninstall apps on mac An app can be deleted or uninstalled from your Mac in order to free up storage space for other things. Launchpad or the Finder are two options for doing this. Use Launchpad to delete apps that were downloaded from the App Store Launchpad offers a convenient way to delete […]

How to Unblock a Number on an Android Phone Here’s how to restore calls and texts from a blocked number on an Android device: Get the Phone app open. The More icon, which resembles three vertical dots, should be tapped. Select Blocked Numbers under Settings. The contact you want to unblock has an X next […]