


How to screenshot on MacBook, Windows and Chromebook
How to screenshot on MacBook, Windows and Chromebook is pretty simple. The following article will show you how to take screenshots on popular operating systems today. This is really convenient
How to screenshot on MacBook:

- To take a screenshot, press and hold: Shift + Command + 3.
- If you see a thumbnail in the corner of your screen, click on it to edit the screenshot. Or wait for the screenshot to save to your screen.
How to screenshot part of the screen on a MacBook

- Shift + Command + 4 are the three keys to press and hold together.
- To select the portion of the screen to capture, drag the crosshair icon. Press and hold the Space bar while dragging and moving the selection. Pressing the Esc (Escape) key stops taking screenshots.

- Release the mouse to take a screenshot.
- Click the thumbnail to change the screenshot if it appears in the corner of your screen. Alternatively, wait until the screenshot is saved to your desktop.
How to capture a window or menu

- The window or menu you want to capture will be opened.
- Hold down Shift and Command and 4 and Space bar at the same time. The pointer is now like a camera. Pressing the Esc (Escape) key will stop taking screenshots.
- To capture it, click the window or menu. If you press while holding down the Option key, the window’s shadow will not be captured in the screenshot.
- Click the thumbnail to change it to the screenshot if it appears in the corner of your screen. Also, wait until the screenshot is saved to your desktop.

How to screenshot record on MacBook
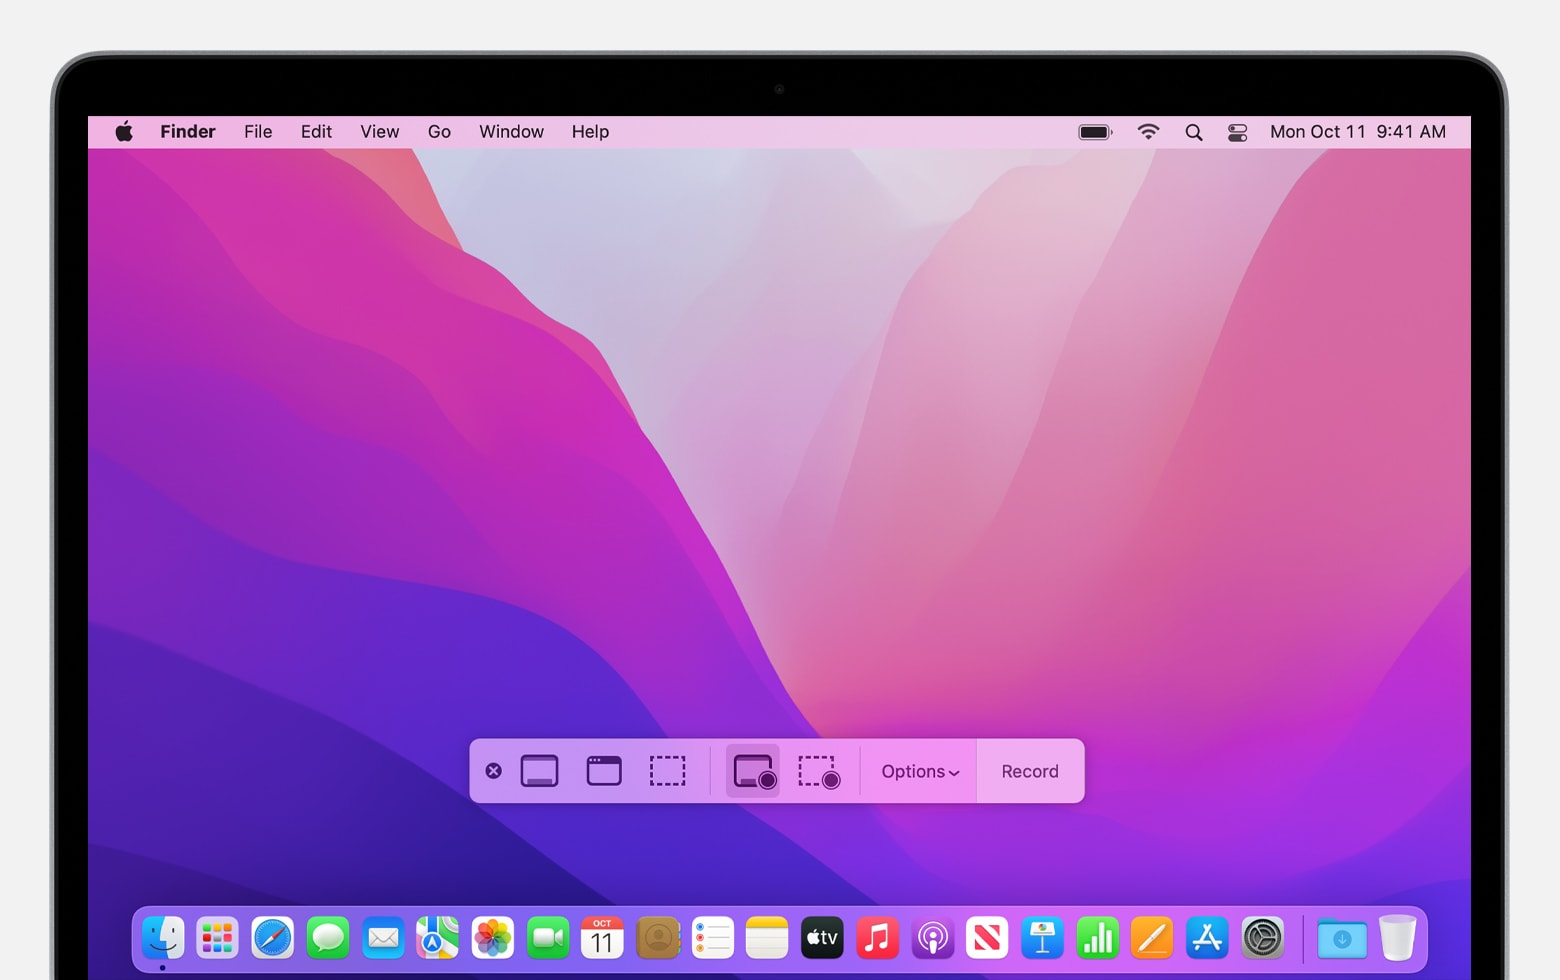
Use the Screenshot toolbar
The entire screen or a specific area of the screen can be video recorded using Screenshot Player or QuickTime.

Hold down Shift, Command, and 5 together to bring up the Screenshot toolbar. On-screen controls are available to record your full screen, a specific area of your screen, or a still image of screen:
Use QuickTime Player
1. From the Applications folder, launch QuickTime Player, then choose File > New Screen Recording from the menu.
- If on-screen controls appear, follow the instructions
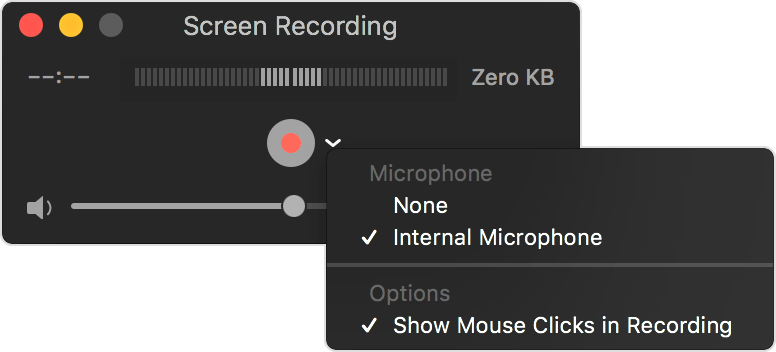
- If you see the Screen Recording window outlined below, follow those instructions
2. You can make modifications before you start recording by clicking the arrow next to the Record button:
- Select a microphone to record voice or other audio along with the recording. You can modify the volume slider to hear that sound while recording. Lower the level or use a headset with a microphone if you hear auditory feedback.
- Select Show Mouse Clicks in Recording so that a black circle appears around the cursor when you click..
3. Select Record to start recording, following:
- To begin recording the whole screen, just click anywhere on screen.
- Drag to select the area you want to record, click Start Recording there.
4. Chose the Stop button in the menu bar, or press Command-Control-Esc to stop recording (Escape).
5. QuickTime Player launches the recording as soon as you stop recording.
How to screenshot on MacBook with Windows keyboard
Using a standard keyboard or a Windows keyboard, you can take a screenshot on any laptop or Mac computer. To take a screenshot, just hold down Windows + Shift + 3. The screenshot will be stored as a .PNG file on your computer. You can choose to rename the saved snapshot file by selecting it using the right-click menu.
Screenshots are immediately saved on your computer under “This PC>Pictures>Screenshots” when you take them. If you don’t like it, you are free to move it and save it to another folder of your choice.
How To Copy Paste and Manage Screenshots on MacBook
While it seems simple, there are tons of great features, built-in apps, and third-party apps that can greatly enhance your copy and paste productivity.
On a Mac, you must first select the text you want to copy and then press Command+C.

Then place the mouse where you want to paste the material you just copied and hit Command + V.

Alternatively, you can copy and paste using the context menu, which can be accessed by right clicking or by holding down the CTRL key while left clicking (or holding the CTRL key and tapping the trackpad mouse).

Repeat the same action to paste the information, right-click or CTRL-left-click the desired location while holding the CTRL key:

Nearly all Mac apps have access to these commands via the Edit Menu.

The majority of items, including files and folders, can be copied and pasted to and from most locations using the same keyboard keys and context menus.
Most of you will think you already know how, but keep reading because MacOS has some incredibly useful time-saving features for copying and pasting.
Find “Show Clipboard” in the Finder Edit menu if you can’t remember what you just copied or even cut:

If you don’t want to copy and paste formatting and text styles between documents.
For instance, when you copy some text from Safari and use Command + V to paste it directly into Word, that text also has favorable formatting.
The text will be simply pasted while maintaining the style and formatting of the existing document if we press Command + Option + Shift + V:
This is great, for example, if you want to quote something.
If you specifically want to copy the style and formatting from the original document in some Apple Apps, such as Pages and Numbers, use Command + Option + C, then paste with Command + Option + V.
Instead of copying text characters, this will just copy the formatting, allowing you to continue typing your own words in the same manner as the copied text.

Copy and paste between devices

The “Universal Clipboard” in MacOS allows you to copy, paste between devices if you have one of them:

Go to System Preferences > General > and select “Allow transfer between this Mac and your iCloud devices” to confirm that the Universal Clipboard is turned on on your Mac.
On iPad, iPhone, etc. Enable Handoff by going to Settings > General > Handoff.
For this to work, each of these devices needs to be signed into the same iCloud device.
Grab
The built-in app for taking screenshots is called Grab. Grab is already set up under Applications > Utilities.

The built-in application to take screenshots is called Grab. Grab has been set up in Apps > Utilities.
The following keyboard shortcuts allow you to access some of Grab’s commands: (shortcut) You will save each of these screenshots to your desktop:
Screenshot of a particular region:
- Use Command + Shift + 4
Full screen capture:
- Use Command + Shift + 3
Screenshot of a given window:
- Use Command + Shift + 4, then press space
MacBook Touch Bar screenshot:
- Use Command + Shift + 6
Open the Grab program and each screenshot will appear as a new window where you can save them or copy/paste them if you don’t want to save them to the Desktop.
Open the app, choose “Grab Help” from the help menu and you can see the options provided by Grab.

Skitch
While there are alternative crop, crop, and screenshot apps in the App Store, this free app is great because it contains built-in markup features.
You can find it by searching for Skitch in the iOS and MacOS App stores.
Once installed, start Skitch and choose the type of screenshot you want to take:

The tool bar on the left will then let you add markup.
How to screenshot on Windows
How to screenshot on Windows Shortcuts
- Select Start, type “snipping tool”, then select it from the results to launch the crop tool.
- To take a screenshot, select New.
- By default, the rectangle mode is selected. By selecting one of the following options from the toolbar, you can change the shape of the snapshot: rectangular, windowed, fullscreen, and freeform.
- Your clipboard is automatically updated with screenshots. When you’re done taking a screenshot, a notification will also appear; Click on it for more editing options.
7 ways to How to screenshot on Windows 10 and Windows 11
There are various techniques you can use to take screenshots on a Windows 10 or Windows 11 PC.
We’ve rounded up all the top methods for taking screenshots in Windows, whether you want to capture the entire screen or just a part of it.
The Print Screen button
Press the Print Screen (PrtScn) key on your keyboard, you can quickly take a full screen screenshot in Windows 10 or Windows 11.
Clipboard will receive the screenshot. Paste the image into any tool that allows you to import the image to save the file.
The Windows key + Print Screen
Press and hold Windows + PrtScn simultaneously to take a screenshot in Windows 10 or Windows 11 and let the file be automatically saved to the Screenshots folder. Screenshots of your entire screen will be saved to a folder when your screen dims.
Alt + Print Screen
Press Alt + PrtScn to record only the window you are working in. You need to paste the picture into another software to save it once it has been copied to your clipboard.
The Snip & Sketch tool in Windows 10
If you want to personalize, annotate, or share your screenshots, Windows 10 Snip & Sketch is the screen capture tool you’ve been looking for for Windows.
Hold down the keyboard shortcut Windows Key + Shift + S to launch Snip & Sketch. Your screen will dim, and a small menu with square, freeform, windowed, or full screen capture options will appear at the top of your screen.
The Snipping Tool in Windows 11
In Windows 11, you can search for Snipping Tool or launch it by pressing Windows Key + Shift + S. Your screen will dim and a toolbar with screenshot options will show up at the top. , just like Snip & Sketch. You can take pictures of various shapes such as rectangle, freeform, full window or full screen using this toolbar.
After you take a screenshot, it’s saved in the Pictures folder and moved to your clipboard so you can share it immediately. You can save and edit the preview by clicking the button that appears at the bottom right corner of your screen.
The Game Bar
Almost all Windows apps and games can be used to take pictures and record videos—called the Game Bar. To use it, follow these steps to open it:
1. Hold Windows key + G.
2. To open the Shooting menu in the overlay menu, click the Capture button (camera icon) in the top menu
3. To take a screenshot, click the camera icon in the Capture menu. , you can also record video By selecting record button with option to include audio by selecting microphone icon.
The Video > Captures folder in File Explorer is where you can locate screenshots and video clips recorded by the Game Bar. These files are saved in the PNG and MP4 formats. alternatively, you can access them through the Game Bar’s Gallery by choosing Show My Snaps > View My Snaps from the Capture menu, located below the screenshot and audio capture buttons.
Power + Volume Up
Press the Power Button + Volume Up Button on a Microsoft Surface device to screenshot of Windows 10 operating system. Your screenshot will be saved to the Pictures > Screenshots folder as the screen dims.
On a Surface 3 or before, you must click the Windows Logo + Volume Down Button in order to snap a screenshot.
How to screenshot on Chromebook
How to screenshot on Chromebook. Utilizing the tools included with Chrome OS is the quickest way to capture what is displayed on your screen.
How to take screenshots & screen recordings on a Chromebook

Step 1
Select “Screen Capture” in Quick Settings.
Verify that the document you want to capture is visible on your screen.
Step 2
Choose whether you want to capture the entire screen, a single window, or a small area of it using the Screen Capture tool.
You have the option to record your screen partially or fully.
Step 3

Choose what you want, then click the screen “Capture.”
Step 4

When finished, the recording or screenshot will appear in Tote on your shelf and be instantly copied to your Clipboard.
How to screenshot on Chromebook With the Keyboard Shortcut
Previously, Chrome OS had keyboard shortcuts for taking screenshots. Press the Shift+Ctrl+Show buttons on your Chromebook. Select Screenshot from the options shown at the bottom of the screen. Choose how you want to take screenshots? the entire screen, part of the screen, or a window. Hold Shift+Ctrl+F5 to open the screenshot menu while using an external keyboard without the Show button.
Where to Find Your Chromebook Screenshots
Clipboard is automatically updated with screenshots. They will also appear in Tote, launched with Chrome OS 89, and keep important files. To retrieve files, screenshots, and recently downloaded files, open Tote from the Shelf.
The screenshot is also saved to your “Downloads” folder for future retrieval. By pressing Shift + Ctrl + Show window, choosing Settings > Select folder, and then selecting the desired folder, you can change where future screenshots are sent.
One option is to back up these photos to Google Drive, where they are accessible from any device, provided the Chromebook has limited hard drive space (Opens in a new window).

How to negotiate salary. It’s not unexpected that many people find it difficult to request higher pay once their job hunt is over and they are in possession of an offer. They don’t want to risk the opportunity now that they’ve made it this far, especially if the pay is fair. However, as the 2023 […]

How to increase milk supply. Most of the time, even if you are unaware of it, your body produces just what your baby needs, despite the concerns of many mothers who worry about poor milk production. There are several techniques to determine whether your infant is receiving enough milk. There are methods you can use […]

How to buy bonds. It’s not as difficult as it might seem to purchase bonds. But before you buy, you must understand the various varieties and know what to look for in a bond. One option to invest is through bonds, which involve lending money to a government or firm rather than purchasing stock (like […]

How to answer tell me about yourself. The interview question “Tell me about yourself” may seem frightening, but it doesn’t have to be. Here are our top suggestions for a terrific response. When asked in an interview, “Tell me about yourself,” it can be challenging to respond if you are unprepared. Finding a job can […]
How to uninstall apps on mac An app can be deleted or uninstalled from your Mac in order to free up storage space for other things. Launchpad or the Finder are two options for doing this. Use Launchpad to delete apps that were downloaded from the App Store Launchpad offers a convenient way to delete […]
How to Unblock a Number on an Android Phone Here’s how to restore calls and texts from a blocked number on an Android device: Get the Phone app open. The More icon, which resembles three vertical dots, should be tapped. Select Blocked Numbers under Settings. The contact you want to unblock has an X next […]