


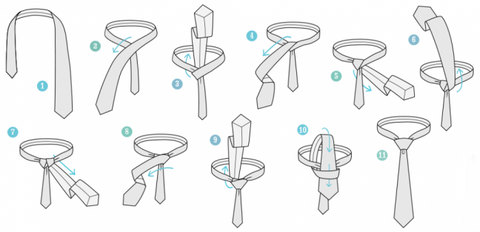
How to tie a tie
How to Tie the Four-in-Hand Knot
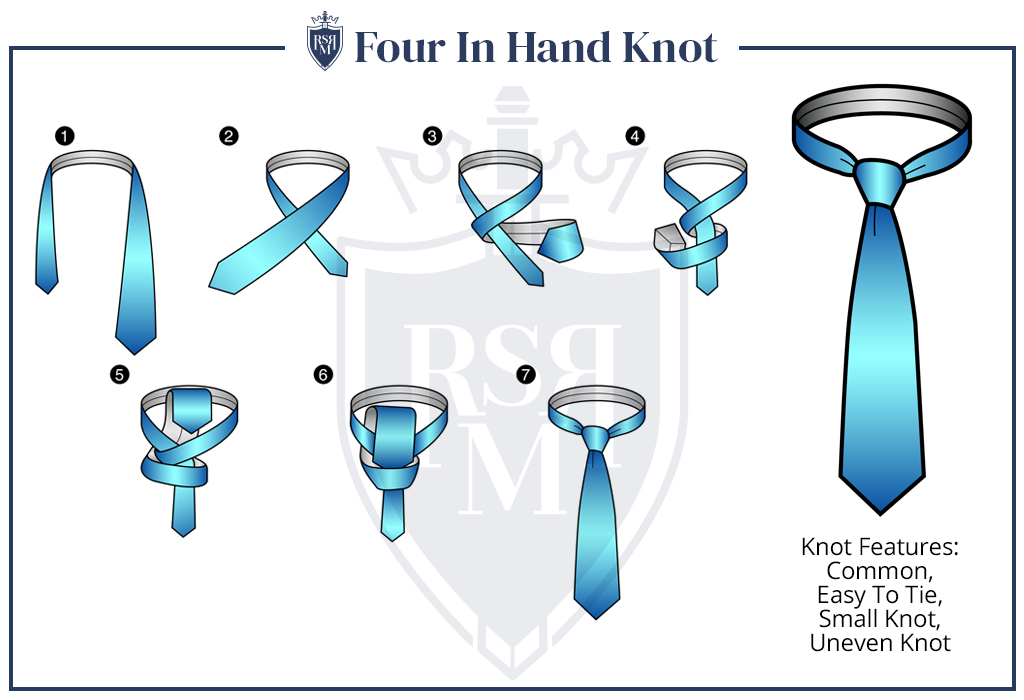
The Four-in-Hand, named after a gentleman’s club of the same name from the 19th century, is the current necktie knot champion. Its simplicity and adaptability are the reasons for its popularity. It is self-releasing, tapering, slender, easy to tie, and mildly asymmetrical. Choose to learn the Four-in-Hand knot if you learn no other knots.
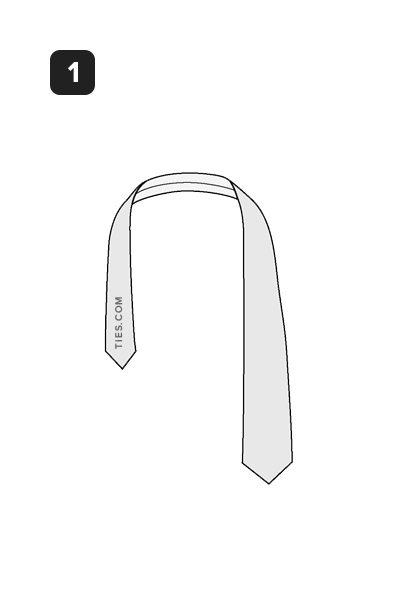
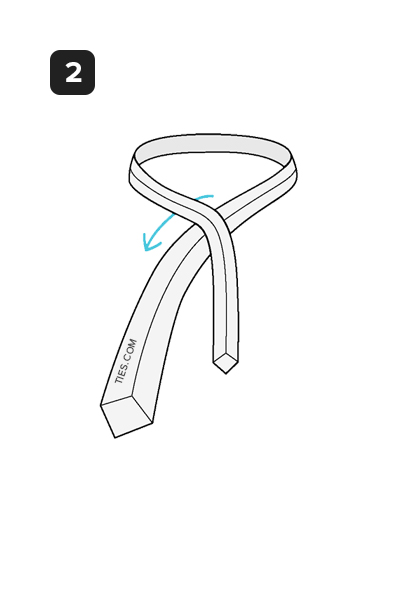
STEP 1: Begin by placing the tie’s wide end on the right and its little end on the left. Start by placing the little end just over your belly button (will vary depending on your height and the length & thickness of your tie). Just shift the wide (active) end.
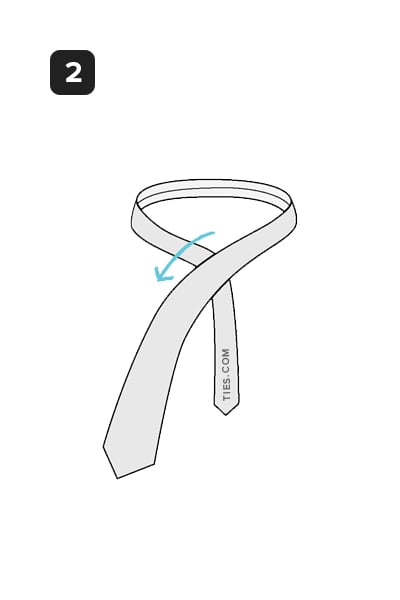
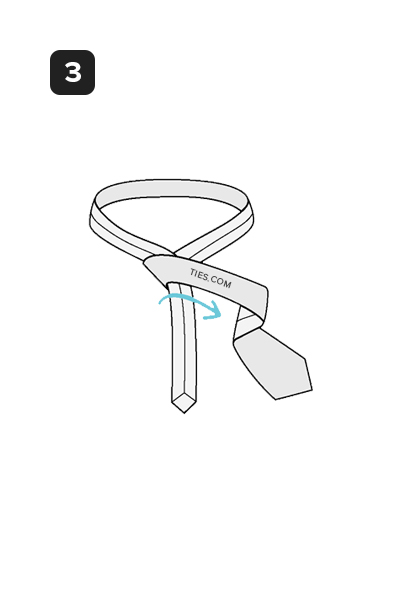
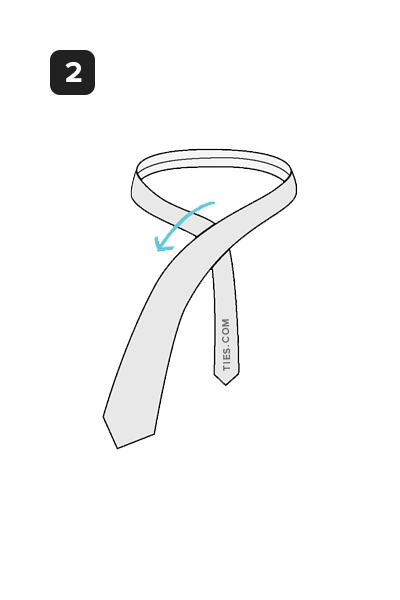
STEP 2: Wide end to the left of the little end
How to Tie the Kelvin Knot
In honor of Lord Kelvin (William Thomson, 1824–1907), a mathematical scientist who made contributions to the theory of knots in relation to atomic structure, the Kelvin necktie knot bears his name. The Simple knot is expanded upon by the Kelvin. The tie is laid inside out at the beginning of the Kelvin knot, just like the Simple knot, creating an inverted tail. This knot creates a neat, slender knot that is about the same size as the Four-in-Hand but just a little bit fuller and angular.

STEP 1 Position the tie so that the wide end is on the right and the little end is on the left, with the back of the tie facing away from you at first. The little end’s tip should sit just above your bellybutton (this will vary depending on your height and the length & thickness of your tie). Keep the active (wide) end stationary.

How to Tie the Windsor Knot
The Duke of Windsor preferred a wide triangular knot but never employed the Windsor knot explicitly. In reality, the Duke tied a Four-in-Hand with specially designed wide and extremely thick ties to create his avant-garde appearance. To replicate the Duke’s knot style, the public created the Windsor knot. The Windsor has various derived forms, all of which go by the same name. With a wide collar, the Windsor creates a triangular knot that is firm and symmetrical. The “Double Windsor” knot is another incorrect name for this knot.
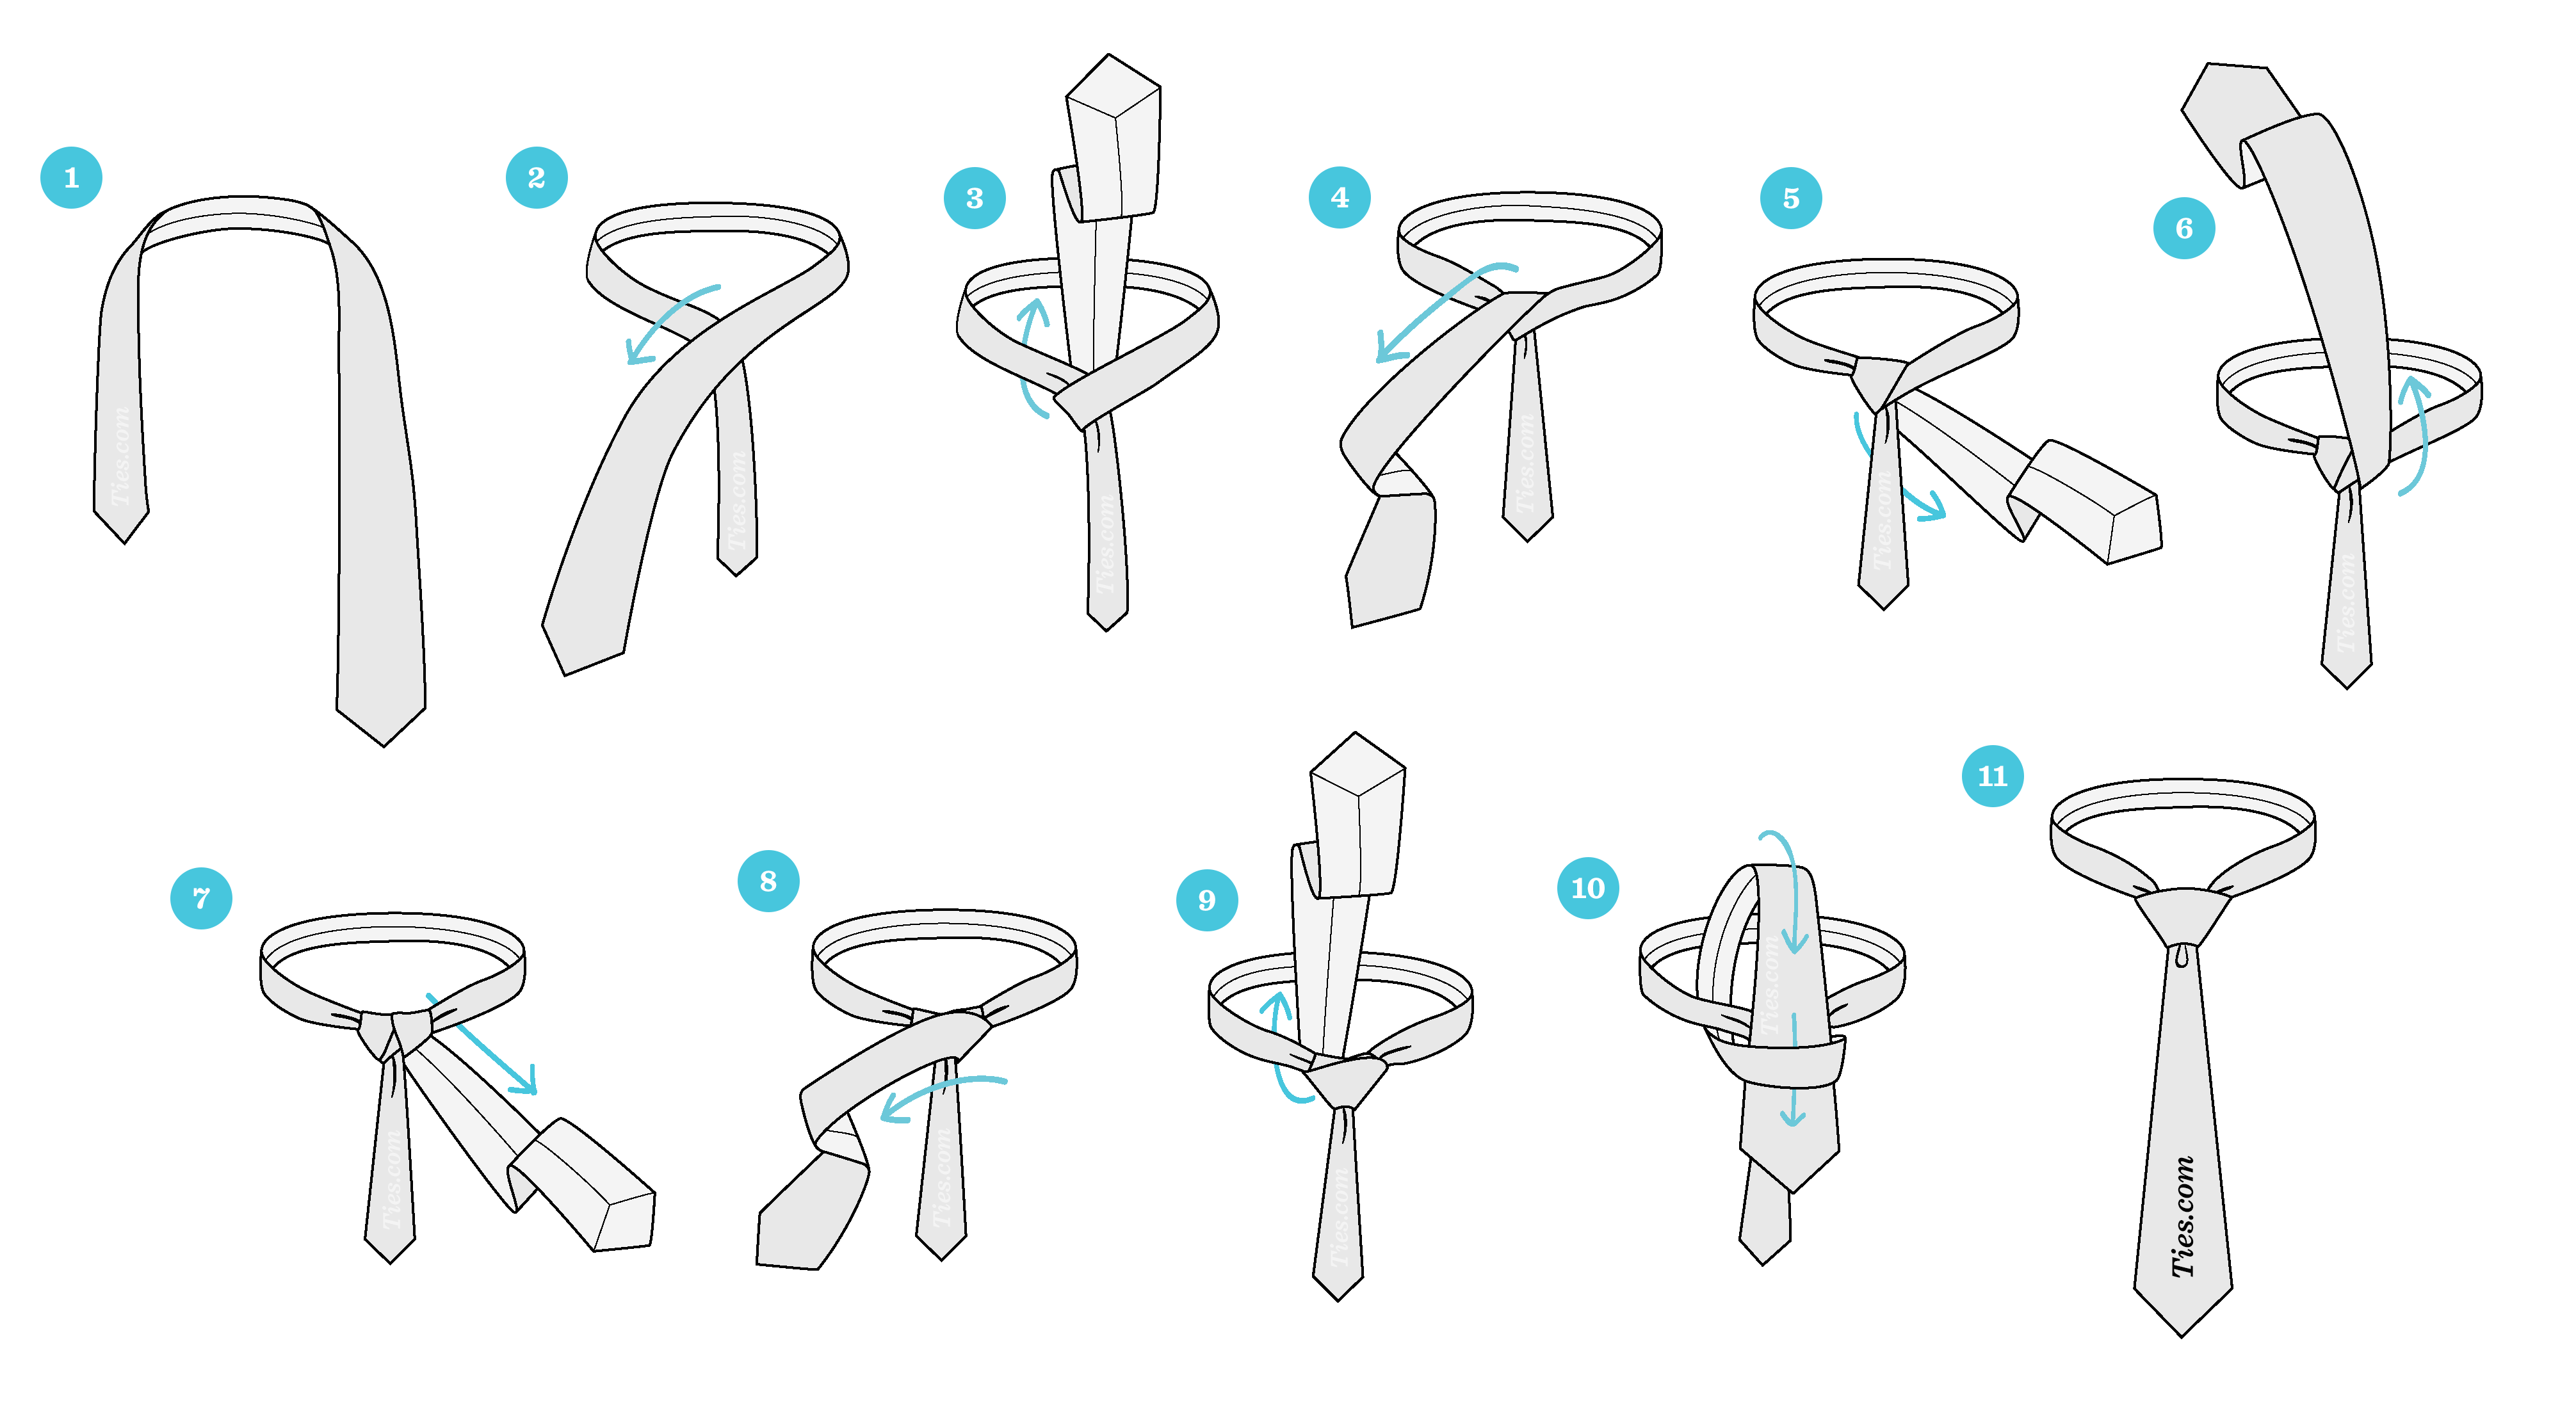
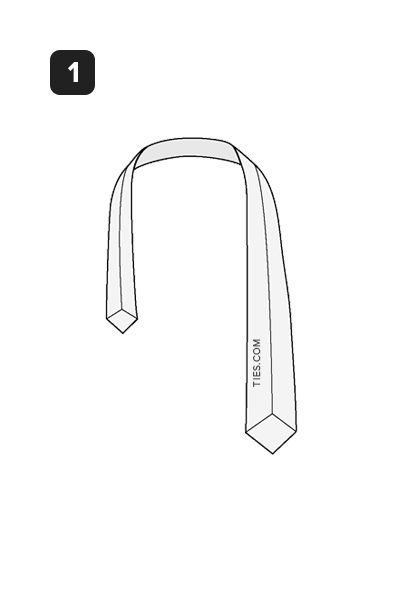
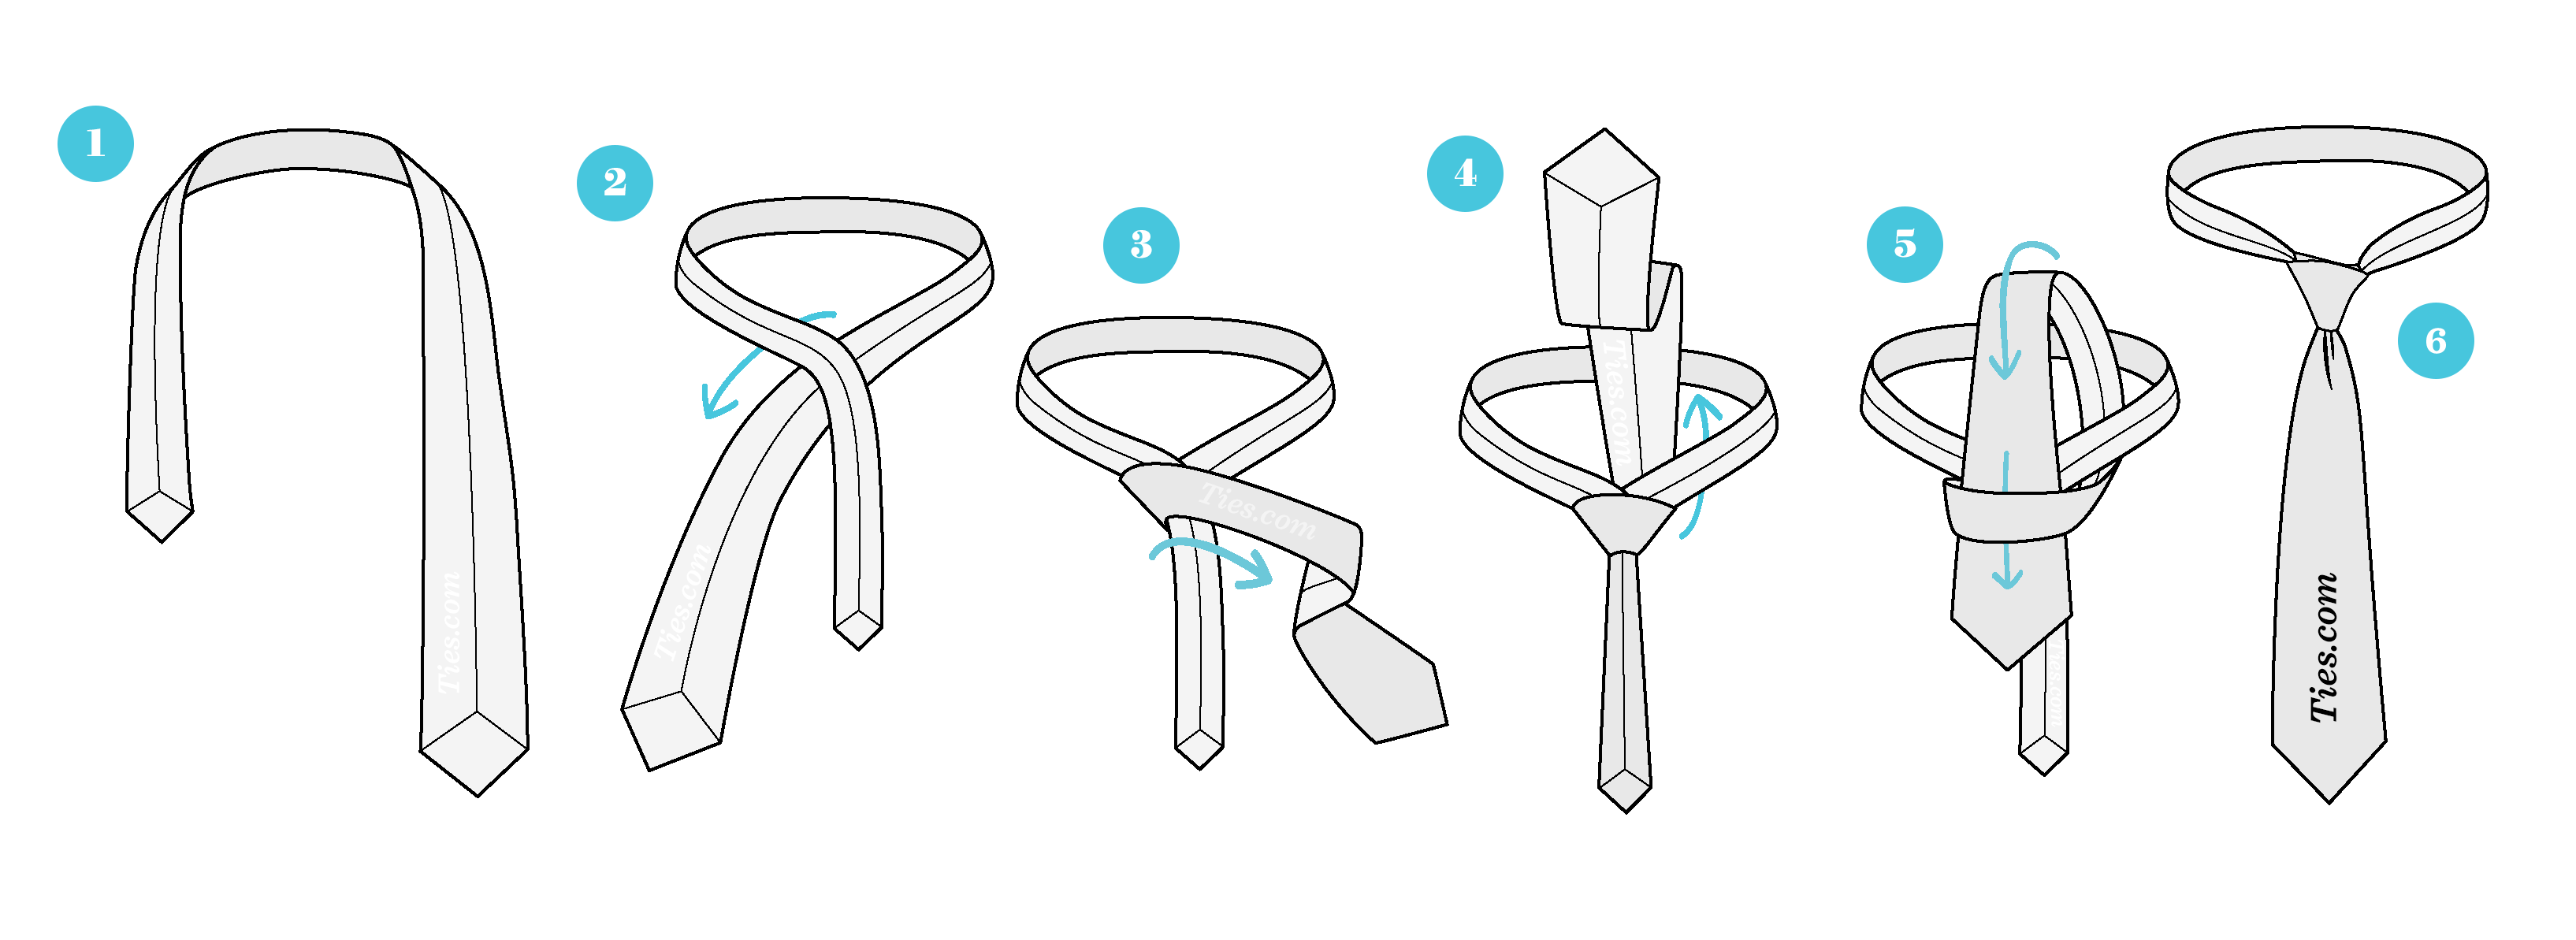
STEP 1 Begin by placing the tie’s wide end on the right and its little end on the left. The little end’s tip should sit just above your bellybutton (this will vary depending on your height and the length & thickness of your tie). Just shift the wide (active) end.

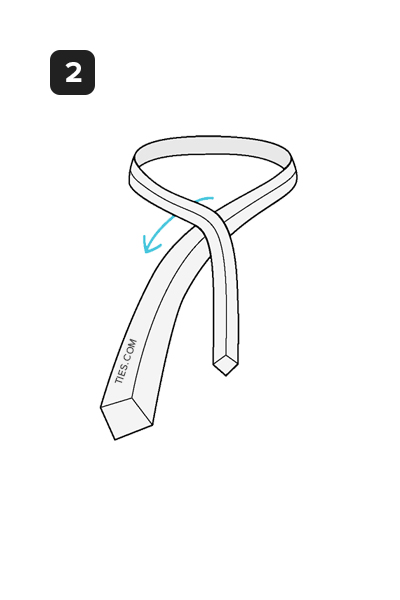
STEP 2: Cross the large end to the left and the little end.
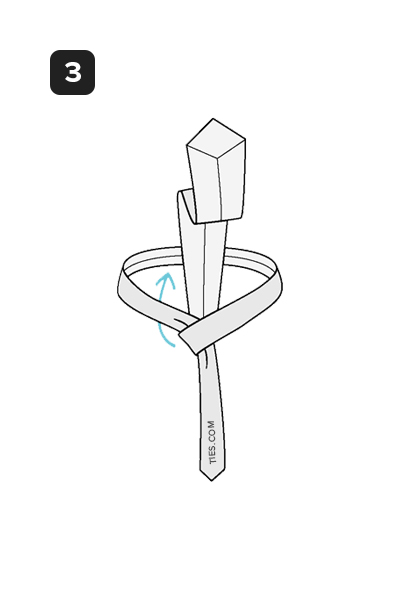
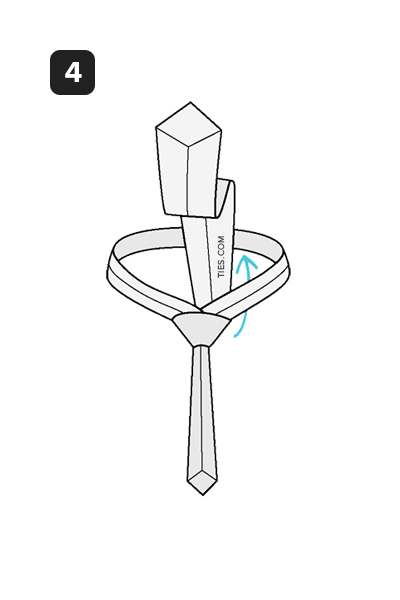
STEP 3 From below, work up into the neck loop.
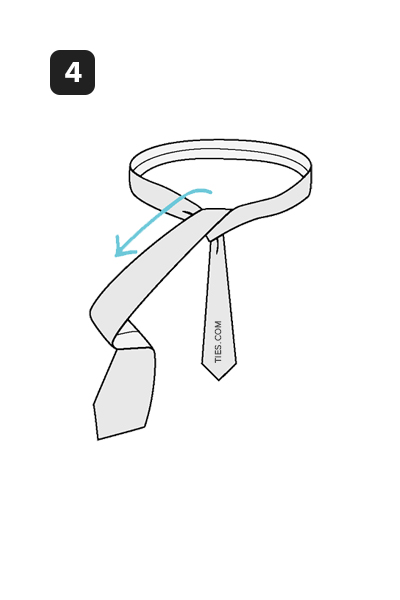
 STEP4 Descend to the left.
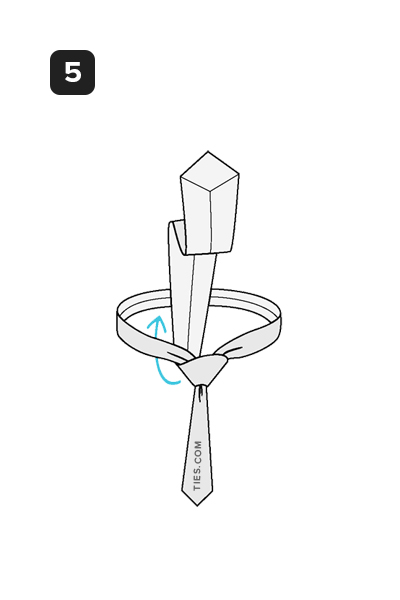
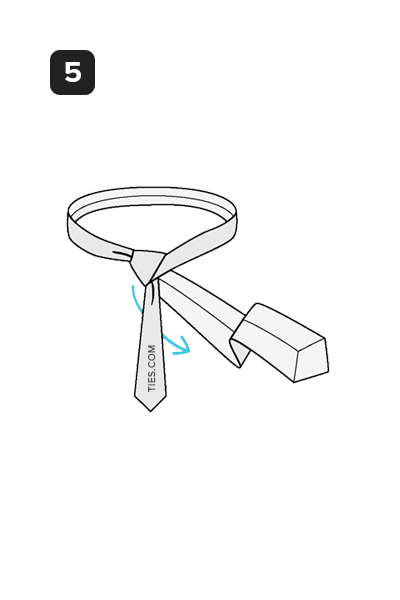
STEP 5 Turn around and move to the right around the little end.
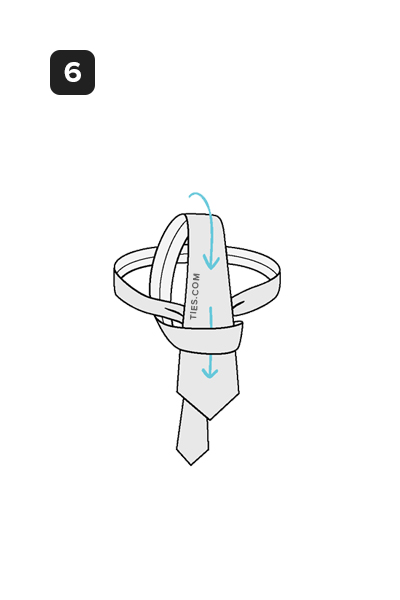
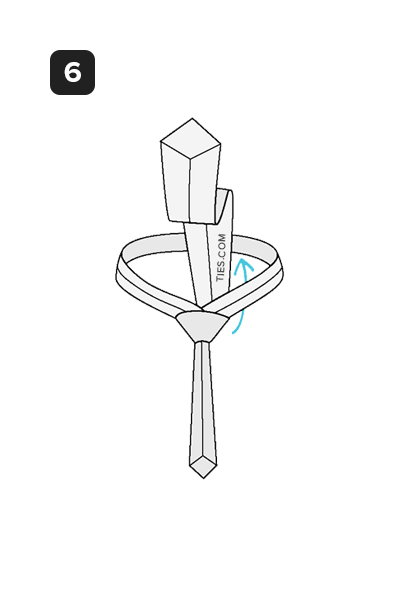
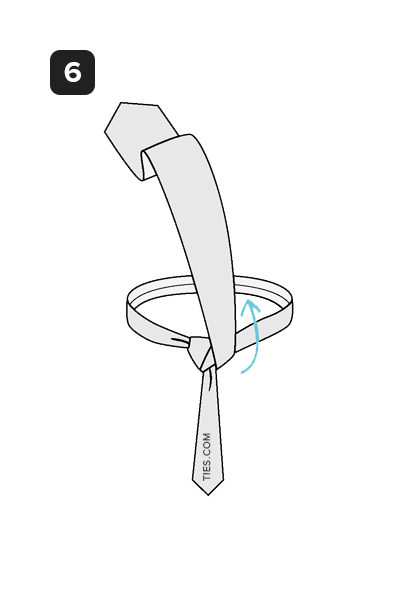
 STEP 6 Move up and toward the neck loop.
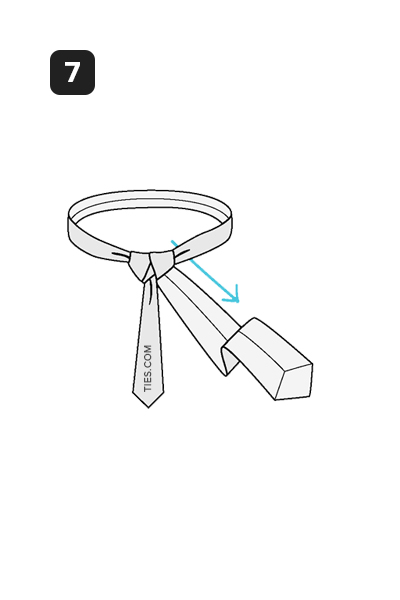
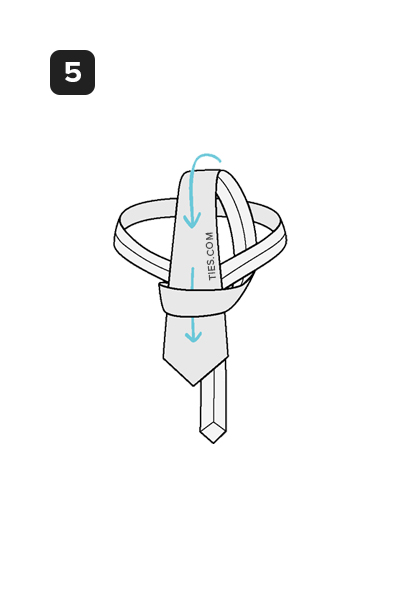
Step 7: Down to the right and through the neck loop.
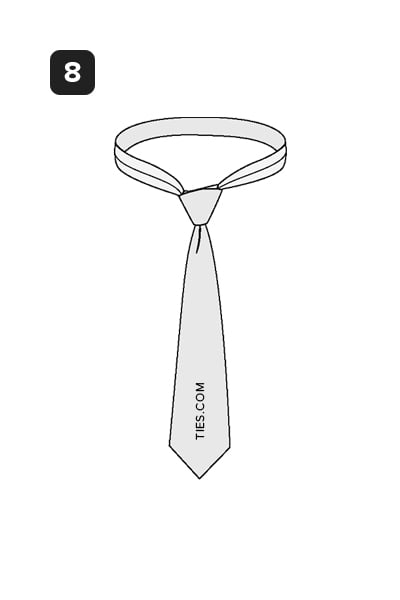
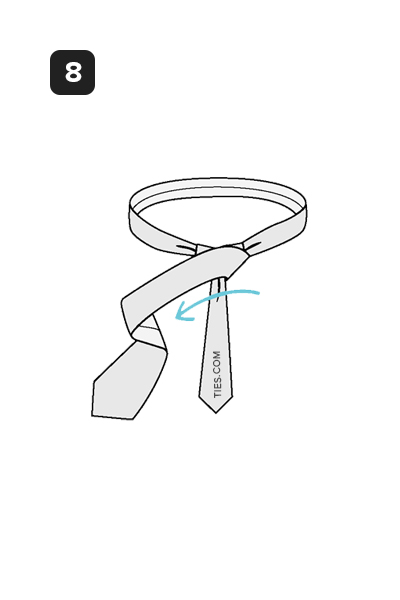
STEP 8 Move to the left across the front.
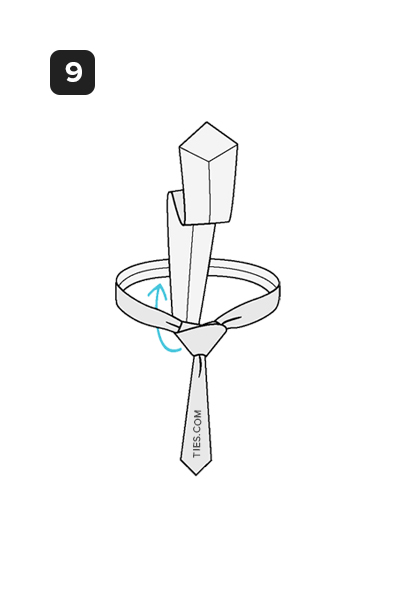
STEP 9 From below, climb up into the neck loop.
STEP 10 Pass your hand downward through the loop you just made in the front.
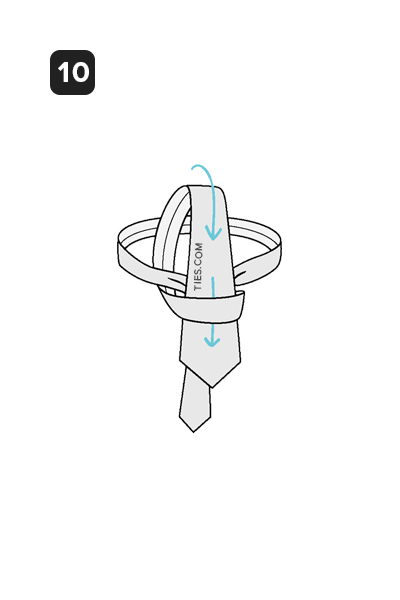
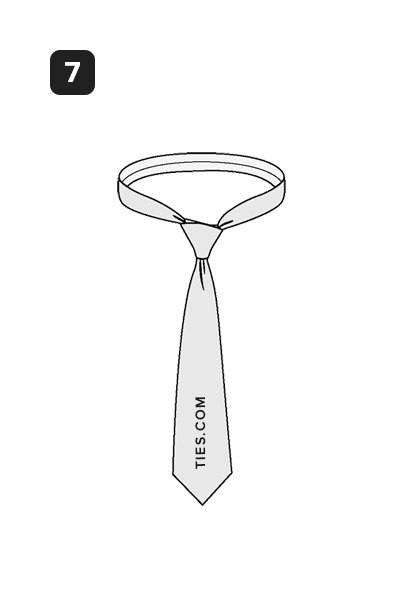
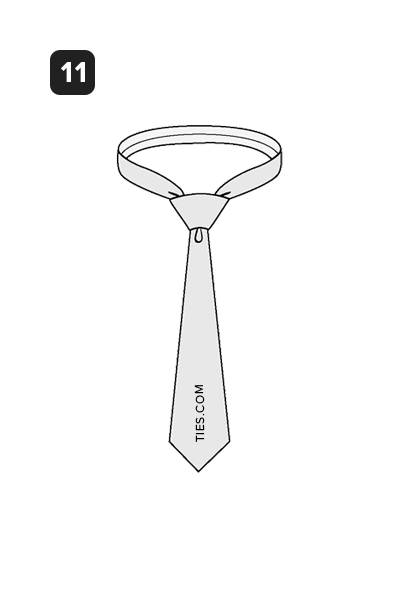
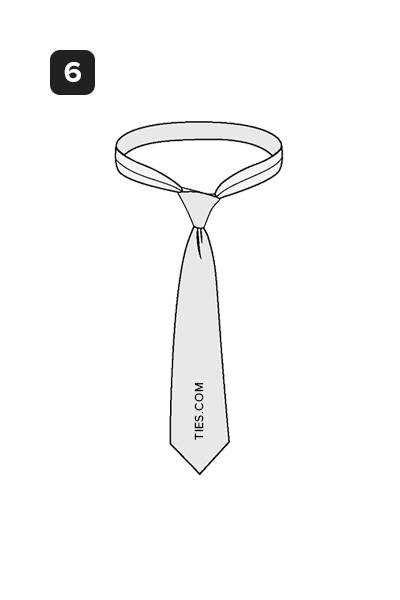
STEP 11 Pull down on the wide end to tighten the knot. Adjust the knot by sliding it up.
How to Tie the Half Windsor Knot
The Half Windsor knot is incredibly adaptable. The Half Windsor knot is really closer to three-quarters the size of the Windsor knot, despite what its name might imply. The Half Windsor is a medium-sized, virtually symmetrical knot that, when made properly, creates a considerable and deep dimple. best suited for medium- to light-weight neckties.

- STEP 1 Begin by placing the tie’s wide end on the right and its little end on the left. The little end’s tip should sit just above your bellybutton (this will vary depending on your height and the length & thickness of your tie). Just shift the wide (active) end.
- STEP 2: Cross the large end to the left and the little end.
- STEP 3 Move to the right and underneath the small end.
- STEP 4 Move up and toward the neck loop.
- STEP 5: Move left and through the neck loop.
- STEP 6 To the right and across the front.
- STEP 7 From below, up into the neck loop.
- STEP 8
Down through the loop you’ve just created in the front. - STEP 9
Tighten the knot by pulling down on the wide end. Slide the knot up & adjust.
How to Tie the Simple Knot (Oriental Knot)
The Simple Knot, also called the Oriental, Kent, and Petit Noeud, has the fewest stages and is relatively simple to learn. Despite being straightforward, this knot is still widely used in China but is rarely seen in the West. This might be the case since untying it is more challenging because it does not self-release. The Simple knot is small and tends to tilt toward the active end due to an asymmetry. When wearing a thick necktie or for tall men who require a little more length, this knot works great. Keep your life simple.
STEP 1 Position the tie so that the wide end is on the right and the little end is on the left, with the back of the tie facing away from you at first. The little end’s tip should sit just above your bellybutton (this will vary depending on your height and the length & thickness of your tie). Keep the active (wide) end stationary.


How to Tie the Eldredge Knot
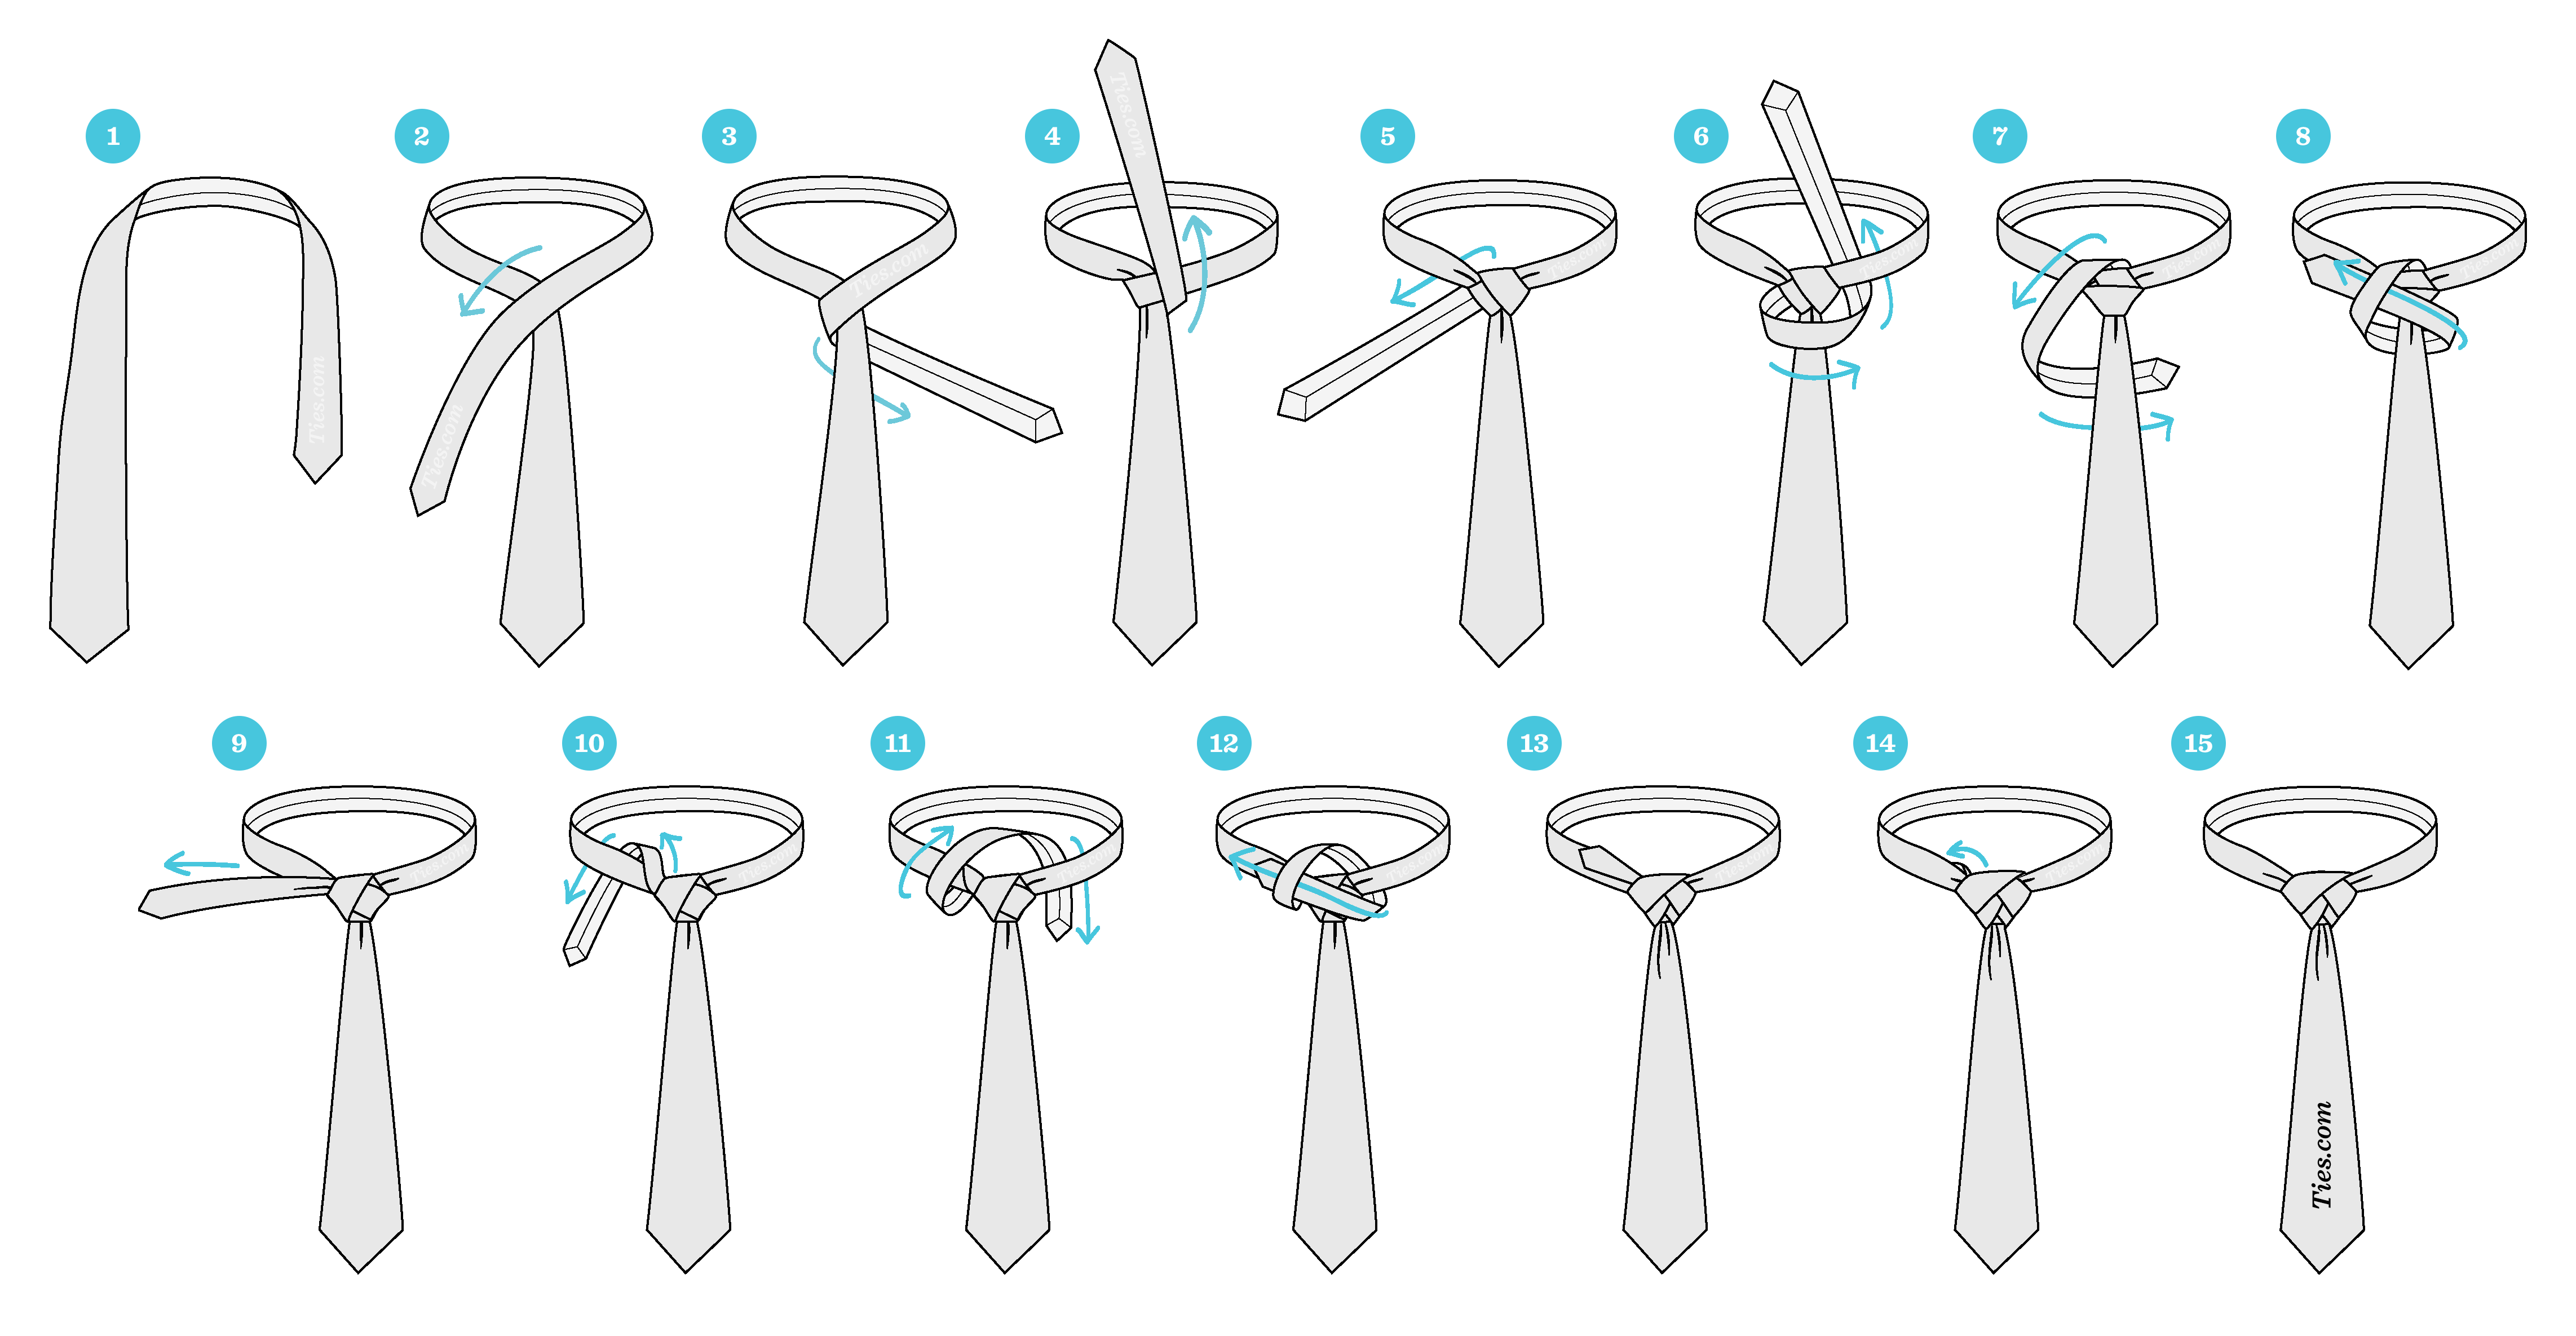
- STEP 1 Begin by placing the tie’s wide end on the left and its little end on the right. The wide end’s tip ought to rest atop your belt buckle. Just shift the little, active end.
- STEP 2: Cross the little end to the left over the wide end.
- STEP 3 Move to the right and beneath the wide end.
- STEP 4 Move up and approach the neck loop.
- STEP 5 Move left and through the neck loop.
- STEP 6 To the right and across the front. then from below, up into the neck loop.
- STEP 7 Descend to the left and turn around to the right at the wide end. Be loose with this part.
- STEP 8 Pass it through the loop created in STEP 7 and across the front, toward the left.
- STEP 9 To tighten, pull the little end in the direction of the left.
- STEP 10 Move up and approach the neck loop. To the left and through the neck loop.
- STEP 11 Move up and approach the neck loop. Right and down through the neck loop. Be loose with this part.
- STEP 12 Cross across the front in a leftward direction, passing through the loop created in STEP 11.
- STEP 13 Tighten by yanking the little end to the left.
- STEP 14: On the left side, tuck the remaining tiny end behind the neck loop.
- STEP 15 Pride yourself.
How To Tie A Tie On Someone Else
It’s more difficult than it looks to knot a tie on someone else.
For starters, the procedure is reversed from how you’re used to it if you’re facing the man you’re aiding. This means that instead of being on your right side, the tie’s wide end will be on your left.
Additionally, you need to angle your body just right so that you can reach around them while still being able to see what you’re doing and account for the height difference between you and the person you’re putting the tie on.
Additionally, it’s crucial to consider their ability to breathe because you need to be careful not to pull too tightly and risk choking them.
It’s a little bit of a juggling act, gentlemen. Therefore, the next time you have to knot a tie for someone, be sure to give yourself plenty of time because it’s not as simple as it seems!
Here are a few simple actions to take in order to keep things simple:
- Tie the necktie such that the wide end hangs down on the wearer’s right side (NOT YOURS!) and the narrow end rests on the wearer’s left.
- The wide end should be crossed over the thin end, then tucked under.
- Through the space beneath their chin, pass the wide end of the rope and draw it tight.
- As a last step, insert the broad end into the loop you just made, and tug to tighten everything up.
- And voilà! You’re done; your friend looks terrific, and you assisted him in getting there. Being a good guy is all about doing that.
How To Teach Someone To Tie Their Own Tie

The truth is that it might be exhausting to be the person who always ties ties. Helping others may cause your own tie to look less stylish because you have your own to tie.
But it’s not like you’ll disappoint your friends. So what is the answer?
Simple: don’t just knot their ties for them; educate them to do it themselves!
I instructed you to stand in front of the person tying your tie in the two tutorials up top. That is sound advice if you want to finish the task swiftly. It’s actually preferable to stand behind them as they tie their ties if you’re trying to teach them how to do it themselves.
Get your friend to face the mirror as you both stand behind him, your arms on either side of his. In order for him to believe that your hands are his, you must tie his tie from behind. Each time you cinch his tie, go as slowly as you can, and describe what you’re doing.
Untie the knot after it is finished and repeat the process. Repeat the aforementioned instructions and explain them as you go to make sure he is paying attention and understanding each step of the procedure. Tie his tie, go through the motions, then take it off one last time.
Now it’s his turn; instruct him to mimic your actions and tie his tie as neatly as possible. Keep a watchful eye on him, and if you see him doing something incorrectly, let him know. He will be able to knot his own tie this manner, but it will be strictly supervised by your professional knowledge.
Continue until your friend can tie his tie without your direct observation.
Well done, teacher.
How To Tie A Necktie in 3 Steps
First, make a knot.
Making ensuring that the string’s ends are even is the first step in tying a tie. You must trim them if they are unequal. Next, enclose the string in a double-fold and secure it with your thumb. After that, join the two ends and wrap them around one another until they meet in the middle. Now your end ought to be looped.
Step 2: Thread the loop with the loose end.
The loose end should now be inserted through the loops and tightened. You can begin looping the thread around the necktie after slipping the loose end through the knots. The loose end should first be tucked underneath the top strand and pulled through the loop. Till you reach the tie’s bottom, keep doing this. The remainder of the free end can now be wrapped around the necktie. Simply pass the loose end through the final loop to tighten it.
Step 3: Complete the knot
After you’ve done around the tie with the string, tie a few tiny knots to complete the look. Make sure there are no spaces between the knots.
Different Types of Tie knots and How To Tie Them
Tie a Windsor Knot
A Windsor knot is a simple way to tie a bow. Start by taking the loose end of the rope and bringing it under the opposite side of the rope. Take the loose end of the opposite side and cross it over the first loose end. Pull both loose ends of the rope taut. Continue crossing the loose ends of the rope over each other until you reach the desired size.
Tie a Square Knot
Square-knot the rope.
This knot resembles the Windsor knot, but uses four loose ends as opposed to the Windsor knot’s two. Start by taking the rope’s end and crossing it over the rope’s other side. The third loose end should be crossed over the second loose end after the second loose end has been crossed over. Once you get the desired amount of knots, keep doing this.
Tie a Half Hitch Knot
The loose end should first be taken and crossed over the top of the rope. Next, cross the rope’s bottom over the top of the first loose end you found. Repeat this procedure until the knot size you want is reached.
Tie a Clove Hitch Knot
Beginners should utilize clove hitch knots since they are simple to tie. If you don’t have much experience with knots, they can be helpful as well. Take the two loose ends and cross them over one another to begin. The next step is to cross the other two loose ends on top of the first two. When you achieve the knot size you want, keep doing this.
Tie a Double Fisherman’s Knot
In fishing, double fisherman’s knots are frequently employed. They are helpful for lacing shoes and tying shoelaces. Take the rope’s ends and cross them over one another to begin. Next, cross the rope’s ends over the previously crossed ends once more. Once you have the desired knot size, repeat this step.
How to tie a tie for wedding
Finally, you have chosen the ideal tie for your wedding! You have everything you need and it is just what you wanted. Up to the crucial point—what is the ideal tie knot for a wedding? So you go online or ask Alexa, and you discover that there are actually a lot of tie knots you can tie, and that picking the proper one is crucial for a wedding! The style of knot you wear can determine whether you come off as exquisitely sophisticated or as a schoolboy, regardless of whether you are the groom, best man, or a guest.
So allow us to assist you in finding the ideal knot for your nuptials.
The perfect tie knot for a wedding is one that stands out, is attractive, and is appropriate for formal settings. The Windsor Knot is the most prevalent, fashionable, and formal knot worn for such an event. It’s the tie knot to don for all of your formal, larger-scale events, like a wedding.
The Windsor Knot is a triangular, symmetrical knot that has its origins in the 20th century with the Duke of Windsor. It looks great with open-collar shirts and shirts with broader collars. The groom frequently wears it because he likes to stand out a little bit more because it takes a little bit more cloth to produce a thicker triangle shape that attracts a fantastic amount of attention to the lovely tie you have chosen! Here is a great image of the guys wearing a Windsor Knot from one of our weddings. As you can see, it is a little bit larger than the typical knot and emphasizes their ties a little bit more.

The instructions shown below show how to tie a Windsor Knot.
1. Near your collar, cross the broad end across the narrow end.
3. Bring the wide end underneath the knot after passing the wide end through the neck loop of the tie.
4. To create a symmetrical knot, feed the broad end through the neck loop.
5. Cross the wide end of the know over the front.
6. Thread the tie through the neck loop’s bottom.
7. Lower the tie by pulling it through the loop in front of the knot.
8. Once it’s cozy, hold the knot’s thin end and draw it up toward your collar.
Although less thick and simpler to tie, the Half Windsor knot is essentially identical to the Windsor knot and can still be worn with open-collar shirts. It is most frequently utilized for ties with a slick or delicate fabric type. The Half-Windsor knot is one of the nicest knots to wear to a wedding despite being a little more laid back.
Follow these instructions to tie a half-windsor knot:) 1. Cross the wide end over the narrow end close to your collar
2. Insert the broad end through the neck loop.
3. Embrace the wide end behind the knot.
4. Wrap the tie’s front end around the knot.
5. Thread the broad end through the neck hold’s bottom loop.
6. To tighten the knot, pass the end through the loop in front of it.

There are a few more inventive and gorgeous knots you can try, even though the Windsor or Half-Windsor knot is the best to wear to a wedding and is the most common! The Eldredge knot is a similarly lovely but slightly more challenging knot. Although there are a few more stages, it is incredibly elegant and eye-catching. As you can see below, the knot forms a long, triangular braided shape.
The four-in-hand knot is acceptable to wear for weddings and pretty much any occasion and requires relatively little work to tie if all of this sounds like too much and you’re not really interested in being creative and simply want a plain traditional appearance. For instructions on how to tie a four-in-hand knot, see below

1. Transverse the wide and narrow ends
2. Interchange the wide and narrow ends.
3. Thread the broad end through the loop at the back of your neck.
4. Bring the broad end of the knot down through the front loop while holding the front loosely with your index finger.
5. After removing your finger, tighten the knot by squeezing the knot up until it is snug.
The Windsor or Half-Windsor knot is the most popular way to “tie” it up for a wedding, but there are many other ways; as long as it is appropriate for the setting, you can be as creative or simple as you like:)
I hope this was helpful and able to answer your query! Please contact us in x2coupons.com if you have any further inquiries.

How to negotiate salary. It’s not unexpected that many people find it difficult to request higher pay once their job hunt is over and they are in possession of an offer. They don’t want to risk the opportunity now that they’ve made it this far, especially if the pay is fair. However, as the 2023 […]
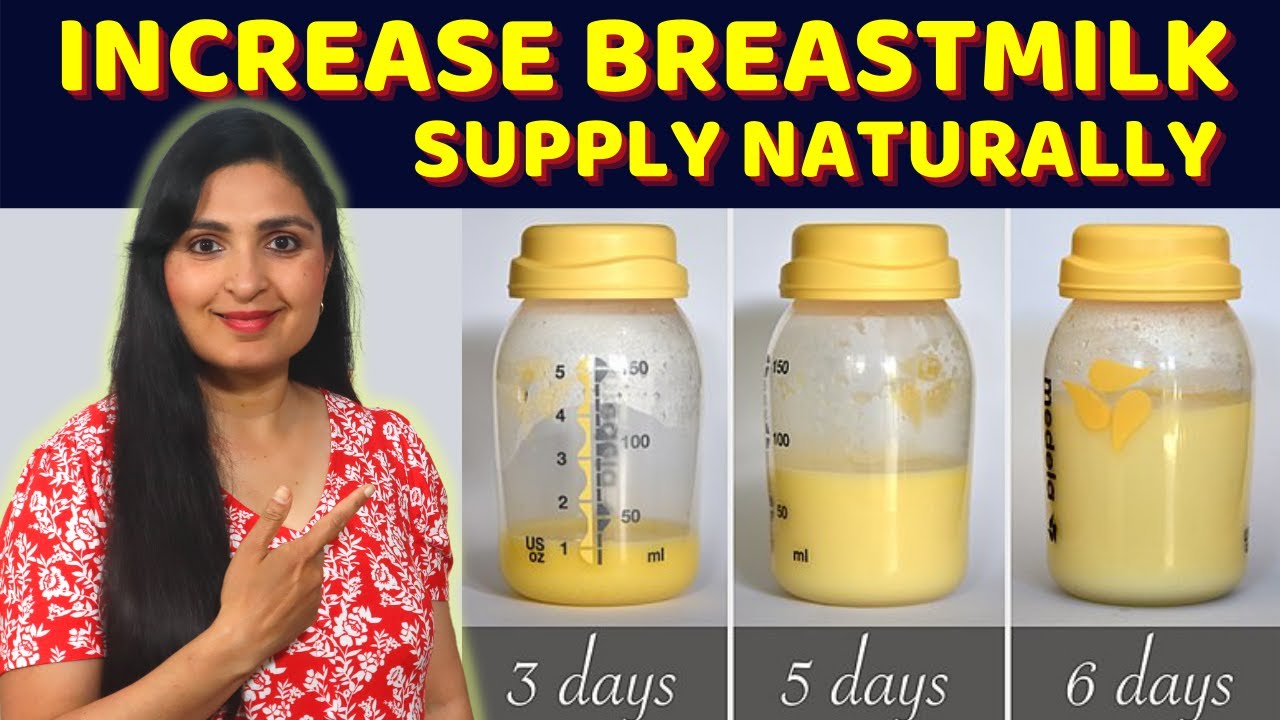
How to increase milk supply. Most of the time, even if you are unaware of it, your body produces just what your baby needs, despite the concerns of many mothers who worry about poor milk production. There are several techniques to determine whether your infant is receiving enough milk. There are methods you can use […]

How to buy bonds. It’s not as difficult as it might seem to purchase bonds. But before you buy, you must understand the various varieties and know what to look for in a bond. One option to invest is through bonds, which involve lending money to a government or firm rather than purchasing stock (like […]

How to answer tell me about yourself. The interview question “Tell me about yourself” may seem frightening, but it doesn’t have to be. Here are our top suggestions for a terrific response. When asked in an interview, “Tell me about yourself,” it can be challenging to respond if you are unprepared. Finding a job can […]

How to uninstall apps on mac An app can be deleted or uninstalled from your Mac in order to free up storage space for other things. Launchpad or the Finder are two options for doing this. Use Launchpad to delete apps that were downloaded from the App Store Launchpad offers a convenient way to delete […]
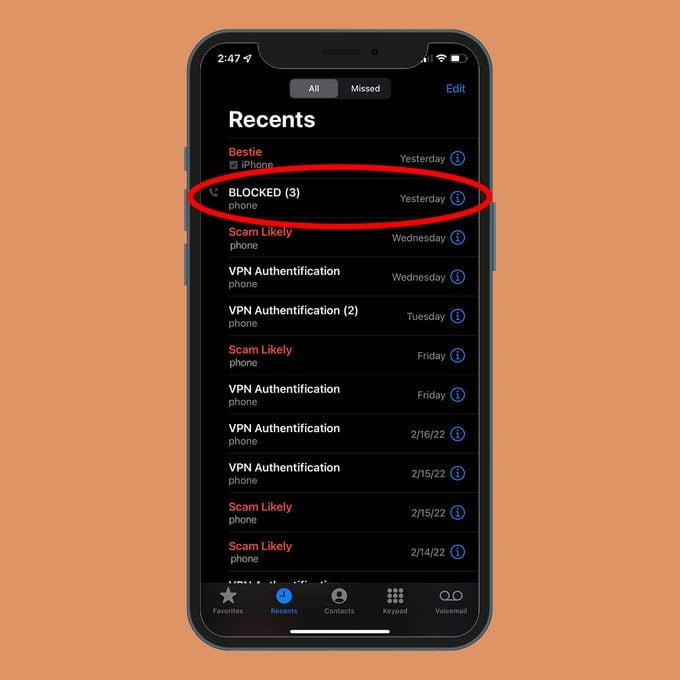
How to Unblock a Number on an Android Phone Here’s how to restore calls and texts from a blocked number on an Android device: Get the Phone app open. The More icon, which resembles three vertical dots, should be tapped. Select Blocked Numbers under Settings. The contact you want to unblock has an X next […]